1 - ROS2 - Démarrage
- Installation PC ROS2
- Tutoriels de base
- Découverte d'Ubuntu Linux et son Terminal Bash
- Usage avancé du bash Linux
- Déploiement de ROS2
- Déploiement de TP de simulation avec Dev Container
Installation PC ROS2
ROS est un Middleware Open Source pour développer des applications robotiques. Originellement développé sous Linux (Ubuntu), il est maintenant disponible sur plusieurs systèmes d'exploitation dont Debian et Windows.
Installation des prérequis et liens importants
Pour des raisons de stabilité et légèreté du système, il y a tout à penser que les déploiements de ROS dans des milieux industriels se font (robotique autonome et mobile) et se feront à l'avenir sur Ubuntu et de plus en plus Debian. L'industrie des serveurs a déjà largement adopté Debian pour sa stabilité et sa modularité. C'est pourquoi plutôt que d'apprendre la ligne de commande Windows, nous recommandons d'apprendre la ligne de commande Bash, utilisée dans Ubuntu/Debian. Pour cela, il faut installer un système (noyau) Linux, plusieurs options s'offrent à nous:
- Machine virtuelle
- Windows subsystem for Linux (WSL2)
- Machine virtuelle Linux, par exemple via VirtualBox
- Machine physique
- dual-boot Windows-Ubuntu -> Installation en quelques clics via une clé USB Live
- PC sous Ubuntu 22.04
- Pour une tour : Branchement d'un SSD SATA dédié au lieu du SSD Windows
- Branchement d'un SSD USB3 type Transcend ESD310C
Notes importantes pour les installations virtuelles (deux premières options d'installation) :
- Ces installations sont suffisantes pour effectuer des simulations et du développement tant qu'il n'y a pas de Hardware à tester. VirtualBox fonctionne à peu près pour des TPs avec une VM URSim mais c'est loin d'être optimal (plantages,...)
- L'accélération graphique n'est pas supportée par la carte graphique (GPU) mais par le processeur (CPU) (voir ce bug)
- un PC avec 32Go de RAM est recommandé si des composants imposants de ROS doivent être compilés, par exemple pour utiliser la version de développement MoveIt 2 Rolling. En effet Windows consomme à lui seul près de 4-8Go, Ubuntu >2Go et la compilation >4Go, on peut vite atteindre la saturation. 16Go peuvent suffire mais il faudra compiler sans parallélisation, et fermer des applications lourdes dans Windows comme Firefox.
Ubuntu via Windows SubSystem for Linux (WSL2)
WSL2 installe une machine virtuelle avec le noyau Linux complet, supporté et managé par Microsoft Windows. Il n'y a pas besoin de droits administrateur car le logiciel est disponible dans le store Windows.
Prérequis :
Installation de Ubuntu 22 :
- Ouvrir Windows Store
- Rechercher et installer
Ubuntu(c'est la version LTS actuelle qui sera installée, en ce moment 22.04.X) - Depuis le menu démarrer Windows, Lancer l'application
Ubuntu. Un Terminal s'ouvre (ligne de commande Linux Bash) - Définir l'utilisateur principal, par exemple
ros2et un mot de passe (8 caractères mini, majuscule, minuscule, chiffre, caractère spécial). - Mettre à jour Ubuntu
sudo apt update
sudo apt upgrade
Depuis Windows, pour éteindre les Machines Virtuelles Ubuntu et ainsi libérer la mémoire RAM affectée :
- Lancer l'application
Windows PowerShell wsl --shutdownAutres commandes WSL depuisWindows PowerShell:wsl --status: devrait retournerDistribution par défaut : Ubuntu,Version par défaut : 2(WSL2)wsl --list(ouwsl -l -v) : liste les Machines Virtuelles Linux installées via WSL (et la version WSL utilisée)
Docker dans une VM WSL2
Pour utiliser docker dans une VM WSL2, par exemple Ubuntu :
-
Désinstaller toute version précédente de docker installée sur votre VM Ubuntu. Dans Terminal(Ubuntu) :
sudo apt remove docker*
-
Ajouter votre utilisateur au groupe docker
sudo groupadd dockersudo usermod -aG docker $USER
-
Passer sur une session
administrateur_windows -
Installer Docker Desktop for Windows https://docs.docker.com/desktop/windows/wsl/#turn-on-docker-desktop-wsl-2c
- Cocher WSL2 (devrait être coché par défaut si votre config WSL2 est OK)
-
Ajouter votre utilisateur_windows au groupe docker
-
Dans CMD/Powershell :
net localgroup docker-users "utilisateur_windows" /ADD
-
-
Repasser sur votre session
utilisateur_windows -
L'intégration Docker-WSL est activée sur la distribution WSL par défaut, normalement Ubuntu (22)
- pour s'en assurer,
wsl --set-default ubuntu - Au besoin il est possible de l'activer sur une distro spécifique dans Settings > Resources > WSL Integration
- pour s'en assurer,
-
Démarrer Terminal(Ubuntu)
Accélération GPU pour applications graphiques et machine learning
https://docs.docker.com/desktop/features/gpu/
Pour tester si le GPU est bien disponible, lancer la commande suivante dans le Terminal(Ubuntu) :
docker run --rm -it --gpus=all nvcr.io/nvidia/k8s/cuda-sample:nbody nbody -gpu -benchmarkLe résultat suivant indique que la carte graphique dédiée Nvidia Quadro P620 est bien exploitée pour les calculs :
> Windowed mode
> Simulation data stored in video memory
> Single precision floating point simulation
> 1 Devices used for simulation
GPU Device 0: "Pascal" with compute capability 6.1

> Compute 6.1 CUDA device: [Quadro P620]
4096 bodies, total time for 10 iterations: 4.417 ms
= 37.987 billion interactions per second
= 759.750 single-precision GFLOP/s at 20 flops per interaction
Sinon, regarder https://innovation.iha.unistra.fr/books/robotique-open-source/page/installation-de-machine-avec-rt-kernel-et-acceleration-graphique#bkmrk-gpu
Ubuntu via VirtualBox
Télécharger et installer VirtualBox pour Windows et l'Extension Pack : https://www.oracle.com/virtualization/technologies/vm/downloads/virtualbox-downloads.html
Ubuntu 24 requiert une version de VirtualBox >7.1 https://www.virtualbox.org/ticket/21955
La version 7.1.8 règle des soucis de la version 7.1.6 avec l'USB https://forums.virtualbox.org/viewtopic.php?t=113298
Déployer la VM avec ROS2 préinstallé (grâce aux instructions suivantes dans cette page)
- Télécharger la VM depuis seafile
- Ubuntu 22 ROS Humble Lien public de téléchargement (\Seafile\IHA-IDF\Smart_Prod\Formation_ROS2\UbuntuROS.ova)
- Ubuntu 24 ROS Jazzy : https://seafile.unistra.fr/f/4892e35890b941e388ef/?dl=1
- Lancer VirtualBox
- Importer la VM : Outils -> Importer -> Rechercher le fichier UbuntuROS.ova
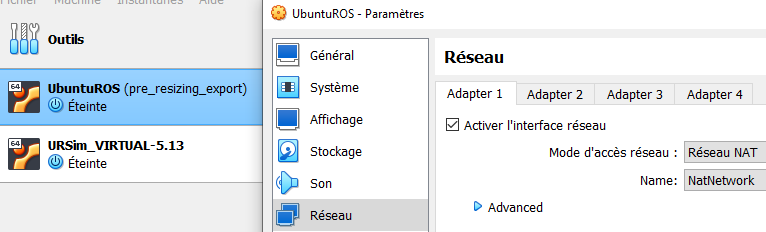
- Vérifier et adapter la configuration de la VM en ressources RAM, CPU, GPU et Réseau selon la configuration de votre PC
cf. https://innovation.iha.unistra.fr/books/robotique-open-source/page/installation-pc-ros2#bkmrk-configuration-virtua - Démarrer la VM
- Ignorer l'erreur sur le dossier partagé Linux-Windows
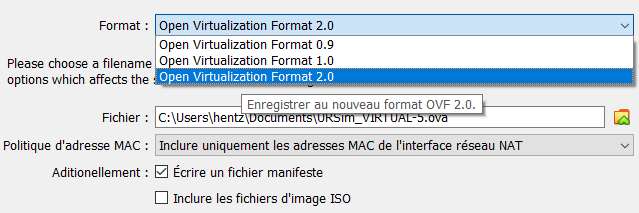
Exportation de VM au format OVF
Le système du TP est maintenu à jour et testé sur un PC Windows. Pour l'exporter sur les PC de salle TP, on veut avoir une image la plus petite possible.
- On commence par nettoyer Ubuntu puis on exporte un fichier
.ova

- Sélectionner le format
OVF 2.0pour une meilleure compressions
Setup pour TP MoveIt2+URSim à l'IUT de Haguenau
La première année j'ai expérimenté avec des PC Windows et VirtualBox :
- Une VM contient Ubuntu 22, ROS et MoveIt
- Une seconde contient Xubuntu 14/16 avec URSim
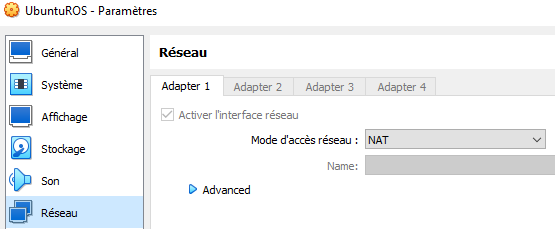
- Les deux VMs en Réseau NAT
Il faut des machines de guerre, régler finement la quantité de RAM et de coeurs alloués aux VM et à Windows, et malgré cela les VM plantent.
En 2025 je change donc de fusil d'épaule et utilise la salle réseau de l'IUT
- Avec des vieilles tours de 2013 : i5, 8G de RAM, petite carte graphique, double écran, 60G de SSD
- Réseau isolé donc possibilité de mettre OS au choix sur les PC, d'isoler ou non les PC et d'éventuels robots à piloter
Migration VM vers disque physique
Entre 2024 et 2025 je suis passé de TPs en VM VirtualBox vers des PC physiques. Dans les deux cas, je maintiens l'environnement de TP sur VirtualBox de mon PC Windows. Ceci présente l'avantage de pouvoir maintenir des états de machines en fonction du type de TP.
On peut déployer un disque virtuel de VM vers un disque physique :
- Nettoyer l'OS et éventuellement désactiver le SWAP pour encore gagner de l'espace
cf. https://innovation.iha.unistra.fr/books/robotique-open-source/page/installation-pc-ros2#bkmrk-all%C3%A9ger-ubuntu-%28pour - Réduire la taille de la partition via l'application Disks. Celle-ci pourra être agrandie après copie de la VM. Garder quelques Go de marge.
- Démarrer la VM sur une
.isoLive Ubuntu
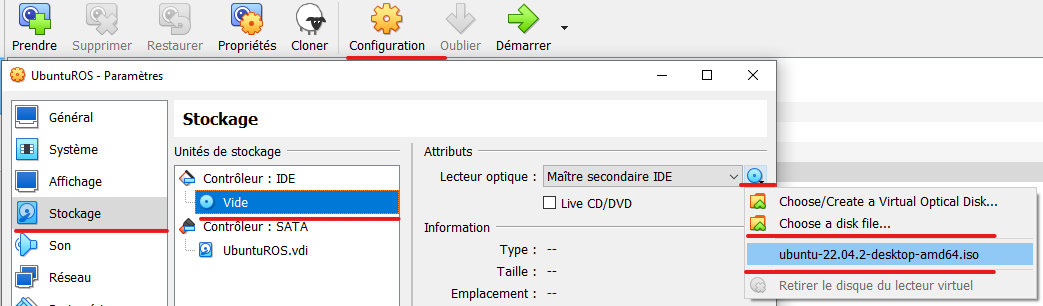
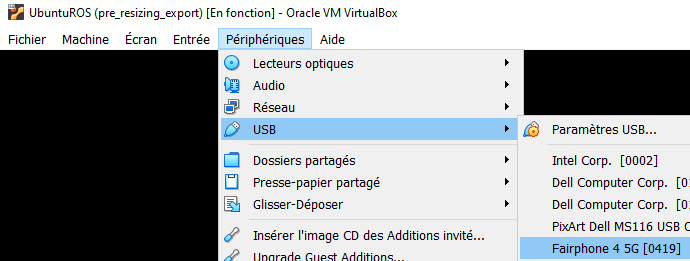
- Brancher un SSD en USB3 au PC (utiliser un adaptateur SATA-USB3 si nécessaire)
- Passer le périphérique USB à la VM
- Avant le démarrage
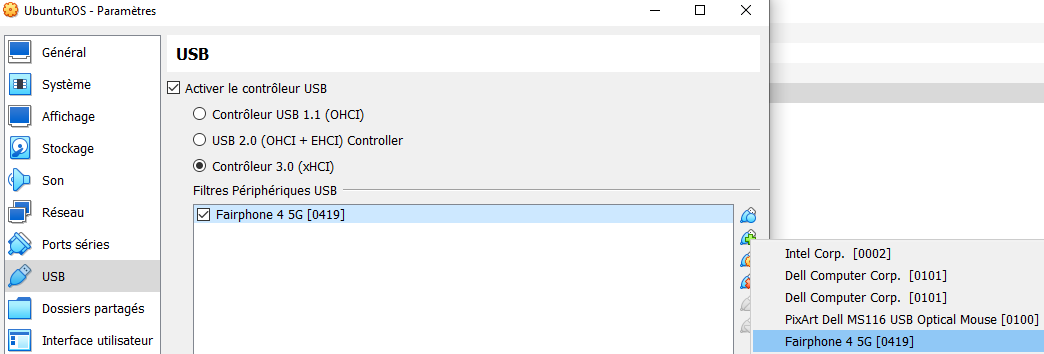
-
- Pendant que la VM tourne
- Ouvrir l'application Disks pour identifier les disques, en général :
- disque virtuel de la VM :
/dev/sda - SSD branché en USB :
/dev/sdb
- disque virtuel de la VM :
- Ouvrir un Terminal et lancer la commande de copie du disque virtuel vers le SSD physique :
sudo dd if=/dev/sda of=/dev/sdb bs=4096 status=progress && sync- Ouvrir Gparted (depuis une Live USB avec le SSD branché) pour vérifier que la partition principale, généralement
sdb3est bien identifiée comme formatée enext4. Agrandir la partition à la taille désirée. - Si le SSD ne boot pas sur un PC, essayer de réparer le grub avec
boot-repairdepuis une Live USB
Windows 10/11
Une installation native sous Windows 10 avec Visual Studio 2019 (Version Community gratuite) est possible :
Installation de ROS2 Humble
Les distributions stables publiées (pré-compilées) de ROS2 sont nommées par ordre alphabétique. Début 2023, on va installer ROS 2 Humble :
sudo apt update && sudo apt install locales
sudo locale-gen en_US en_US.UTF-8
sudo update-locale LC_ALL=en_US.UTF-8 LANG=en_US.UTF-8
export LANG=en_US.UTF-8
sudo apt install software-properties-common
sudo add-apt-repository universe
sudo apt update && sudo apt install curl
sudo curl -sSL https://raw.githubusercontent.com/ros/rosdistro/master/ros.key -o /usr/share/keyrings/ros-archive-keyring.gpg
echo "deb [arch=$(dpkg --print-architecture) signed-by=/usr/share/keyrings/ros-archive-keyring.gpg] http://packages.ros.org/ros2/ubuntu $(. /etc/os-release && echo $UBUNTU_CODENAME) main" | sudo tee /etc/apt/sources.list.d/ros2.list > /dev/null
sudo apt update && sudo apt upgrade
sudo apt install ros-humble-desktop-full
source /opt/ros/humble/setup.bash
echo 'source /opt/ros/humble/setup.bash' >> ~/.bashrc
Tester l'installation
https://docs.ros.org/en/humble/Installation/Ubuntu-Install-Debians.html#try-some-examples
- Ouvrir un premier Terminal :
ros2 run demo_nodes_cpp talker - Ouvrir un second Terminal :
ros2 run demo_nodes_cpp listener
Installation de Jazzy pour la Navigation et Manipulation
Jazzy est la LTS 2024-2029. Avec UR, Turtlebot3, Nav2, MoveIt2, etc.
## Install ROS
sudo apt update && sudo apt install locales
# Test locale
#locale
sudo locale-gen en_US en_US.UTF-8
sudo update-locale LC_ALL=en_US.UTF-8 LANG=en_US.UTF-8
export LANG=en_US.UTF-8
sudo apt install software-properties-common
sudo add-apt-repository universe
sudo apt update && sudo apt install curl
sudo curl -sSL https://raw.githubusercontent.com/ros/rosdistro/master/ros.key -o /usr/share/keyrings/ros-archive-keyring.gpg
echo "deb [arch=$(dpkg --print-architecture) signed-by=/usr/share/keyrings/ros-archive-keyring.gpg] http://packages.ros.org/ros2/ubuntu $(. /etc/os-release && echo $UBUNTU_CODENAME) main" | sudo tee /etc/apt/sources.list.d/ros2.list > /dev/null
sudo apt update && sudo apt upgrade
sudo apt install ros-dev-tools
sudo apt install ros-jazzy-desktop-full
echo 'source /opt/ros/jazzy/setup.bash' >> ~/.bashrc
source ~/.bashrc
# Test installation (first Terminal)
#ros2 run demo_nodes_cpp talker
# Test installation (second Terminal)
#ros2 run demo_nodes_cpp listener

## Install Nav2 (465Mo)
sudo apt install ros-jazzy-nav2-bringup # depends on ros-jazzy-navigation2
source ~/.bashrc
# Test installation
#ros2 launch nav2_bringup tb3_simulation_launch.py headless:=False

## Install TurtleBot3 Simulation
sudo apt install ros-jazzy-turtlebot3-simulations
echo 'export ROS_DOMAIN_ID=30 #TURTLEBOT3' >> ~/.bashrc
echo 'export TURTLEBOT3_MODEL=burger' >> ~/.bashrc
source ~/.bashrc
# Test installation
#ros2 launch turtlebot3_gazebo turtlebot3_world.launch.py

## Install dependencies to build ROS packages from source
sudo apt install python3-argcomplete python3-colcon-common-extensions python3-colcon-mixin libboost-system-dev build-essential
colcon mixin add default https://raw.githubusercontent.com/colcon/colcon-mixin-repository/master/index.yaml
colcon mixin update default

## Install TurtleBot3 from source
sudo apt install ros-jazzy-hls-lfcd-lds-driver ros-jazzy-turtlebot3-msgs ros-jazzy-dynamixel-sdk libudev-dev
mkdir -p ~/turtlebot3_ws/src && cd ~/turtlebot3_ws/src
#git clone -b humble-devel https://github.com/ROBOTIS-GIT/turtlebot3.git
git clone -b jazzy https://github.com/ROBOTIS-GIT/turtlebot3.git
git clone -b ros2-devel https://github.com/ROBOTIS-GIT/ld08_driver.git
cd ~/turtlebot3_ws/src/turtlebot3
rm -rf turtlebot3_cartographer turtlebot3_navigation2
cd ~/turtlebot3_ws/
colcon build --symlink-install
rosdep update && rosdep install --ignore-src --from-paths src -y
vcs --help
vcs status
sudo apt list ros-jazzy-gazebo-ros-pkgs
sudo apt list ros-jazzy-ros-gz
sudo apt install ros-jazzy-ros-gz
colcon build --symlink-install
ros2 launch nav2_bringup tb3_simulation_launch.py slam:=True nav:=True headless:=False use_sim_time:=True
exit
cd ..
cd turtlebot3_ws/
colcon build --symlink-install --parallel-workers 1
cd src/
git clone -b jazzy https://github.com/ROBOTIS-GIT/turtlebot3_simulations.git
#git clone -b humble https://github.com/ROBOTIS-GIT/turtlebot3_simulations.git
cd ..
colcon build --symlink-install --parallel-workers 1
sudo nano .bashrc
sudo nano ~/.bashrc
ros2 launch turtlebot3_gazebo turtlebot3_world.launch.py
sudo apt list ros-jazzy-turtlebot3-*
sudo apt install ros-jazzy-turtlebot3-fake-node
sudo apt install ros-jazzy-gazebo-msgs
cd src/
sudo apt update && rosdep install -r --from-paths . --ignore-src --rosdistro $ROS_DISTRO -y
rosdep update
sudo apt update && rosdep install -r --from-paths . --ignore-src --rosdistro $ROS_DISTRO -y
sudo curl https://packages.osrfoundation.org/gazebo.gpg --output /usr/share/keyrings/pkgs-osrf-archive-keyring.gpg
echo "deb [arch=$(dpkg --print-architecture) signed-by=/usr/share/keyrings/pkgs-osrf-archive-keyring.gpg] http://packages.osrfoundation.org/gazebo/ubuntu-stable $(lsb_release -cs) main" | sudo tee /etc/apt/sources.list.d/gazebo-stable.list > /dev/null
sudo apt-get update
sudo apt-get install gz-harmonic
cd ..
colcon build --symlink-install --parallel-workers 1
source in
source install/setup.bash
ros2 launch turtlebot3_gazebo turtlebot3_world.launch.py

## Install MoveIt2 Tutorials
mkdir -p ~/ws_moveit/src
cd ~/ws_moveit/src
git clone -b main https://github.com/moveit/moveit2_tutorials
vcs import --recursive < moveit2_tutorials/moveit2_tutorials.repos
sudo apt update && rosdep install -r --from-paths . --ignore-src --rosdistro $ROS_DISTRO -y
cd ..
colcon build --mixin release
source ~/ws_moveit2/install/setup.bash
# Test installation https://github.com/moveit/moveit2_tutorials/blob/humble/doc/examples/move_group_interface/move_group_interface_tutorial.rst
#ros2 launch moveit2_tutorials move_group.launch.py
# Test installation (second Terminal)
#source ~/ws_moveit2/install/setup.bash
#ros2 launch moveit2_tutorials move_group_interface_tutorial.launch.py

# Install UR ROS2 Driver
mkdir -p ur_ws/src
cd ur_ws
git clone -b main https://github.com/UniversalRobots/Universal_Robots_ROS2_Tutorials.git src/ur_tutorials
rosdep update && rosdep install --ignore-src --from-paths src -y
colcon build --symlink-install
source ~/ur_ws/install/setup.bash
# Test installation (first Terminal)
#ros2 launch ur_robot_driver ur_control.launch.py ur_type:=ur5e robot_ip:=yyy.yyy.yyy.yyy use_mock_hardware:=true launch_rviz:=false
# Test installation (second Terminal)
#source ~/ur_ws/install/setup.bash
#ros2 launch ur_moveit_config ur_moveit.launch.py ur_type:=ur5e launch_rviz:=true

# Install UR ROS2 Gazebo
git clone -b ros2 https://github.com/UniversalRobots/Universal_Robots_ROS2_GZ_Simulation.git src/ur_simulation_gz
rosdep update && rosdep install --ignore-src --from-paths src -y
colcon build --symlink-install
source ~/ur_ws/install/setup.bash
# Test installation https://github.com/UniversalRobots/Universal_Robots_ROS2_GZ_Simulation
#ros2 launch ur_simulation_gz ur_sim_moveit.launch.py
# OR
# Test installation (first Terminal)
#ros2 launch ur_simulation_gz ur_sim_control.launch.py
# Test installation (second Terminal)
#source ~/ur_ws/install/setup.bash
#ros2 run ur_robot_driver example_move.py

## Install URSim with docker (only on native Ubuntu PC)
sudo apt install docker-compose
sudo usermod -aG docker $USER
sudo service docker start
# Test installation
#docker run hello-world
#sudo service docker status
sudo usermod -aG docker robot
docker pull universalrobots/ursim_e-series
docker run hello-world
docker pull universalrobots/ursim_e-series
ros2 run ur_robot_driver start_ursim.sh -m ur5e
sudo apt install ros-jazzy-ur
sudo apt list python3-rosdep
sudo rosdep init
rosdep update
sudo apt update
sudo apt dist-upgrade
ros2 run ur_robot_driver start_ursim.sh -m ur5e
sudo apt list python3-colcon*
colcon mixin add default https://raw.githubusercontent.com/colcon/colcon-mixin-repository/master/index.yaml
colcon mixin update default
sudo apt list python3-vcstool
Bonus SOARM-100, VBox addons, etc
  1  sudo apt upgrade
    2  sudo snap remove firefox
    3  sudo apt remove firefox
    4  snap list
    5  sudo rm -rf /var/cache/snapd/
    6  sudo add-apt-repository ppa:mozillateam/ppa
    7  sudo nano /etc/apt/preferences.d/mozillateamppa
    8  sudo apt update
    9  sudo apt install firefox-esr
   10  sudo apt upgrade
   11  exit
   12  sudo apt install terminator
   13  sudo apt update && sudo apt install locales
   14  # Test locale
   15  #locale
   16  sudo locale-gen en_US en_US.UTF-8
   17  sudo update-locale LC_ALL=en_US.UTF-8 LANG=en_US.UTF-8
   18  export LANG=en_US.UTF-8
   19  sudo apt install software-properties-common
   20  sudo add-apt-repository universe
   21  sudo apt update && sudo apt install curl
   22  sudo curl -sSL https://raw.githubusercontent.com/ros/rosdistro/master/ros.key -o /usr/share/keyrings/ros-archive-keyring.gpg
   23  echo "deb [arch=$(dpkg --print-architecture) signed-by=/usr/share/keyrings/ros-archive-keyring.gpg] http://packages.ros.org/ros2/ubuntu $(. /etc/os-release && echo $UBUNTU_CODENAME) main" | sudo tee /etc/apt/sources.list.d/ros2.list > /dev/null
   24  sudo apt update && sudo apt upgrade
   25  sudo apt install ros-dev-tools
   26  sudo apt install ros-jazzy-desktop-full
   27  echo 'source /opt/ros/jazzy/setup.bash' >> ~/.bashrc
   28  source /opt/ros/jazzy/setup.bash
   29  exit
   30  mkdir -p ws_so_arm100/src
   31  cd ws_so_arm100/src
   32  git clone https://github.com/JafarAbdi/ros2_so_arm100
   33  cd ..
   34  git submodule init
   35  cd src/
   36  git submodule init
   37  git clone --recurse-submodules https://github.com/JafarAbdi/ros2_so_arm100
   38  rm -rf ros2_so_arm100/
   39  git clone --recurse-submodules https://github.com/JafarAbdi/ros2_so_arm100
   40  cd ..
   41  rosdep update && rosdep install --ignore-src --from-paths src -y
   42  rosdep init
   43  sudo rosdep init
   44  rosdep update && rosdep install --ignore-src --from-paths src -y
   45  colcon build --symlink-install --parallel-workers 1
   46  source install/setup.bash
   47  ros2 launch so_arm100_moveit_config demo.launch.py hardware_type:=mock_components
   48  exit
   49  source install/setup.bash
   50  ros2 run rqt_joint_trajectory_controller rqt_joint_trajectory_controller
   51  exit
   52  cd ws_so_arm100/
   53  source install/setup.bash
   54  ros2 launch so_arm100_moveit_config demo.launch.py hardware_type:=mock_components
   55  ros2 launch so_arm100_moveit_config demo.launch.py hardware_type:=mock_components # hardware_type:=real for running with hardware
   56  ros2 launch so_arm100_moveit_config moveit_rviz.launch.py
   57  exit
   58  ros2 launch so_arm100_description controllers_bringup.launch.py hardware_type:=mock_components # hardware_type:=real for running with hardware
   59  source install/setup.bash
   60  ros2 launch so_arm100_description controllers_bringup.launch.py hardware_type:=mock_components # hardware_type:=real for running with hardware
   61  exit
   62  cd ws_so_arm100/
   63  source install/setup.bash
   64  ros2 launch so_arm100_moveit_config demo.launch.py hardware_type:=mock_components # hardware_type:=real for running with hardware
   65  nano src/ros2_so_arm100/so_arm100_description/package.xml
   66  nano src/ros2_so_arm100/so_arm100_moveit_config/package.xml
   67  rosdep update && rosdep install --ignore-src --from-paths src -y
   68  nano src/ros2_so_arm100/so_arm100_moveit_config/package.xml
   69  ros2 launch so_arm100_moveit_config demo.launch.py hardware_type:=mock_components # hardware_type:=real for running with hardware
   70  exit
   71  cd ws_so_arm100/
   72  nano src/ros2_so_arm100/so_arm100_moveit_config/package.xml
   73  cd
   74  sudo apt install htop
   75  sudo htop
   76  exit
   77  sudo apt install python3-argcomplete python3-colcon-common-extensions libboost-system-dev build-essential
   78  mkdir -p ~/ws_moveit/src
   79  cd ~/ws_moveit/src
   80  git clone -b main https://github.com/moveit/moveit2_tutorials
   81  vcs import --recursive < moveit2_tutorials/moveit2_tutorials.repos
   82  sudo apt update && rosdep install -r --from-paths . --ignore-src --rosdistro $ROS_DISTRO -y
   83  cd ..
   84  colcon build --mixin release
   85  sudo apt install python3-colcon-common-extensions
   86  sudo apt install python3-colcon-mixin
   87  colcon mixin add default https://raw.githubusercontent.com/colcon/colcon-mixin-repository/master/index.yaml
   88  colcon mixin update default
   89  colcon build --mixin release --parallel-workers 1
   90  source install/setup.bash
   91  exit
   92  cd ws_moveit/
   93  source install/setup.bash
   94  ros2 launch moveit2_tutorials demo.launch.py rviz_config:=panda_moveit_config_demo_empty.rviz
   95  exit
   96  cd ..
   97  nano .bashrc
   98  cd ur_ws/
   99  source install/setup.bash
  100  ros2 launch ur_robot_driver test_scaled_joint_trajectory_controller.launch.py
  101  ros2 launch ur_moveit_config ur_moveit.launch.py ur_type:=ur5e launch_rviz:=true
  102  exit
  103  mkdir -p ur_ws/src
  104  cd ur_ws/
  105  git clone https://github.com/UniversalRobots/Universal_Robots_ROS2_Tutorials.git src/ur_tutorials
  106  rosdep update && rosdep install --ignore-src --from-paths src -y
  107  git clone -b ros2 https://github.com/UniversalRobots/Universal_Robots_ROS2_GZ_Simulation.git src/ur_simulation_gz
  108  rosdep update && rosdep install --ignore-src --from-paths src -y
  109  colcon build --symlink-install --parallel-workers 1
  110  source install/setup.bash
  111  ros2 launch ur_robot_driver ur_control.launch.py ur_type:=ur5e robot_ip:=yyy.yyy.yyy.yyy fake_hardware:=true launch_rviz:=false
  112  ros2 launch ur_robot_driver ur_control.launch.py ur_type:=ur5e robot_ip:=yyy.yyy.yyy.yyy mock_hardware:=true launch_rviz:=false
  113  ros2 launch ur_robot_driver ur_control.launch.py ur_type:=ur5e robot_ip:=yyy.yyy.yyy.yyy use_mock_hardware:=true
  114  ros2 launch ur_robot_driver ur_control.launch.py ur_type:=ur5e robot_ip:=yyy.yyy.yyy.yyy use_mock_hardware:=true launch_rviz:=false
  115  exit
  116  wget https://gitlab.com/paulcarroty/vscodium-deb-rpm-repo/raw/master/pub.gpg
  117  sudo mv pub.gpg /usr/share/keyrings/vscodium-archive-keyring.asc
  118  echo 'deb [ signed-by=/usr/share/keyrings/vscodium-archive-keyring.asc ] https://paulcarroty.gitlab.io/vscodium-deb-rpm-repo/debs vscodium main'     | sudo tee /etc/apt/sources.list.d/vscodium.list
  119  sudo apt update
  120  sudo apt install codium
  121  snap list
  122  df -h
  123  sudo rm -rf /var/cache/snapd/
  124  sudo apt autoremove --purge snapd gnome-software-plugin-snap
  125  rm -fr ~/snap
  126  cat <<EOF | sudo tee /etc/apt/preferences.d/nosnap.pref
  127  # To prevent repository packages from triggering the installation of Snap,
  128  # this file forbids snapd from being installed by APT.
  129  # For more information: https://linuxmint-user-guide.readthedocs.io/en/latest/snap.html
  130  Package: snapd
  131  Pin: release a=*
  132  Pin-Priority: -10
  133  EOF
  134  sudo apt install gnome-software --no-install-recommends
  135  sudo apt autoremove --purge
  136  exit
  137  sudo apt-get autoremove brltty
  138  wget https://repo.anaconda.com/miniconda/Miniconda3-latest-Linux-x86_64.sh
  139  sha256sum ~/Miniconda3-latest-Linux-x86_64.sh
  140  bash ~/Miniconda3-latest-Linux-x86_64.sh
  141  nano .bashrc
  142  exit
  143  conda create -y -n lerobot python=3.10
  144  conda activate lerobot
  145  git clone https://github.com/huggingface/lerobot.git ~/lerobot
  146  conda install ffmpeg -c conda-forge
  147  cd ~/lerobot && pip install -e ".[feetech]"
  148  nano lerobot/common/robot_devices/robots/configs.py
  149  python lerobot/scripts/find_motors_bus_port.py
  150  exit
  151  sudo reboot now
  152  conda config --set auto_activate_base false
  153  exit
  154  nano .bashrc
  155  exit
  156  cd ws_so_arm100/
  157  ls src/
  158  source install/setup.bash
  159  sudo apt list librang*
  160  sudo apt list libserial*
  161  ls /dev
  162  ls /dev/tty*
  163  exit
  164  ./VBoxLinuxAdditions.run
  165  sudo ./VBoxLinuxAdditions.run
  166  sudo rcvboxadd reload
  167  sudo shutdown now
  168  sudo rcvoxadd reload
  169  sudo apt install mainline
  170  sudo add-apt-repository ppa:cappelikan/ppa
  171  sudo apt update
  172  sudo apt install mainline
  173  exit
  174  uname -r
  175  sudo su
  176  uname -r
  177  sudo su
  178  uname -r
  179  sudo su
  180  cd /media/admin_ros/VBox_GAs_7.1.8/
  181  sudo ./VBoxLinuxAdditions.run
  182  sudo rcvboxadd reload
  183  df -h
  184  sudo apt autoremove --purge
  185  df -h
  186  ncdu
  187  sudo apt install ncdu
  188  ncdu
  189  rm -rf .cache/pip/
  190  ncdu
  191  ncdu /
  192  sudo apt clean
  193  df -
  194  df -h
  195  sudo nano /etc/fstab
  196  sudo reboot
  197  df -h
  198  ls -l
  199  rm -rf Miniconda3-latest-Linux-x86_64.sh
  200  free -m
  201  ncdu /
  202  sudo nano /etc/fstab
  203  sudo rm /swap.img
  204  exit
  205  df -h
  206  exit
Installation d'autres versions de ROS2
Pour avoir accès à toutes les dernières fonctionnalités en cours de développement (partiellement publiées), il faut installer ROS2 Rolling, qui est une distribution en développement continu "rolling release". Par exemple en Avril 2023, l'API Python de MoveIt2 et son tutoriel ne sont disponibles que sous rolling.
On peut installer plusieurs versions de ros en parallèle. Chaque version sera installée dans /opt/ros/version. Pour faire cohabiter les deux versions, il faut "sourcer" le bon répertoire avant de lancer un programme ros2 launch ... ou de compiler un workspace colcon build .... Deux options s'offrent à nous :
- Si on bascule souvent de version : commenter les lignes
source /opt/ros/humble/setup.bashen bas du fichier~/.bashrc- Il faudra alors lancer la commande
source /opt/ros/humble/setup.bashà chaque nouvelle ouverture de Terminal Bash.
- Il faudra alors lancer la commande
- Si on travaille principalement avec une version : commenter la ligne correspondant à la version principale
source /opt/ros/humble/setup.bashen bas du fichier~/.bashrclorsqu'on veut utiliser la version secondaire.
Gestion de version avec Ansible
L'idéal serait de gérer l'état des VM/PC de TP avec ansible plutôt que des snapshot VirtualBox
Voir https://innovation.iha.unistra.fr/books/robotique-open-source/page/deploiement-de-ros2
https://github.com/richlamdev/ansible-desktop-ubuntu
Outils utiles
Terminal multi-fenêtres Terminator
- Installer Terminator : c'est un logiciel de Ligne de commande pratique pour programmer avec ROS
- Depuis Windows Store : Rechercher et installer
Terminator (Ubuntu) - Depuis la ligne de commande Linux :
sudo apt install terminator
- Depuis Windows Store : Rechercher et installer
- Depuis le menu démarrer Windows, Lancer
Terminator (Ubuntu)
Visual Studio Codium
Pour éviter d'alourdir la VM avec de la télémétrie Microsoft, on installe la version sans tracker de Visual Studio Code depuis un dépôt debian :
- Lancer la VM VirtualBox ou WSL (
Terminator (Ubuntu)) - Dans Terminator, lancer les commandes suivantes :
wget https://gitlab.com/paulcarroty/vscodium-deb-rpm-repo/raw/master/pub.gpg
sudo mv pub.gpg /usr/share/keyrings/vscodium-archive-keyring.asc
echo 'deb [ signed-by=/usr/share/keyrings/vscodium-archive-keyring.asc ] https://paulcarroty.gitlab.io/vscodium-deb-rpm-repo/debs vscodium main' \
    | sudo tee /etc/apt/sources.list.d/vscodium.list
sudo apt update
sudo apt install codium
- Lancer VSCodium dans la VM VirtualBox ou directement depuis Windows, lancer
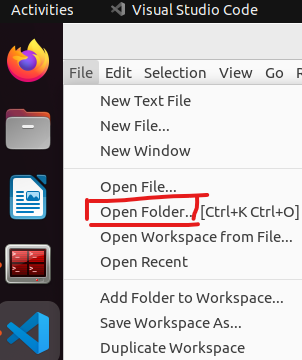
VSCodium (Ubuntu) - Ouvrir le dossier contenant le code source
/srcdu projet dont vous voulez étudier/modifier le code :File --> Open Folder --> ~/ws_moveit/src
Installer Firefox dans WSL
https://askubuntu.com/questions/1444962/how-do-i-install-firefox-in-wsl-when-it-requires-snap-but-snap-doesnt-work
sudo snap remove firefox
sudo apt remove firefox
sudo add-apt-repository ppa:mozillateam/ppa

# Create a new file, it should be empty as it opens:
sudo gedit /etc/apt/preferences.d/mozillateamppa

# Insert these lines, then save and exit
Package: firefox*
Pin: release o=LP-PPA-mozillateam
Pin-Priority: 501

# after saving, do
sudo apt update
sudo apt install firefox-esr
Alléger Ubuntu (pour VM ou clonage)
- Désinstaller snap :
- Vérifier qu'on n'a pas de paquet snap important avec
snap list - Purger snap et tous ses paquets
- Vérifier qu'on n'a pas de paquet snap important avec
sudo rm -rf /var/cache/snapd/

sudo apt autoremove --purge snapd gnome-software-plugin-snap

rm -fr ~/snap

# sudo apt-mark hold snapd
-
- Empêcher snap d'être réinstallé par Ubuntu
cat <<EOF | sudo tee /etc/apt/preferences.d/nosnap.pref
# To prevent repository packages from triggering the installation of Snap,
# this file forbids snapd from being installed by APT.
# For more information: https://linuxmint-user-guide.readthedocs.io/en/latest/snap.html

Package: snapd
Pin: release a=*
Pin-Priority: -10
EOF
-
- Installer le magasin d'applications de gnome sans snap/flatpak
sudo apt install gnome-software --no-install-recommends
- Installer le magasin d'applications de gnome sans snap/flatpak
- Supprimer les paquets apt plus nécessaires
sudo apt autoremove --purge - Supprimer le cache de compilation de VSCode
~/.cache/vscode-cpptools - Supprimer le cache de pip
~/.cache/pip - Supprimer les fichiers de compilation des workspaces qui ne seront pas utilisés en TP. Attention à conserver les paquets qui devront être compilés en TP (en utilisant
colcon build --package-select). - Désactiver le SWAP avec
swapoff -apuis commenter la ligne dans/etc/fstabpuis supprimer le fichier de swap/swap.img - Réduire la taille de la partition via l'application Disks. Celle-ci pourra être agrandie après copie de la VM.
Configuration VirtualBox
Windows consomme à lui seul près de 4-8Go, Ubuntu >2Go et la compilation >4Go, on peut vite atteindre la saturation. Un PC de 16Go peut suffire mais il faudra compiler sans parallélisation, et fermer des applications lourdes dans Windows comme Firefox.
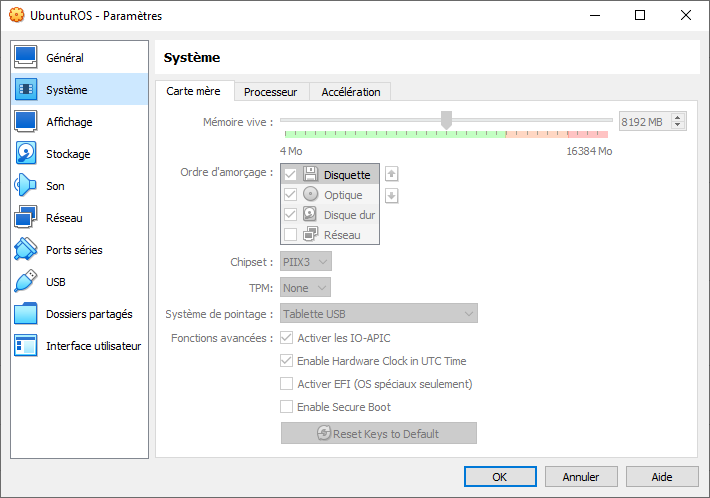
- Vérifier et adapter la configuration de la VM en ressources RAM, CPU, GPU et Réseau selon la configuration de votre PC
- 8GB mini de RAM si vous devez compiler des workspace ROS
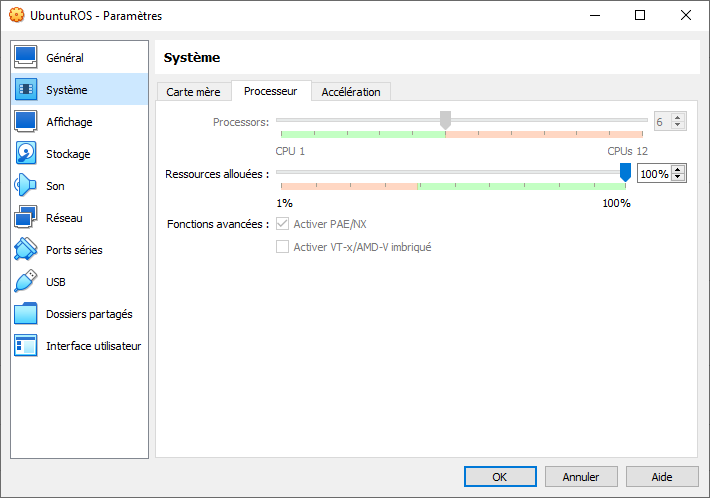
- 4 CPU mini. 6-10 CPU si l'accélération graphique ne fonctionne pas et que vous faites du RViz ou Gazebo
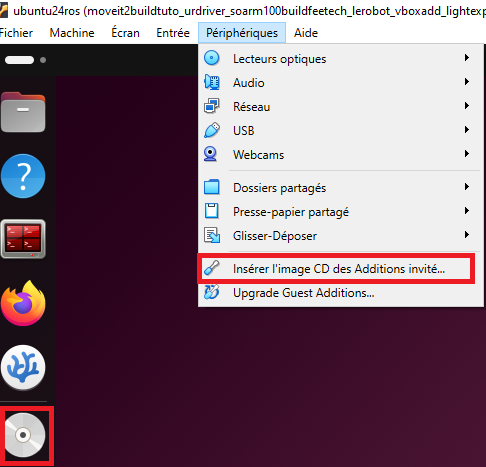
Installation des Guest Add-ons pour gestion de l'accélération graphique, du copier-coller entre Windows et la VMhttps://doc.ubuntu-fr.org/virtualbox_additions_invite- A priori la nouvelle façon d'installer les add-on c'est simplement installer
sudo apt install virtualbox-guest-x11dans la VM. Puis démarrer la session Xorg, cf. prochain point.
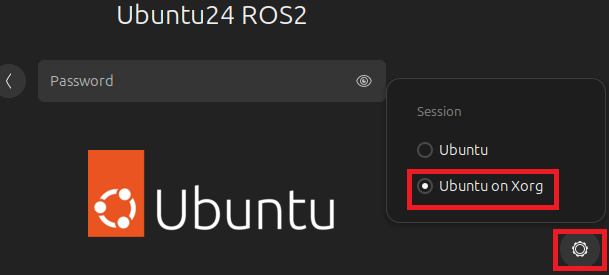
- Démarrage d'une session graphique Xorg qui est plus stable que Wayland sous VirtualBox
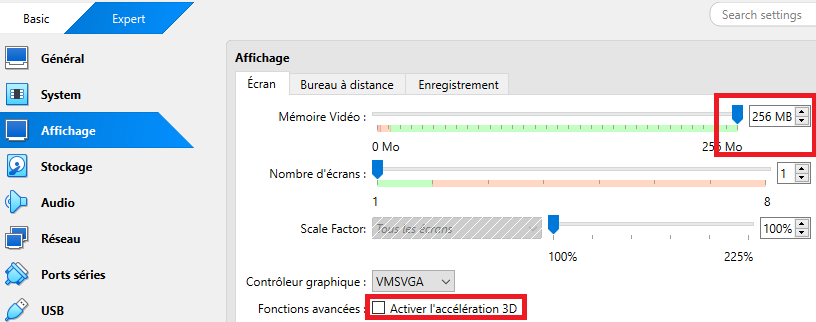
- Désactiver l'accélération graphique qui n'est pas bien supportée sous Ubuntu 24.04 avec VirtualBox 7.1.7
https://www.virtualbox.org/ticket/21955
https://forums.virtualbox.org/viewtopic.php?t=111676
Même passer au kernel 6.3 qui semblait non problématique n'a pas réglé le soucis
Astuce en cas de soucis suite à màj VirtualBox : https://forums.virtualbox.org/viewtopic.php?t=12692
- Supprimer les Extensions Pack
- Désinstaller
- Réinstaller
Sources
-----
Auteur: Gauthier Hentz, sur le wiki de l'innovation de l'IUT de Haguenau
Attribution-NonCommercial-PartageMemeConditions 4.0 International (CC BY-NC-SA 4.0)
Tutoriels de base
Pour comprendre les concepts de ROS2 par la pratique, il existe des tutoriels pour débutant. Ils reposent sur la simulation d'un robot mobile à deux roues principales développé par les développeurs de ROS en 2010 : Turtlebot. Le TurtleBot 3 est vendue par Robotis et peut être couplé à un bras manipulateur 5 axes OpenMANIPULATOR-X. Il est possible de simuler des applications de manipulation mobile avec Gazebo.
Pour réaliser les tutoriels de base, il nous faut un environnement de développement, deux options :
- Une machine virtuelle (VM) VirtualBox, ou disponible au téléchargement ici
- Le plus simple et rapide pour démarrer
- Si on n'a pas de Hardware ou qu'on ne souhaite travailler qu'en simulation
- Une installation simple ou dual-boot sur un PC
- Il faut alors installer de zéro
- Indispensable si on veut travailler avec du Hardware
Supposons que vous avez installé et testé votre environnement comme celui de la VM.
Connexion à la VM
- nom : ubuntu22ros2
- utilisateur :
etudiant - mdp : département de l'IUT
Nous pouvons directement passer aux tutoriels sur les outils ROS 2 en ligne de commande :
Ces premiers tutoriels ne nécessitent qu'une installation basique de ROS 2, on n'y regarde pas le code source.
Ensuite on passe aux tutoriels sur les bibliothèques clientes de ROS 2 en C++ et Python :
- Using
colconto build packages - Creating a workspace
- Creating a package
- Writing a simple publisher and subscriber (C++) --> Correction
- Writing a simple publisher and subscriber (Python)
- Writing a simple service and client (C++)
- Writing a simple service and client (Python)
- Creating custom msg and srv files
Ces tutoriels vous engagent à copier et analyser du code source en C++ et Python. Les fichiers créés sont placés dans le dossier de travail (workspace) /home/etudiant/ros2_ws/src, à ouvrir avec Visual Studio Code :
Vous trouverez des fichiers de correction commentés dans ros2_ws/src/cpp_pubsub/src/, en particulier :
- publisher_member_function.cpp
- subscriber_member_function.cpp
Pour les tester il faut lancer :
cd ~/ros2_ws
colcon build --packages-select cpp_pubsub
source install/setup.bash
ros2 run cpp_pubsub talker
Le noeud se met à publier/parler :
[INFO] [minimal_publisher]: Publishing: "Hello World: 0"
[INFO] [minimal_publisher]: Publishing: "Hello World: 1"
[INFO] [minimal_publisher]: Publishing: "Hello World: 2"
[INFO] [minimal_publisher]: Publishing: "Hello World: 3"
[INFO] [minimal_publisher]: Publishing: "Hello World: 4"
Puis dans un second Terminal :
ros2 run cpp_pubsub listener
Le noeud se met à écouter :
[INFO] [minimal_subscriber]: I heard: "Hello World: 10"
[INFO] [minimal_subscriber]: I heard: "Hello World: 11"
[INFO] [minimal_subscriber]: I heard: "Hello World: 12"
[INFO] [minimal_subscriber]: I heard: "Hello World: 13"
[INFO] [minimal_subscriber]: I heard: "Hello World: 14"
Tapez Ctrl+C dans chaque Terminal pour arrêter les noeuds ("stop spinning").
-----
Auteur: Gauthier Hentz, sur le wiki de l'innovation de l'IUT de Haguenau
Attribution-NonCommercial-PartageMemeConditions 4.0 International (CC BY-NC-SA 4.0)
Découverte d'Ubuntu Linux et son Terminal Bash
Navigating the Ubuntu GUI
In this exercise, we will familiarize ourselves with the graphical user interface (GUI) of the Ubuntu operating system.
Task 1: Familiarize Yourself with the Ubuntu Desktop
At the log-in screen, click in the password input box, enter rosindustrial for the password, and hit enter. The screen should look like the image below when you log in:
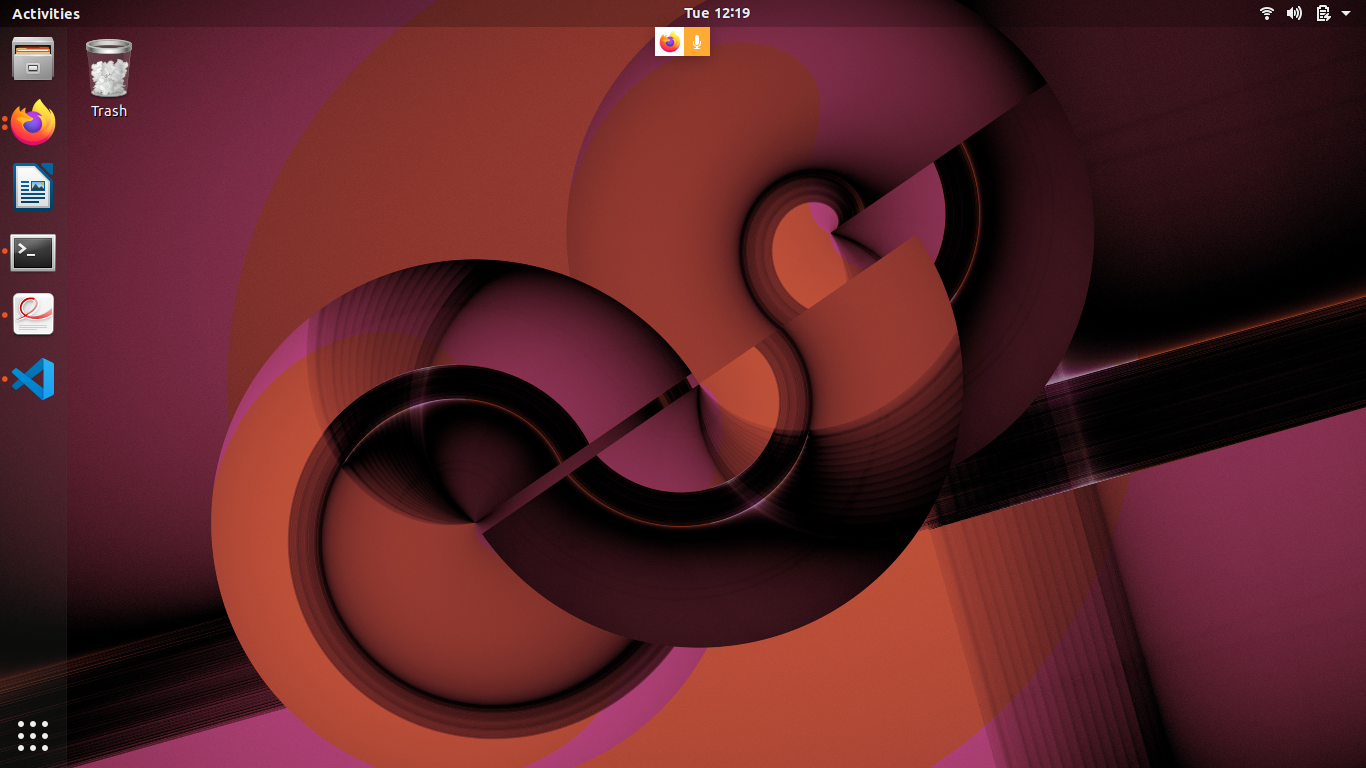
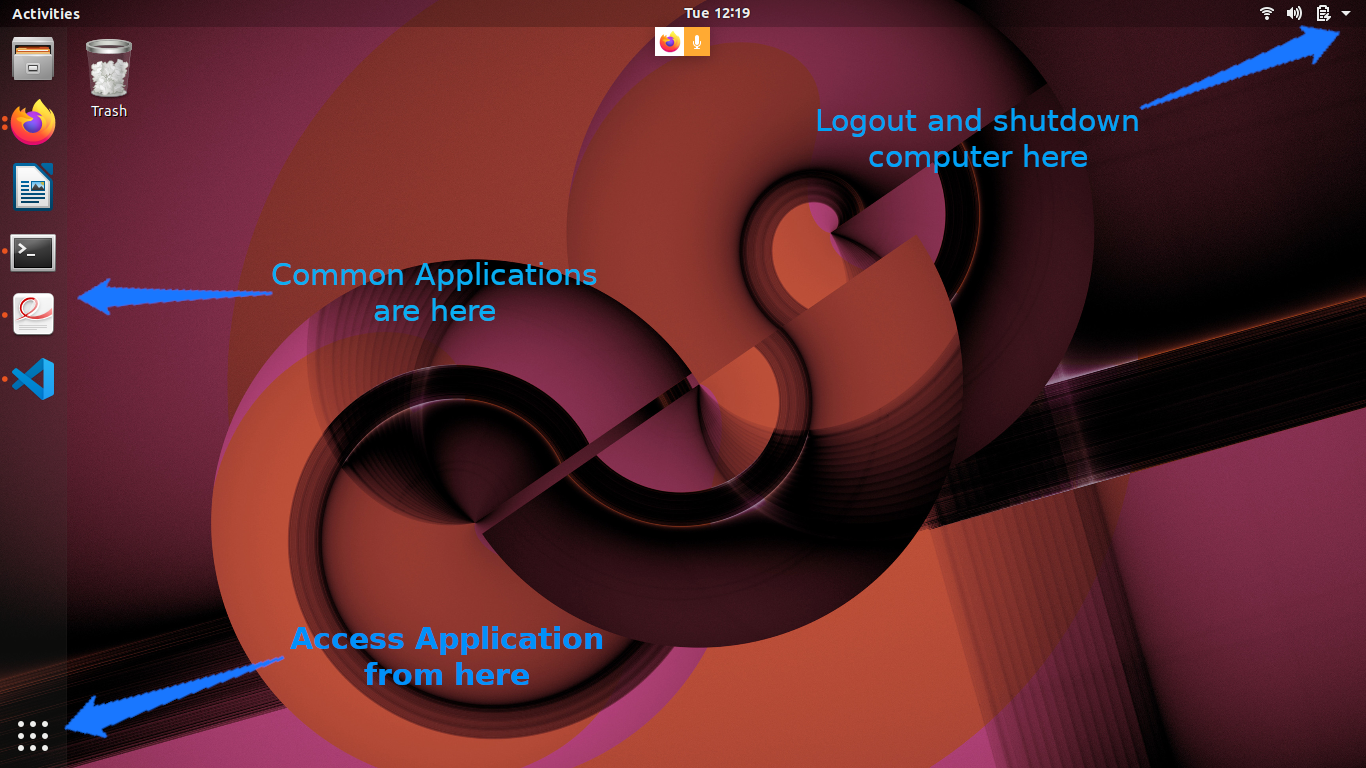
There are several things you will notice on the desktop:
-
The gear icon on the top right of the screen brings up a menu which allows the user to log out, shut down the computer, access system settings, etc…
-
The bar on the left side shows running and “favorite” applications, connected thumb drives, etc.
-
The top icon is used to access all applications and files. We will look at this in more detail later.
-
The next icons are either applications which are currently running or have been “pinned” (again, more on pinning later)
-
Any removable drives, like thumb drives, are found after the application icons.
-
If the launcher bar gets “too full”, clicking and dragging up/down allows you to see the applications that are hidden.
-
To reorganize the icons on the launcher, click and hold the icon until it “pops out”, then move it to the desired location.
Task 2: Open and Inspect an Application
Click on the filing-cabinet icon in the launcher. A window should show up, and your desktop should look like something below:
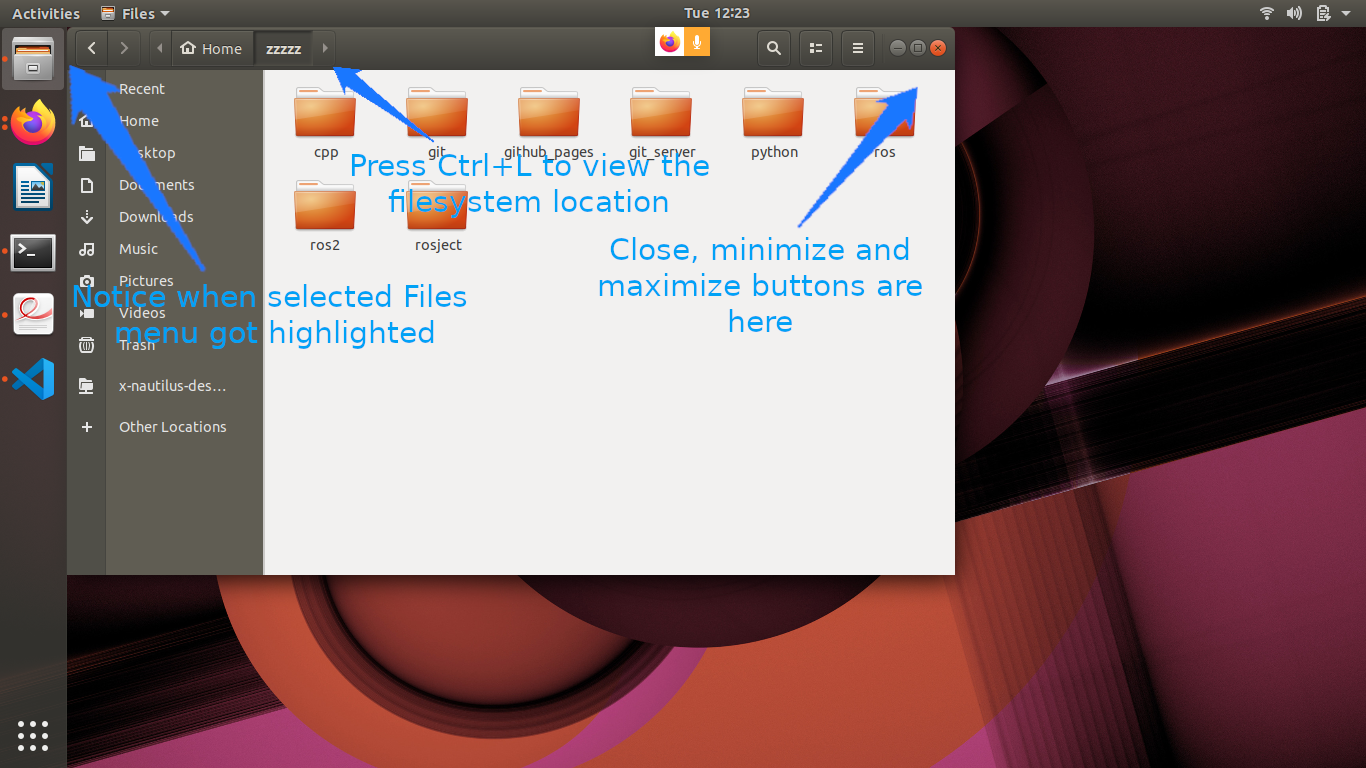
Things to notice:
-
The close, minimize, and maximize buttons typically found on the right-hand side of the window title bar are found on the left-hand side.
-
The menu for windows are found on the menu bar at the top of the screen, much in the same way Macs do. The menus, however, only show up when you hover the mouse over the menu bar.
-
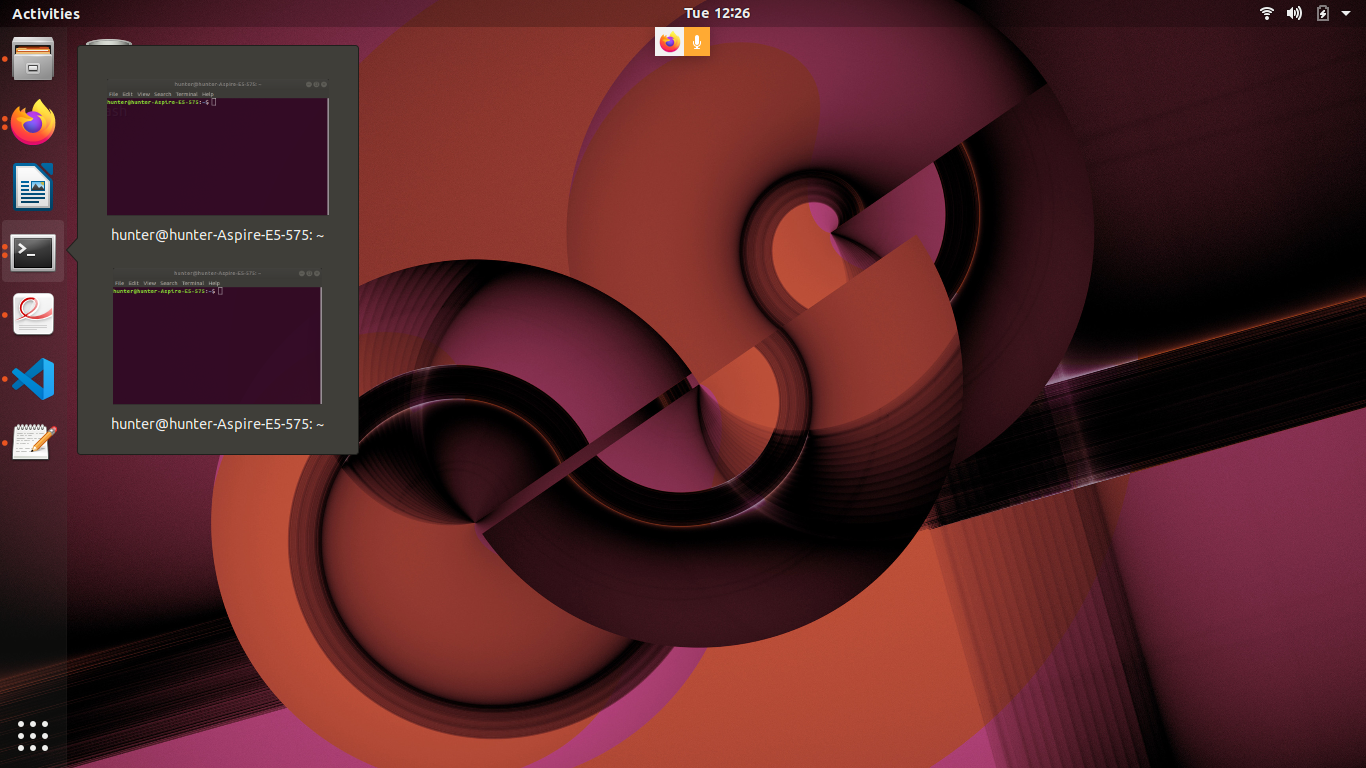
Notice that there are menu highlights of the folder icon. The dots on the left show how many windows of this application are open. Clicking on these icons when the applications are open does one of two things:
-
If there is only one window open, this window gets focus.
-
If more than one are open, clicking a second time causes all of the windows to show up in the foreground, so that you can choose which window to go to (see below):
Task 3: Start an Application & Pin it to the Launcher Bar
Click on the launcher button (top left) and type gedit in the search box. The “Text Editor” application (this is actually gedit) should show up (see below):
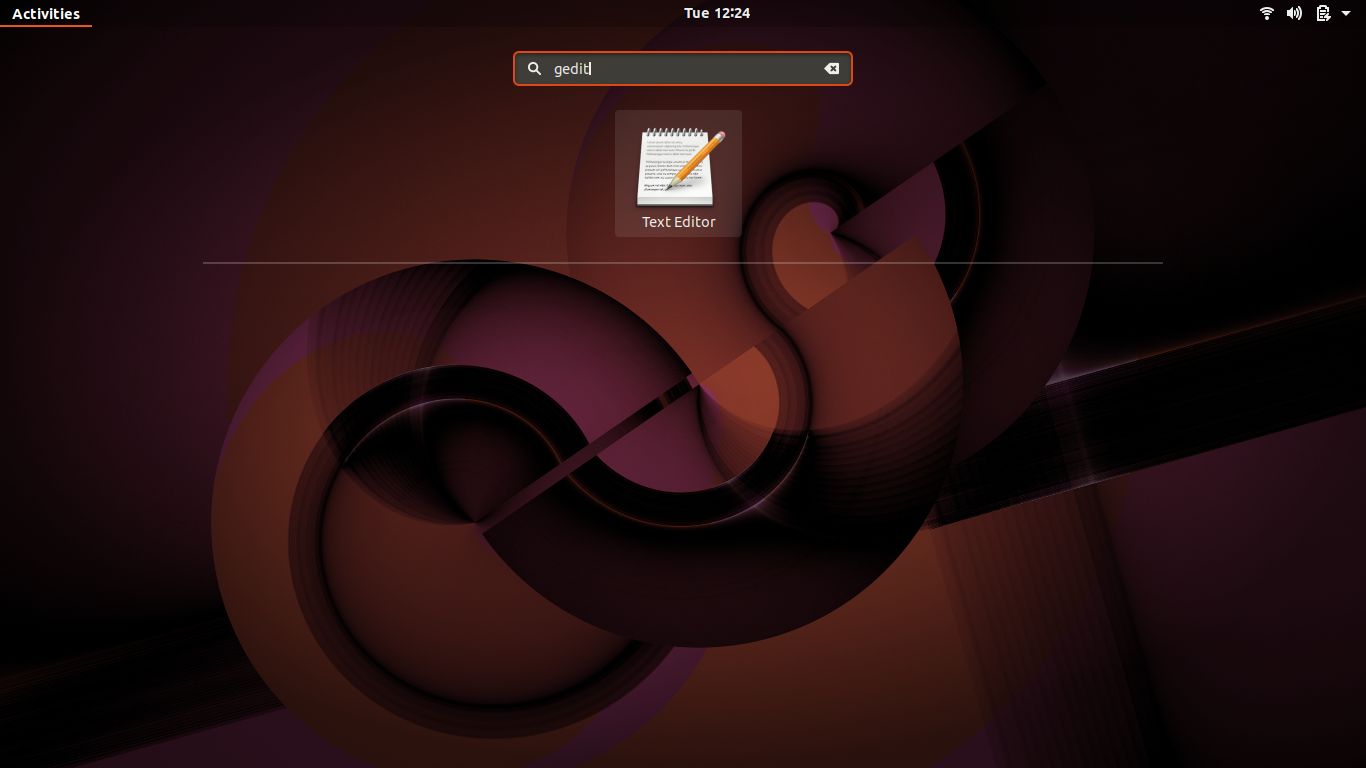
Click on the application. The text editor window should show up on the screen, and the text editor icon should show up on the launcher bar on the left-hand side (see below):

-
Right-click on the text editor launch icon, and select “Lock to Launcher”.
-
Close the gedit window. The launcher icon should remain after the window closes.
-
Click on the gedit launcher icon. You should see a new gedit window appear.
Le Terminal Linux
In this exercise, we will familiarize ourselves with the Linux terminal.
Starting the Terminal
-
Pour ouvrir le Terminal, recherchez le programme "terminator" ou cliquez sur l'icône:

-
Create a second terminal window, either by:
-
Right-clicking on the terminal and selecting the “Open Terminal” or
-
Selecting “Open Terminal” from the “File” menu
-
-
Create a second terminal within the same window by pressing “Ctrl+Shift+T” while the terminal window is selected.
-
Close the 2nd terminal tab, either by:
-
clicking the small ‘x’ in the terminal tab (not the main terminal window)
-
typing
exitand hitting enter.
-
-
The window will have a single line, which looks like this:
ros-industrial@ros-i-humble-vm:~$ -
This is called the prompt, where you enter commands. The prompt, by default, provides three pieces of information:
-
ros-industrial is the login name of the user you are running as.
-
ros-i-humble-vm is the host name of the computer.
-
~ is the directory in which the terminal is currently in. (More on this later).
-
-
Close the terminal window by typing
exitor clicking on the red ‘x’ in the window’s titlebar.

Navigating Directories and Listing Files
Prepare your environment
-
Open your home folder in the file browser.
-
Double-click on the
ex0.3folder we created in the previous step.-
We’ll use this to illustrate various file operations in the terminal.
-
-
Right click in the main file-browser window and select “Open in Terminal” to create a terminal window at that location.
-
In the terminal window, type the following command to create some sample files that we can study later:
-
cp -a ~/industrial_training/exercises/0.3/. .
-
ls Command
-
Enter
lsinto the terminal.-
You should see
test.txt, andnewlisted. (If you don’t see ‘new’, go back and complete the previous exercise). -
Directories, like
new, are colored in blue. -
The file
sample_jobis in green; this indicates it has its “execute” bit set, which means it can be executed as a command.
-
-
Type
ls *.txt. Only the filetest.txtwill be displayed. -
Enter
ls -linto the terminal.-
Adding the
-loption shows one entry per line, with additional information about each entry in the directory. -
The first 10 characters indicate the file type and permissions
-
The first character is
dif the entry is a directory. -
The next 9 characters are the permissions bits for the file
-
The third and fourth fields are the owning user and group, respectively.
-
The second-to-last field is the time the file was last modified.
-
If the file is a symbolic link, the link’s target file is listed after the link’s file name.
-
-
Enter
ls -ain the terminal.-
You will now see one additional file, which is hidden.
-
-
Enter
ls -a -l(orls -al) in the command.-
You’ll now see that the file
hidden_link.txtpoints to.hidden_text_file.txt.
-
pwd and cd Commands
-
Enter
pwdinto the terminal.-
This will show you the full path of the directory you are working in.
-
-
Enter
cd newinto the terminal.-
The prompt should change to
ros-industrial@ros-i-humble-vm:~/ex0.3/new$. -
Typing
pwdwill show you now in the directory/home/ros-industrial/ex0.3/new.
-
-
Enter
cd ..into the terminal. * In the previous exercise, we noted that..is the parent folder. * The prompt should therefore indicate that the current working directory is/home/ros-industrial/ex0.3. -
Enter
cd /bin, followed byls.-
This folder contains a list of the most basic Linux commands.
Note thatpwdandlsare both in this folder.
-
-
Enter
cd ~/ex0.3to return to our working directory.-
Linux uses the
~character as a shorthand representation for your home directory. -
It’s a convenient way to reference files and paths in command-line commands.
-
You’ll be typing it a lot in this class… remember it!
-
If you want a full list of options available for any of the commands given in this section, type man <command> (where <command> is the command you want information on) in the command line. This will provide you with built-in documentation for the command. Use the arrow and page up/down keys to scroll, and q to exit.
Altering Files
mv Command
-
Type
mv test.txt test2.txt, followed byls.-
You will notice that the file has been renamed to
test2.txt.
This step shows howmvcan rename files.
-
-
Type
mv test2.txt new, thenls.-
The file will no longer be present in the folder.
-
-
Type
cd new, thenls.-
You will see
test2.txtin the folder.
These steps show howmvcan move files.
-
-
Type
mv test2.txt ../test.txt, thenls.-
test2.txtwill no longer be there.
-
-
Type
cd .., thenls.-
You will notice that
test.txtis present again.
This shows howmvcan move and rename files in one step.
-
cp Command
-
Type
cp test.txt new/test2.txt, thenls new.-
You will see
test2.txtis now in thenewfolder.
-
-
Type
cp test.txt "test copy.txt", thenls -l.-
You will see that
test.txthas been copied totest copy.txt.
Note that the quotation marks are necessary when spaces or other special characters are included in the file name.
-
rm Command
-
Type
rm "test copy.txt", thenls -l.-
You will notice that
test copy.txtis no longer there.
-
mkdir Command
-
Type
mkdir new2, thenls.-
You will see there is a new folder
new2.
-
touch Command
-
Type
touch ~/Templates/"Untitled Document".-
This will create a new Document named “Untitled Document”
-
You can use the -i flag with cp, mv, and rm commands to prompt you when a file will be overwritten or removed.
Editing Text (and Other GUI Commands)
-
Type
gedit test.txt.-
You will notice that a new text editor window will open, and
test.txtwill be loaded. -
The terminal will not come back with a prompt until the window is closed.
-
-
There are two ways around this limitation. Try both…
-
Starting the program and immediately returning a prompt:
-
Type
gedit test.txt &.-
The
&character tells the terminal to run this command in “the background”, meaning the prompt will return immediately.
-
-
Close the window, then type
ls.-
In addition to showing the files, the terminal will notify you that
gedithas finished.
-
-
-
Moving an already running program into the background:
-
Type
gedit test.txt.-
The window should open, and the terminal should not have a prompt waiting.
-
-
In the terminal window, press Ctrl+Z.
-
The terminal will indicate that
gedithas stopped, and a prompt will appear.
-
-
Try to use the
geditwindow.-
Because it is paused, the window will not run.
-
-
Type
bgin the terminal.-
The
geditwindow can now run.
-
-
Close the
geditwindow, and typelsin the terminal window.-
As before, the terminal window will indicate that
geditis finished.
-
-
Running Commands as Root
-
In a terminal, type
ls -a /root.-
The terminal will indicate that you cannot read the folder
/root. -
Many times you will need to run a command that cannot be done as an ordinary user, and must be done as the “super user”
-
-
To run the previous command as root, add
sudoto the beginning of the command.-
In this instance, type
sudo ls -a /rootinstead. -
The terminal will request your password (in this case,
rosindustrial) in order to proceed. -
Once you enter the password, you should see the contents of the
/rootdirectory.
-
Warning: sudo is a powerful tool which doesn’t provide any sanity checks on what you ask it to do, so be VERY careful in using it
https://industrial-training-master.readthedocs.io/en/humble/_source/prerequisites/Navigating-the-Ubuntu-GUI.html
Usage avancé du bash Linux
Job management
Stopping Jobs
-
Type
./sample_job.-
The program will start running.
-
-
Press Control+C.
-
The program should exit.
-
-
Type
./sample_job sigterm.-
The program will start running.
-
-
Press Control+C.
-
This time the program will not die.
-
Stopping “Out of Control” Jobs
-
Open a new terminal window.
-
Type
ps ax. -
Scroll up until you find
python ./sample_job sigterm.-
This is the job that is running in the first window.
-
The first field in the table is the ID of the process (use
man psto learn more about the other fields).
-
-
Type
ps ax | grep sample.-
You will notice that only a few lines are returned.
-
This is useful if you want to find a particular process
-
Note: this is an advanced technique called “piping”, where the output of one program is passed into the input of the next. This is beyond the scope of this class, but is useful to learn if you intend to use the terminal extensively.
-
-
Type
kill <id>, where<id>is the job number you found with theps ax. -
In the first window, type
./sample_job sigterm sigkill.-
The program will start running.
-
-
In the second window, type
ps ax | grep sampleto get the id of the process. -
Type
kill <id>.-
This time, the process will not die.
-
-
Type
kill -SIGKILL <id>.-
This time the process will exit.
-
Showing Process and Memory usage
-
In a terminal, type
top.-
A table will be shown, updated once per second, showing all of the processes on the system, as well as the overall CPU and memory usage.
-
-
Press the Shift+P key.
-
This will sort processes by CPU utilization.
This can be used to determine which processes are using too much CPU time.
-
-
Press the Shift+M key.
-
This will sort processes by memory utilization
This can be used to determine which processes are using too much memory.
-
-
Press q or Ctrl+C to exit the program.
Déploiement de ROS2
Pour le déploiement d'environnements pédagogique et concours
On voit plusieurs approches :
- déploiement de machine native Ubuntu, par clonage de disque par exemple
- déploiement de VM VirtualBox
- déploiement de Docker container
Veut-on enseigner la robotique ou l'ingénierie logiciel sous Linux ? Selon moi, il faut différencier deux types de public :
- On veut enseigner la robotique Open Source, par exemple à des électroniciens
- on n'aborde pas l'installation ROS, la création de package dans un workspace et sa compilation
- on fournit une machine dont l'enseignant maitrise l'état
- tout est fait dans un IDE type VSCode.
- les apprenants peuvent se concentrer sur la génération de codes et d'algorithmes pour résoudre un problème robotique
- on reste en simulation ou on déploie sur un robot en fin de parcours
- on bascule d'une conteneur à un autre depuis VSCode pour éviter les erreurs de config
- On veut enseigner l'ingénierie logiciel appliquée à la robotique avec ROS
- initiation à Ubuntu et à la ligne de commande
- on déroule tout le tutoriel ROS en encourageant à faire un dual-boot (ou éventuellement un WSL) sur une machine personnelle
- on insiste sur les réflexes de compilation dans le terminal
- on laisse naviguer entre plusieurs workspaces sans Docker
Besoin pour la robotique industrielle
Par ordre croissant de complexité :
- Visualisation et planification trajectoire avec MoveIt2 via plugin motion_planning dans RViz2 https://moveit.picknik.ai/main/doc/tutorials/quickstart_in_rviz/quickstart_in_rviz_tutorial.html
- cellule SO-ARM100 ou Panda (moveit2_tutorial officiel) ou cellule UR5e
- MoveIt2 Python API https://moveit.picknik.ai/main/doc/examples/motion_planning_python_api/motion_planning_python_api_tutorial.html
- Connexion à docker container URSim https://innovation.iha.unistra.fr/books/robotique-open-source/page/universal-robot-ros2-driver#bkmrk-installation-du-simu
- Contrôle vrai SO-ARM100
- Contrôle vrai UR5e
- Contrôle local de trajectoire avec MoveIt Servo : téléopération via manette ou asservissement visuel (TOF sensor) https://moveit.picknik.ai/main/doc/how_to_guides/controller_teleoperation/controller_teleoperation.html
- Gazebo et simulation traitement de l'image 2D/3D
- Pour aller plus loin : Cartesian Path Planning, Hybrid Planning, MoveIt Task Constructor (https://moveit.picknik.ai/main/doc/tutorials/pick_and_place_with_moveit_task_constructor/pick_and_place_with_moveit_task_constructor.html , UR10e_welding_demo)
Besoin pour la robotique mobile
Par ordre croissant de complexité :
Pour le déploiement de robots dans l'industrie
Dev Container
https://github.com/robot-mindset
Pour un développement local
- Installer Visual Studio Code
- Installer Docker avec le support de l'accélération graphique
- Installer l'extension
Dev Container
Pour un développement sur un serveur/PC distant
- Installer le pack d'extensions
Remote Development
Lancer le conteneur de développement :
- Optionnel : se connecter à la machine de développement distante depuis Visual Studio Code
- Ouvrir la Command Palette
Ctrl+Shift+P - Lancer
Remote-SSH: Connect to host... - Configurer la connexion ssh par mot-de-passe ou clé si ce n'a pas encore été fait
- Ouvrir la Command Palette
- Cloner le dépôt https://github.com/rplayground/sandbox
- Lancer
Dev Container: Reopen in Container
https://articulatedrobotics.xyz/tutorials/docker/dev-containers/
Remote-SSH sur machine distante via une machine intermédiaire
https://stackoverflow.com/questions/59456119/ssh-session-within-ssh-session-vs-code
- On veut connecter Visual Studio Code à une machine
MyWorkstationsur un réseau local via un serveur publicMyServerqui est dans ce réseau local - On ajoute la configuration suivante dans
/home/user/.ssh/config
Host MyServer
    HostName adress.server
    User username

Host MyWorkstation
    HostName workstation.adress.within.network.of.the.server
    User usernameInWorkstation
    ProxyJump server.adress
Docker Containers + VSCode
https://github.com/gautz/unistra-aica-practical/tree/main/tmuxinator
https://github.com/ppswaroopa/ros2-dockergen
https://github.com/robot-mindset
Quelques conseils de Ragesh (https://robotair.io/) que j'ai rencontré au Fraunhofer :
https://github.com/athackst/workstation_setup
https://docs.ros.org/en/iron/How-To-Guides/Setup-ROS-2-with-VSCode-and-Docker-Container.html
https://www.allisonthackston.com/articles/vscode-docker-ros2.html
MoveIt2, docker https://fr.slideshare.net/secret/vdPbBCNB3LamRy https://moveit.picknik.ai/main/doc/how_to_guides/how_to_setup_docker_containers_in_ubuntu.html
Ansible
https://github.com/robot-mindset
https://www.linkedin.com/pulse/deploying-ros2-packages-using-ansible-ragesh-ramachandran/
https://blog.robotair.io/best-way-to-ship-your-ros-app-a53927186c35
https://github.com/swarmBots-ipa/ansible_automation
https://github.com/ipa-rar/ros2-playbooks
https://github.com/Laura7089/ros2-ansible
https://github.com/jeremyfix/ros2_ansible_turtlebot
https://github.com/rarrais/ansible-role-ros2
Multipass
https://artivis.github.io/post/2023/multipass_ros_blueprint/
YOCTO
JupyterLab
https://blog.jupyter.org/jupyterlab-ros-3dc9dab7f421
Scripts bash, Cluster SSH
https://github.com/robot-mindset
https://github.com/ROS-French-Users-Group/ros2_bash_deployment_scripts
https://github.com/runtimerobotics/ros2_oneline_install
Scripts de Loïc Cuvillon : https://seafile.unistra.fr/d/50662484c5f641709cd7/
Scripts Gauthier Hentz : https://innovation.iha.unistra.fr/books/robotique-open-source/page/installation-pc-ros2#bkmrk-installation-de-jazz
Discussions
https://discourse.ros.org/t/easy-way-to-distribute-an-instance-of-ubuntu-w-ros-to-students/31824/4
Singularity, Robolaunch, ROSblox https://discourse.ros.org/t/what-environments-do-you-use-for-training-and-courses/26473/6
Python https://discourse.ros.org/t/teaching-with-ros-or-zeroros-at-university/32124
Sources
Déploiement de TP de simulation avec Dev Container
On suppose qu'on veut déployer des TP qui font appel à des environnements de simulation, comme Gazebo ou URSim.
Pour faciliter le déploiement reproductible en général, et en particulier la réutilisation d'environnements de développement fournis par les développeurs, on utilise des conteneurs Docker. On a besoin d'accélération graphique via un GPU pour afficher ces simulations afin de ne pas surcharger le CPU.
Installation de Docker
On peut faire tourner le conteneur Docker sur n'importe quel environnement : Linux, Windows, Mac, ou sur un serveur
Développement local sur Linux avec X11 et pas Wayland
- Installer par exemple Ubuntu 24 ou Linux Mint 22 Mate
- Vérifier que le système de fenêtrage est X11 et pas Wayland
- Installer docker.io : le paquet debian de docker
sudo apt install -y docker.io --install-recommends -
Ajouter votre user au groupe docker, ATTENTION ça lui donne les droits admin
sudo usermod -aG docker $USER - Installer git
sudo apt install git
Développement local sur Windows avec X11 forwarding
- Vérifier les prérequis à WSL2 de votre Windows
- Installer Docker Desktop
- Vérifier que Docker est configuré et fonctionne avec WSL2
- Installer une distribution Linux via WSL2, par exemple Ubuntu 24 depuis le Microsoft Store
- Lancer un Terminal Ubuntu sur WSL2 (taper
ubuntudepuis le menu démarrer) - Installer git
sudo apt install git
Développement sur serveur distant
- Installer une distribution Linux Server, par exemple Yunohost 12
- Installer Docker en mode rootless
- Créer un utilisateur YunoHost, lui donner un accès ssh et les droits appropriés (ne pas l'ajouter au groupe admin YunoHost)
-
NE PAS ajouter votre user au groupe docker, car ça lui donnerait des droits admin
sudo usermod -aG docker $USER - Lancer les commandes
dockeravecsudo
Avec PWA
Ici, on suppose qu'on ne fait pas tourner d'algorithmes qui ont besoin de GPU, type Machine Learning, dans le conteneur.
Une première approche est de séparer la partie calcul CPU de la partie graphique GPU. On fait tourner les calculs dans le conteneur. On fait tourner les applications graphiques dans le navigateur Web de l'hôte via une PWA, par exemple via gzweb pour gazebo. Il nous faut alors un navigateur qui supporte l'accélération graphique des applications Web, seuls Chrome et dérivés supportent le WebGL :
- Installer Chrome sur Windows ou Chromium sur Linux, de préférence depuis le PPA
- Vérifier que WebGL est activé en vérifiant que le cube tourne sur https://get.webgl.org/
L'énorme avantage est que l'environnement de développement Docker n'a pas besoin d'accélération graphique. Pas besoin de perdre du temps à essayer de passer la carte graphique au conteneur. Un serveur sans accélération graphique suffit.
https://github.com/rplayground/sandbox
source /opt/ros/$ROS_DISTRO/setup.bash
source /usr/share/gazebo/setup.sh
GAZEBO_MODEL_PATH=$GAZEBO_MODEL_PATH:$(find /opt/ros/$ROS_DISTRO/share \
  -mindepth 1 -maxdepth 2 -type d -name "models" | paste -s -d: -)
ros2 launch ./launch/security_demo_launch.py \
  use_rviz:=False headless:=True
Pour un développement local
- Installer Visual Studio Code, sur Linux depuis Snap ou le PPA Microsoft Noter que Codium sur Linux ne supporte par l'extension Dev Container nécessaire
- Désactiver la collecte des données :
Settings > Telemetry > Telemetry Level > off - Installer Docker
avec le support de l'accélération graphique, cf. ci-dessus - Installer l'extension
Dev Container. Noter que les extensions nécessaires au développement de ROS seront installées dans le VSCode-Server du container - Sur Windows : Lancer un Terminal Ubuntu sur WSL2 (taper ubuntu depuis le menu démarrer)
- Sur Linux : Lancer un Terminal
- Cloner le dépôt du Dev Container
git clone https://github.com/rplayground/sandbox - Se placer dans le dossier
cd ~/sandbox - Ouvrir le dossier dans Visual Studio Code
code . - Lancer
Dev Container: Reopen in Container
Pour un développement distant sur un serveur/PC
- Installer le pack d'extensions
Remote Development - Se connecter à la machine de développement distante depuis Visual Studio Code
- Ouvrir la Command Palette
Ctrl+Shift+P - Lancer
Remote-SSH: Connect to host... - Configurer la connexion ssh par mot-de-passe ou clé si ce n'a pas encore été fait
- Ouvrir la Command Palette
- Cloner le dépôt https://github.com/rplayground/sandbox
- Ouvrir le dossier sandbox
- Lancer
Dev Container: Reopen in Container
Tester l'installation
- Le dépôt https://github.com/rplayground/sandbox?tab=readme-ov-file#demo fournit un environnement préconfiguré avec
- Les paquets Nav2
- Les paquets turtlebot3_simulations
- Le serveur Gazebo et le client web gzweb
- Des utilitaires pour le démarrage des interfaces graphiques dans le navigateur
- Ouvrir un nouveau Terminal dans VisualStudio Code
- Configurer le Bash et lancer la démo de sécurité :
source /opt/ros/$ROS_DISTRO/setup.bash
source /usr/share/gazebo/setup.sh
GAZEBO_MODEL_PATH=$GAZEBO_MODEL_PATH:$(find /opt/ros/$ROS_DISTRO/share \
  -mindepth 1 -maxdepth 2 -type d -name "models" | paste -s -d: -)
ros2 launch ./launch/security_demo_launch.py \
use_rviz:=False headless:=True- Depuis la palette de commandes
F1, taperTasks: Run Tasket sélectionnerStart Visualizations - Depuis le panneau des Ports, cliquer
Open in Browserpour le port8080et ouvrir le lien dans Chrome/Chromium
Il est possible de lancer d'autres environnements de simulation, par ex. turtlebot3_simulations :
- On choisi le modèle de turtlebot3 et on lance gazebo en mode headless
export ROS_DOMAIN_ID=30 #TURTLEBOT3
export LDS_MODEL=LDS-01
export TURTLEBOT3_MODEL=burger
ros2 launch turtlebot3_gazebo turtlebot3_world.launch.py \
  use_rviz:=False headless:=True
Comprendre les spécificités du container sandbox
- On remarque qu'on est connecté en
rootet que la sandbox est installée dans un workspace d'overlayroot@iha-portrob-1:/opt/overlay_ws/src/sandbox# - Le fichier de configuration du bash
cat /root/.bashrcn'a pas été modifié pour sourcer les exécutables ros - La distribution ROS installée est
echo $ROS_DISTROhumble - A chaque réinitialisation du container et ouverture de nouveau Terminal il faut donc lancer :
source /opt/ros/$ROS_DISTRO/setup.bash source /usr/share/gazebo/setup.sh GAZEBO_MODEL_PATH=$GAZEBO_MODEL_PATH:$(find /opt/ros/$ROS_DISTRO/share \ -mindepth 1 -maxdepth 2 -type d -name "models" | paste -s -d: -) - Que nous dit
devcontainer.json
{
    "name": "Sandbox",
    "image": "ghcr.io/rplayground/sandbox:main",
    // "build": {
    //     "dockerfile": "../Dockerfile",
    //     "context": "..",
    //     "target": "visualizer",
    //     "cacheFrom": "ghcr.io/rplayground/sandbox:main"
    // },
    "runArgs": [
        // "--cap-add=SYS_PTRACE", // enable debugging, e.g. gdb
        // "--ipc=host", // shared memory transport with host, e.g. rviz GUIs
        // "--network=host", // network access to host interfaces, e.g. eth0
        // "--pid=host", // DDS discovery with host, without --network=host
        // "--privileged", // device access to host peripherals, e.g. USB
        // "--security-opt=seccomp=unconfined", // enable debugging, e.g. gdb
    ],
    "workspaceFolder": "/opt/overlay_ws/src/sandbox",
    "workspaceMount": "source=${localWorkspaceFolder},target=${containerWorkspaceFolder},type=bind",
    "onCreateCommand": ".devcontainer/on-create-command.sh",
    "updateContentCommand": ".devcontainer/update-content-command.sh",
    "postCreateCommand": ".devcontainer/post-create-command.sh",
    "customizations": {
        "codespaces": {
            "openFiles": [
                "README.md"
            ]
        },
        "vscode": {
            "settings": {},
            "extensions": [
                "eamodio.gitlens",
                "GitHub.copilot",
                "ms-iot.vscode-ros",
                "streetsidesoftware.code-spell-checker"
            ]
        }
    }
}
- Que nous dit
Dockerfile
Installation de Docker avec accélération graphique
Ici, on peut faire tourner dans le conteneur des algorithmes qui ont besoin de GPU, type Machine Learning.
AMD/Intel sous Linux
NVidia Sous Linux
- Installer le Driver propriétaire NVidia (si les driver proprio n'ont pas été autorisés à l'installation d'Ubuntu)
sudo apt install curl- Installer le Nvidia Container Toolkit
curl -fsSL https://nvidia.github.io/libnvidia-container/gpgkey | sudo gpg --dearmor -o /usr/share/keyrings/nvidia-container-toolkit-keyring.gpg \
  && curl -s -L https://nvidia.github.io/libnvidia-container/stable/deb/nvidia-container-toolkit.list | \
    sed 's#deb https://#deb [signed-by=/usr/share/keyrings/nvidia-container-toolkit-keyring.gpg] https://#g' | \
    sudo tee /etc/apt/sources.list.d/nvidia-container-toolkit.list && \
sudo apt-get update && sudo apt-get install nvidia-container-toolkit- Redémarrer le PC
- Lancer docker avec l'argument
--gpus=allpour tester qu'il a bien accès au GPUdocker run --rm -it --gpus=all nvcr.io/nvidia/k8s/cuda-sample:nbody nbody -gpu -benchmark -
Le résultat suivant indique que la carte graphique dédiée
Nvidia Quadro P620est bien exploitée pour les calculs :
> Windowed mode
> Simulation data stored in video memory
> Single precision floating point simulation
> 1 Devices used for simulation
GPU Device 0: "Pascal" with compute capability 6.1

> Compute 6.1 CUDA device: [Quadro P620]
4096 bodies, total time for 10 iterations: 4.417 ms
= 37.987 billion interactions per second
= 759.750 single-precision GFLOP/s at 20 flops per interaction- Si ça ne s'affiche pas : https://docs.nvidia.com/datacenter/cloud-native/container-toolkit/latest/install-guide.html#configuring-docker
NVidia Sous Linux Public Server (rootless docker)
NVidia Sous Windows
Lancement Dev Container avec accélération graphique
- Ajouter dans
.devcontainer/devcontainer.json
{
    "name": "Sandbox",
    "hostRequirements": {
        "gpu": "optional" // switch on CPU if no (NVidia?) GPU available
    },
    "runArgs": [
        "--gpus=all" // enable NVidia GPU with NVidia driver
        // "--device=/dev/dri" // enable Intel/AMD GPU
}
Avec X11 Forwarding
On peut aussi afficher les fenêtres graphiques des applications qui tournent dans le Container directement sur l'hôte, par ex. gazebo-client
Pour cela il faut :
- Installer dans le conteneur le gestionnaire de fenêtres x11-apps (partie serveur)
- Avoir accès à un gestionnaire de fenêtres X11 sur l'hôte (partie client)
- Configurer correctement l'hôte et le Dev Container pour que le conteneur ait accès au client X11
- Cela peut poser des problèmes de sécurité car le conteneur risque d'avoir accès à tout ce qu'il se passe sur l'écran de l'hôte
On ne peut plus se contenter d'une distribution Linux Serveur type YunoHost pour le développement distant
Les calculs graphiques se font alors dans le container ??
Avec VNC
Ressources
https://articulatedrobotics.xyz/tutorials/docker/dev-containers/