3 - ROS2 - Manipulation Mobile
- Assemblage du Turtlebot et OpenManipulator-X et configuration initiale
- Installation et démarrage du OpenManipulator-X & Turtlebot 3
Assemblage du Turtlebot et OpenManipulator-X et configuration initiale
https://www.classes.cs.uchicago.edu/archive/2022/fall/20600-1/turtlebot_assembly_setup.html
A Word of Caution
This page is NOT intended for student use. This page is designed for course staff to build and maintaing the turtlebots. If you are a student, please ensure you have permission from course staff before making any of the changes detailed on this page to any of the turtlebots.
Setup Checklist
- Turtlebot Assembly Tips
- OpenMANIPULATOR Arm First-Time Configuration
- Connecting the Pi to a Wi-Fi Network
- Attaching/Detaching the OpenMANIPULATOR Arm
Turtlebot Assembly Tips
Turtlebot3
- DO NOT TIGHTEN the screws too much.
- Page 10: When connecting one pair of waffle-plates to another, make that the seams connecting each waffle-plate are parallel to one other.
- Page 17: When attaching the wheels to the dynamixels, do not tighten the screws too much.
- Page 28: Mount the LiDAR further up than the manual specifies so that the arm can fit on (see completed Turtlebots for reference).
OpenMANIPULATOR Arm
- OpenMANIPULATOR Dynamixel 12: when putting the back piece onto the servo, you will need to break off a plastic piece where the cable should be threaded through.
- Make sure the placement of the marking on the servo horns is identical to the diagram PRIOR to screwing anything down onto it.
OpenMANIPULATOR Arm First-Time Configuration
After assembling an OpenMANIPULATOR arm, its servos must first be configured properly before it can be used. By default, all the arm motors are set to the same ID (1) and the wrong baud rate, which causes collisions when trying to detect them.
- Setup OpenCR with Arduino IDE using OpenCR 1.0 manual, “Arduino IDE” section
- Download Dynamixel Wizard 2.0 if not already installed.
- Connect a SINGLE motor (no daisy-chains in the arm) to the OpenCR module and DISCONNECT ALL OTHER MOTORS (the wheel motors!!)
- Open up Dynamixel Wizard 2.0 and update the firmware for that motor by following this tutorial. The arm Dynamixel model is XM430-W350, and the wheel motors are XM430-W210.
- Scan for connected Dynamixels using the “Scan” button on the top menu. If the scan does not turn up any results, you may need to change the scan options in the "Options" menu. By default, an unconfigured arm motor will have ID 1, be on Protocol 2.0, and have a baud rate of 57600 bps.
- Change the ID for the detected motor from 1 to 11/12/13/14/15 (whichever you're doing the procedure for). Click on the “ID” item, and find the ID # you want in the lower right corner. Click it and press “Save”.
- Change the baud rate to 1M (if not already 1M). Click on the “Baud Rate (Bus)” item, and find the 1 Mbps option. Click it and press “Save”.
- Disconnect the motor (both in the wizard by clicking “Disconnect” up top and physically disconnecting from the board) and repeat the steps for the remaining ones.
Attaching/Detaching the OpenMANIPULATOR Arm
Physical Attachment/Detachment
Follow these steps below:
- The arm can be attached and detached by first removing the top layer of the the Turtlebot. There are 10 screws around the perimeter of the top layer that you will need to remove with a Phillips head / cross screwdriver.
- Once the top layer of the Turtlebot is loose, disconnect the cable that is attached to the LiDAR. This cable is multi-colored with several pins.
Note: ONLY remove this LiDAR cable in this step.Once the top layer is fully disconnected, flip the top layer upside-down for easy access.

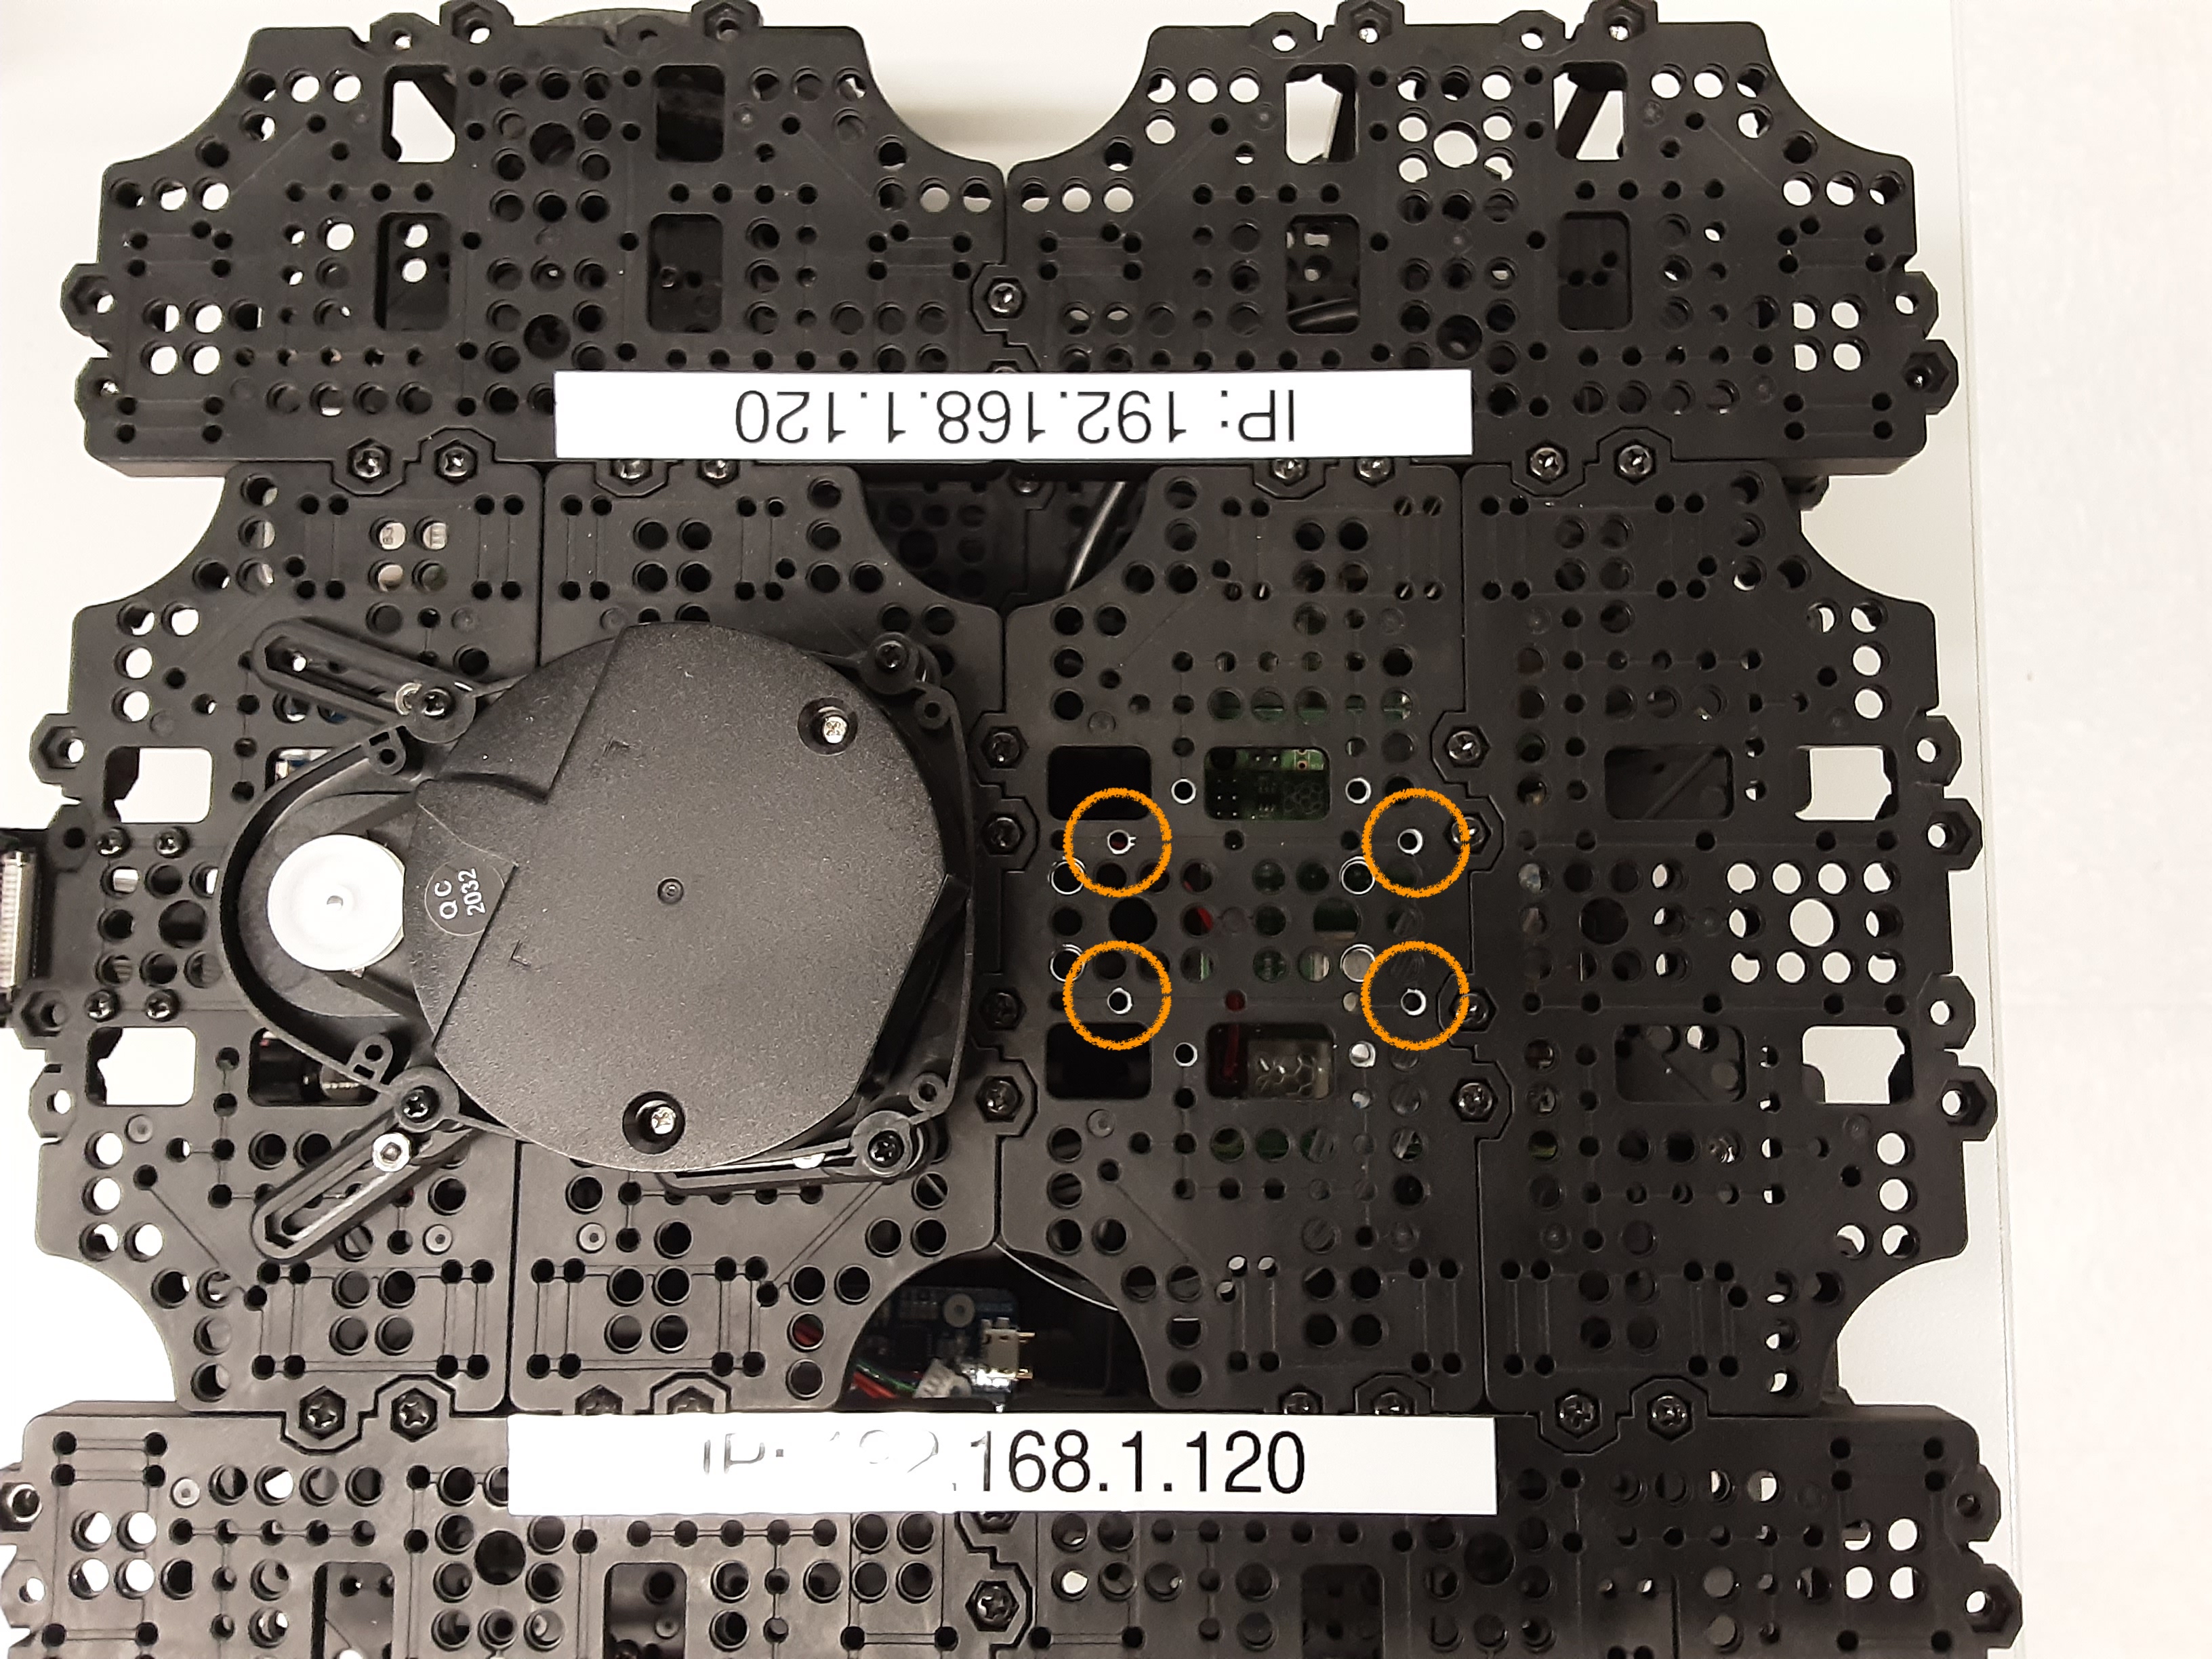
- To connect the arm, there are four screws that you will need to insert through the bottom side of the top layer that connect to Dynamixel #11. The exact location of the screws are marked in the picture below. Use an hex/allen key to secure them.
- Once the arm is securely attached, thread the cable connected to DynaMIXEL #11 through the top layer (if not already threaded) and attach the other end to the remaining 3-pin slot on the OpenCR board. It should be the open slot adjacent to the already occupied slots.
- Reconnect the LiDAR cable and re-screw the top layer onto the robot.
To disconnect the arm, follow the same steps as above, but remove the four screws instead and disconnect the DynaMIXEL.
Updating Firmware and Files
Every time the arm is attached or detached, you will need to reconfigure environment variables and update the OpenCR firmware.
If you are attaching the arm, set the environment variable OPENCR_MODEL=om_with_tb3 and ensure that OPENCR_PORT=/dev/ttyACM0 in the ~/.bashrc file.
$ export OPENCR_PORT=/dev/ttyACM0
$ export OPENCR_MODEL=om_with_tb3
Source the file and update the firmware with:
$ source ~/.bashrc$ cd ~/opencr_update && ./update.sh $OPENCR_PORT $OPENCR_MODEL.opencrIf you are detaching the arm, set the environment variable OPENCR_MODEL=waffle and ensure that OPENCR_PORT=/dev/ttyACM0 in the ~/.bashrc file.
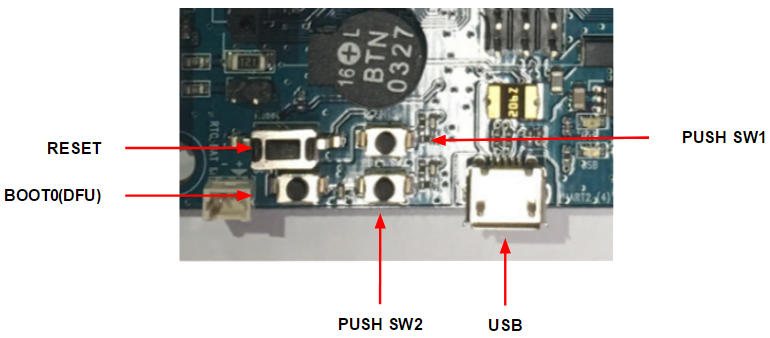
Enter the OpenCR board into firmware recovery mode by pressing and holding SW2, and simultaneously pressing RESET (you will need to remove the top layer of the turtlebot in order to access those OpenCR buttons). If you want to read more about the OpenCR bootloader, please refer to this page in the OpenCR 1.0 manual.
Source the file and update the firmware with:
$ source ~/.bashrc$ cd ~/opencr_update && ./update.sh $OPENCR_PORT $OPENCR_MODEL.opencrCommon Errors During Setup
Firmware Recovery Mode and Device Firmware Update for OpenCR Board
We found the firmware recovery mode not clearly detailed in the Turtlebot3 manual. Here are the steps for firmware recovery:
- Push and hold SW2
- Press RESET
- Release SW2
- Arduino code should upload successfully with
jump_with_fw
Firmware recovery is different from device firmware update (DFU), where the steps are:
- Push and hold BOOT
- Press RESET
- Release BOOT
Troubleshooting /dev/ttyACM0 Connection Issues
If the /dev/ttyACM0 port isn't found or running bringup on the Pi is hanging:
- Make sure
$OPENCR_MODELis correct (wafflefor no arm,om_with_tb3for arm) - Disconnect and reconnect the USB cable connecting the Pi and OpenCR board
- Enter firmware recovery (SW2 + RESET)
- Reinstall the firmware with ./update.sh $OPENCR_PORT $OPENCR_MODEL.opencr (see more detailed steps above in the prior section on attaching/detaching the arm)
- [If the above doesn’t work] Restart
roscore - [If the above doesn’t work] Reupload the sketch using the Arduino IDE (install instructions) in
Examples > OpenCR > Etc > usb_to_dxlto the OpenCR board (which you'll need to directly connect to your computer)
If the hydro rosserial / groovy Arduino error appears:
- Configure the arm motors as described in the previous section on attaching/detaching the arm
- Enter firmware recovery (SW2 + RESET)
- Reinstall the firmware with ./update.sh $OPENCR_PORT $OPENCR_MODEL.opencr
- Set up the wheel motors by uploading the sketch using the Arduino IDE (install instructions) in
Examples > TurtleBot3 > turtlebot3_setup > turtlebot3_setup_motorto the OpenCR board (which you'll need to directly connect to your computer)
Installation et démarrage du OpenManipulator-X & Turtlebot 3
Suivre d'abord https://innovation.iha.unistra.fr/books/robotique-open-source/page/installation-et-demarrage-du-turtlebot-3
Montage et Configuration des Dynamixels
https://www.classes.cs.uchicago.edu/archive/2022/fall/20600-1/turtlebot_assembly_setup.html
- Installer Arduino IDE :
sudo apt install arduino - https://emanual.robotis.com/docs/en/parts/controller/opencr10/#install-on-linux
- Connecter OpenCR https://emanual.robotis.com/docs/en/platform/turtlebot3/manipulation/#arduino-ide
- Installer Dynamixel Wizard https://emanual.robotis.com/docs/en/software/dynamixel/dynamixel_wizard2/
- Lancer Dynamixel Wizard
cd ~/ROBOTIS/DynamixelWizard2 bash DynamixelWizard2.sh - Si une erreur de dépendance apparait, désinstaller/réinstaller/upgrader dynamixelWizard via l'executable
~/ROBOTIS/DynamixelWizard2/maintenancetool
https://emanual.robotis.com/docs/en/software/dynamixel/dynamixel_wizard2/#uninstall-linux
Pour l'Open-Manipulator
Configurer les dynamixel (baud et ID 11 à 15) https://www.classes.cs.uchicago.edu/archive/2022/fall/20600-1/turtlebot_assembly_setup.html#arm-first-time :
- Connect a SINGLE motor (no daisy-chains in the arm) to the OpenCR module and DISCONNECT ALL OTHER MOTORS (the wheel motors!!)
- Open up Dynamixel Wizard 2.0 and update the firmware for that motor by following this tutorial. The arm Dynamixel model is XM430-W350, and the wheel motors are XM430-W210.
- Scan for connected Dynamixels using the “Scan” button on the top menu. If the scan does not turn up any results, you may need to change the scan options in the "Options" menu. By default, an unconfigured arm motor will have ID 1, be on Protocol 2.0, and have a baud rate of 57600 bps.
- Change the ID for the detected motor from 1 to 11/12/13/14/15 (whichever you're doing the procedure for). Click on the “ID” item, and find the ID # you want in the lower right corner. Click it and press “Save”.
- Change the baud rate to 1M (if not already 1M). Click on the “Baud Rate (Bus)” item, and find the 1 Mbps option. Click it and press “Save”.
- Disconnect the motor (both in the wizard by clicking “Disconnect” up top and physically disconnecting from the board) and repeat the steps for the remaining ones
Pour le Turtlebot
Via Arduino IDE ou DynamixelWizard en s'inspirant de : https://emanual.robotis.com/docs/en/platform/turtlebot3/faq/#setup-dynamixels-for-turtlebot3
- Moteur gauche : ID=1
- Moteur droit : ID=2
- Baud rate : 1M
Test depuis un PC sans la raspberry
Téléopération du OpenManipulator-X seul
Suivre le tutoriel Foxy en remplaçant foxy par humble et foxy-devel par ros2 en utilisant l'interface de communication OpenCR : https://emanual.robotis.com/docs/en/platform/openmanipulator_x/quick_start_guide/
Pour tester le bon fonctionnement du bras et de sa pince, on connecte la carte OpenCR directement à un PC ayant ROS Humble préinstallé :
- Installer et compiler le workspace
sudo apt install ros-humble-rqt* ros-humble-joint-state-publisher
mkdir -p ~/openmanipulator_ws/src/
cd ~/openmanipulator_ws/src/
git clone -b ros2 https://github.com/ROBOTIS-GIT/DynamixelSDK.git
git clone -b ros2 https://github.com/ROBOTIS-GIT/dynamixel-workbench.git
git clone -b ros2 https://github.com/ROBOTIS-GIT/open_manipulator.git
git clone -b ros2 https://github.com/ROBOTIS-GIT/open_manipulator_msgs.git
git clone -b ros2 https://github.com/ROBOTIS-GIT/open_manipulator_dependencies.git
git clone -b ros2 https://github.com/ROBOTIS-GIT/robotis_manipulator.git
cd ~/openmanipulator_ws && colcon build --symlink-install- Corriger le bug de compilation et re-compiler. Dans
src/open_manipulator/open_manipulator_x_controller/src/open_manipulator_x_controller.cpp, lignes 67-68, remplacer :
par :this->declare_parameter("sim");this->declare_parameter("control_period");
this->declare_parameter("sim", false);this->declare_parameter("control_period", 0.010); - Lancer
arduino - Uploader l'exemple
File > Examples > OpenCR > 10.Etc > usb_to_dxlvers OpenCR
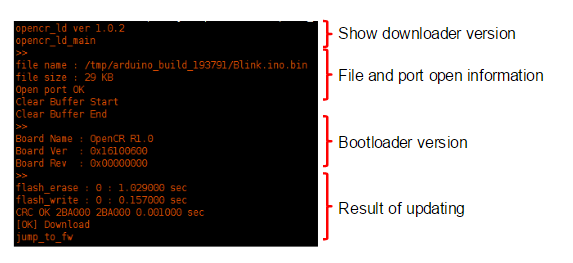
- Si cela réussit, jump_to_fw apparaît, sinon essayer d'uploader une seconde fois
- Lancer le contrôleur du robot. Attention les moteurs vont bouger et se bloquer dans la position initiale
ros2 launch open_manipulator_x_controller open_manipulator_x_controller.launch.py usb_port:=/dev/ttyACM0 - Dans un second terminal, lancer le noeud de téléopération :
ros2 run open_manipulator_x_teleop teleop_keyboard - Piloter le robot dans l'espace Cartésien ou articulaire avec les touches indiquées
Programmation hors-ligne du OpenManipulator-X et TurtleBot3 depuis MoveIt
On suit le tutoriel https://emanual.robotis.com/docs/en/platform/turtlebot3/manipulation/#operate-the-actual-openmanipulator en installant tout ce qui est censé être installé sur le raspberry [SBC]/[TurtleBot3] sur le PC [Remote PC].
- Installer le workspace et compiler :
sudo apt install ros-humble-dynamixel-sdk ros-humble-ros2-control ros-humble-ros2-controllers ros-humble-gripper-controllers ros-humble-moveit
cd ~/turtlebot3_ws/src/
git clone -b humble-devel https://github.com/ROBOTIS-GIT/turtlebot3_manipulation.git
cd ~/turtlebot3_ws && colcon build --symlink-install- Ajouter au
~/.bashrc:
export ROS_DOMAIN_ID=30 #TURTLEBOT3
export LDS_MODEL=LDS-02
export TURTLEBOT3_MODEL=waffle_pi
export OPENCR_PORT=/dev/ttyACM0
export OPENCR_MODEL=turtlebot3_manipulation- AVANT TOUT FLASHAGE DE OPENCR, se mettre en mode debug en
- Rester appuyé sur le bouton SW2
- Appuyer quelques secondes sur RESET
- Relacher RESET
- Relacher SW2
- ATTENTION SI LE MODE DEBUG n'est pas activé, il se peut
jump_fwsoit affiché mais que le flashage ait échoué. - Configurer OpenCR pour turtlebot3_manipulation depuis Arduino
File > Examples > Turtlebot3 ROS2 > turtlebot3_manipulationou avec le prebuild :
rm -rf ./opencr_update.tar.bz2
wget https://github.com/ROBOTIS-GIT/OpenCR-Binaries/raw/master/turtlebot3/ROS2/latest/opencr_update.tar.bz2
tar -xvf opencr_update.tar.bz2
cd ./opencr_update
./update.sh $OPENCR_PORT $OPENCR_MODEL.opencr- Démarrer ROS Control :
ros2 launch turtlebot3_manipulation_bringup hardware.launch.py - Le setup a fonctionné si le robot apparaît dans la bonne configuration dans RViz !
- Dans un second terminal démarrer au choix :
- MoveIt pour la programmation hors-ligne et planification de trajectoire :
ros2 launch turtlebot3_manipulation_moveit_config moveit_core.launch.py- Piloter le robot en bougeant les flèches dans RViz et en cliquant sur "Plan and Execute"
- MoveIt servo
ros2 launch turtlebot3_manipulation_moveit_config servo.launch.py- et la téléopération avec le clavier (dans un 3ème terminal)
ros2 run turtlebot3_manipulation_teleop turtlebot3_manipulation_teleop - Piloter le robot dans l'espace Cartésien ou articulaire avec les touches indiquées
- et la téléopération avec le clavier (dans un 3ème terminal)
- MoveIt pour la programmation hors-ligne et planification de trajectoire :
Configuration OpenCR
Pour le Turtlebot : https://emanual.robotis.com/docs/en/platform/turtlebot3/opencr_setup/#opencr-setup
Pour l'OpenManipulator-X : https://emanual.robotis.com/docs/en/platform/turtlebot3/manipulation/#opencr-setup
Dépendances manquantes :
sudo apt install ros-humble-hardware-interface
ros-humble-ros2-control ?
ros-humble-joint-state-publisher ?
Dépendances manquantes côté Raspberry :
sudo apt install rros-humble-gripper-controllers ros-humble-xacroDépendances manquantes côté PC :
sudo apt install ros-humble-moveit-servoIssues :
https://forum.robotis.com/t/ros-2-foxy-openxmanuipaltor-bringup-issues/2142/9
https://github.com/ROBOTIS-GIT/open_manipulator/issues/212
https://github.com/ROBOTIS-GIT/open_manipulator/issues/209
-----
Auteur: Gauthier Hentz, sur le wiki de l'innovation de l'IUT de Haguenau
Attribution-NonCommercial-PartageMemeConditions 4.0 International (CC BY-NC-SA 4.0)