Bras Robot Arduino ROS2
Bras robot low-cost
Modèles commerciaux fermés
Niryo Ned 2
https://niryo.com/fr/produit/bras-robotise-6-axes/
https://github.com/NiryoRobotics
DAGU Six-servo Robot Arm
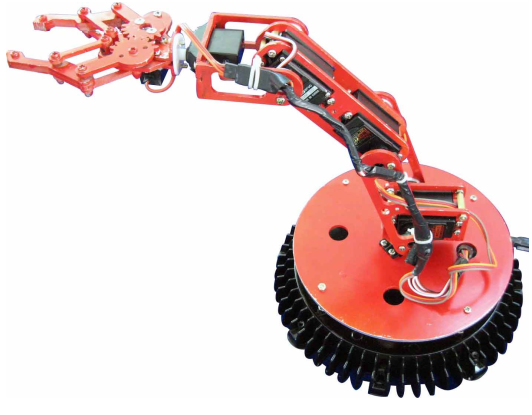
- 5DOF Manipulateur + 1DOF Pince
- 6 servos
- 3x 13 kg.cm torque metal gear, 40.4 * 19.8 * 36 mm, 48g, 0.22s/60°
- 1x 3.2 kg.cm, 39.5 x20.0x35.5mm, 41g, 0.27s/60°
- 2x 2.3 kg.cm, 28 x14x29.8mm, 18g, 0.13/60°
- Carte de contrôle AREXX Intelligence Centre
https://seafile.unistra.fr/d/693101e6046d4819a3af/
https://arexx.com/product/robot-arm/
Modèles Open Source
https://github.com/AntoBrandi/Robotics-and-ROS-2-Learn-by-Doing-Manipulators
Open Manipulator-X
https://emanual.robotis.com/docs/en/platform/openmanipulator_x/specification/#specification
- 5 DOF Manipulateur + 1 DOF Pince
- 6x Dynamixel XM430-W350 https://emanual.robotis.com/docs/en/dxl/x/xm430-w350/
- Carte de contrôle Robotis OpenCR1.0 https://emanual.robotis.com/docs/en/parts/controller/opencr10/
SO-ARM100
https://github.com/TheRobotStudio/SO-ARM100
- 5 DOF Manipulateur + 1 DOF Pince
- 6 servos Feetech STS3215 https://www.feetechrc.com/en/2020-05-13_56655.html
- Waveshare Serial Bus Servo Driver Board https://www.waveshare.com/wiki/Bus_Servo_Adapter_(A)
- OU
- Feetech FE-URT-1 https://www.feetechrc.com/FE-URT1-C001.html
https://github.com/huggingface/lerobot/blob/main/examples/10_use_so100.md
https://github.com/JafarAbdi/ros2_so_arm100
Cartes de contrôle
OpenCR1.0
https://emanual.robotis.com/docs/en/parts/controller/opencr10/
- STM32F746ZGT6 / 32-bit ARM Cortex®-M7 with FPU (216MHz, 462DMIPS)
Reference Manual, Datasheet - Programmer : ARM Cortex 10pin JTAG/SWD connector
USB Device Firmware Upgrade (DFU)
Serial - Digital I/O
- 32 pins (L 14, R 18) *Arduino connectivity
- 5Pin OLLO x 4
- GPIO x 18 pins
- PWM x 6
- I2C x 1
- SPI x 1
- Communication Ports
- USB x 1 (Micro-B USB connector/USB 2.0/Host/Peripheral/OTG)
- TTL x 3 (B3B-EH-A / DYNAMIXEL)
- RS485 x 3 (B4B-EH-A / DYNAMIXEL)
- UART x 2 (20010WS-04)
- CAN x 1 (20010WS-04)
Waveshare Serial Bus Servo Driver Board
https://www.waveshare.com/wiki/Bus_Servo_Adapter_(A)
- Supports connecting to a host or MCU
- up to 253 ST/SC series serial bus servos
- RS485
- UART pour contrôle depuis Arduino, ESP32, STM32 (RX-RX, TX-TX)
- USB pour contrôle via Raspberry, Jetson ou PC
- 9~12.6V voltage input (the input voltage and the servo voltage must be matched)
Feetech FE-URT-1
https://www.feetechrc.com/FE-URT1-C001.html
AREXX Intelligence Centre
https://seafile.unistra.fr/d/693101e6046d4819a3af/
- atmega168 MCU
- RS232
- default baud rate is 115.2k
- Wifi wireless control reserve the ISP downloaded, you can download the MCU controller program using the STK500 ISP cable

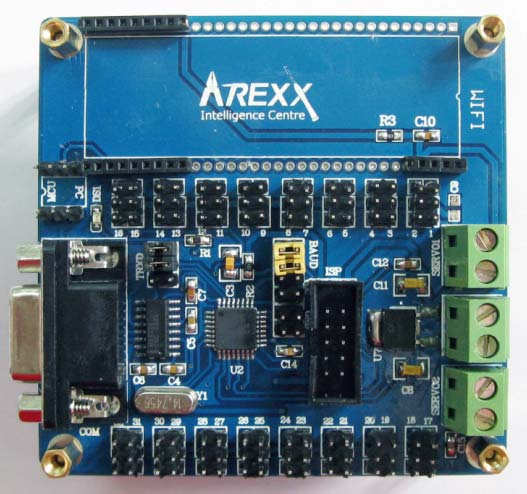
- dual - Power Supply
- 6 ~ 12 V SCM power
- 4.8 ~ 6 V, 1.2A servo motor power [servo motor power supply Road 1-16 respectively, a 17-32 road supply port])
Servomoteurs
Dynamixel XM430-W350
https://emanual.robotis.com/docs/en/dxl/x/xm430-w350/
- 4.1 [N.m] (at 12.0 [V], 2.3 [A])
- 46 [rev/min] (at 12.0 [V])
- 10.0 ~ 14.8 [V]
- Operating Modes
- Current Control Mode
- Velocity Control Mode
- Position Control Mode (0 ~ 360 [°])
- Extended Position Control Mode (Multi-turn)
- Current-based Position Control Mode
- PWM Control Mode (Voltage Control Mode)
- baud rate 9,600 [bps] ~ 4.5 [Mbps]
- TTL Half Duplex Asynchronous Serial Communication with 8bit, 1stop, No Parity
- RS485 Asynchronous Serial Communication with 8bit, 1stop, No Parity
Feetech STS3215
https://www.feetechrc.com/en/2020-05-13_56655.html
Pilotage des servomoteurs : TTL, RS232, RS485
Modes de contrôle des servomoteurs
Regarder la classification des constructeurs permet de se rendre compte des différentes manières de piloter un servomoteur :
- Feetech https://www.feetechrc.com/
- Robotis :
Cela va donc du contrôle PWM jusqu'aux bus et protocoles industriels :
- Servos de modélisme asservis en position "servo 180°" ou en vitesse "servo 360°" via signal PWM
- Feetech "PWM series servo" https://www.feetechrc.com/pwm%20series%20servo.html
- https://arduino.blaisepascal.fr/conversion-numeriqueanalogique-pwm/
- https://arduino.blaisepascal.fr/communication-2/
- https://arduino.blaisepascal.fr/premiers-pas/faire-tourner-les-servos-2/
- https://arduino.blaisepascal.fr/servo-suiveur/
- https://arduino.blaisepascal.fr/les-servomoteurs/
- https://arduino.blaisepascal.fr/controle-dun-servomoteur/
- Feetech "PWM series servo" https://www.feetechrc.com/pwm%20series%20servo.html
- Servos pédagogiques Dynamixel "série X" ou Feetech "Smart Serial Bus Servo"
- TTL, ex. Feetech STS3235
- RS485, ex. Feetech SMS..
- TTL, ex. Feetech STS3235
- Servos professionnels Dynamixel "série P" ou Feetech "Modbus RTU Series Servo", par ex.
Introduction au contrôle PLC
https://celka.fr/ocw/plc-control/modbus/intro-modbus/intro/
Protocoles de communication
Dynamixel :
- Dynamixel Protocol 2.0 https://emanual.robotis.com/docs/en/dxl/protocol2/
- Modbus RTU pour les Dynamixel Pro (PH, RH, PM) https://emanual.robotis.com/docs/en/dxl/p/ph42-020-s300-r/#protocol-type13
Feetech :
- Modbus RTU pour les modèles : https://www.feetechrc.com/modbus-rtu%20series%20servo.html
- Exemple servo 24V 24kg https://www.feetechrc.com/24v-24kgcm-modbus-rtu%E8%88%B5%E6%9C%BA.html
- Exemple servo 24V 24kg https://www.feetechrc.com/24v-24kgcm-modbus-rtu%E8%88%B5%E6%9C%BA.html
https://esp32io.com/tutorials/esp32-rs485
SO-ARM100
LeRobot sur Ubuntu
Installation
- Installer Miniconda pour Linux : l'environnement de développement Python
wget https://repo.anaconda.com/miniconda/Miniconda3-latest-Linux-x86_64.sh
# Vérifier que la clé SHA256 de Miniconda3-latest-Linux-x86_64.sh ici : https://repo.anaconda.com/miniconda/ correspond à :
sha256sum ~/Miniconda3-latest-Linux-x86_64.sh
bash ~/Miniconda3-latest-Linux-x86_64.sh
source ~/.bashrc- Créer et activer l'environnement Conda
conda create -y -n lerobot python=3.10
conda activate lerobot
git clone https://github.com/huggingface/lerobot.git ~/lerobot
conda install ffmpeg -c conda-forge
cd ~/lerobot && pip install -e ".[feetech]"
Ne pas activer conda au démarrage : conda config --set auto_activate_base false
Ne pas configurer le shell pour initialiser conda au démarrage : conda init --reverse $SHELL
Configurer les servomoteurs
La carte FE-URT-1 fournie par Feetech n'est pas détectée à cause d'un conflit avec un paquet de brail. On le désinstalle :
sudo apt-get autoremove brlttyhttps://askubuntu.com/questions/1321442/how-to-look-for-ch340-usb-drivers/1472246#1472246
https://github.com/huggingface/lerobot/blob/main/examples/10_use_so100.md#c-configure-the-motors
- Brancher la carte
- Trouver l'interface USB sur laquelle est branchée la carte, par ex.
/dev/ttyACM0
python lerobot/scripts/find_motors_bus_port.py
- Changer les droits sur le interfaces USB
sudo chmod 666 /dev/ttyACM0
sudo chmod 666 /dev/ttyACM1- Ouvrir Codium > File > Open Folder >
admin_ros/lerobot - Modifier le fichier de config
gedit ~/lerobot/lerobot/common/robot_devices/robots/configs.py
- Chercher la config du So100 en ligne 436
class So100RobotConfig(ManipulatorRobotConfig): - Remplacer
port="/dev/tty.usbmodem58760431091",pour leleader_arms(L446) et lefollower_arms(L463) par le port découvert - Brancher les servos un à un à la carte puis lancer le script d'initialisation, en incrémentant l'ID à chaque fois :
python lerobot/scripts/configure_motor.py \
  --port /dev/tty.usbmodem58760432961 \
  --brand feetech \
  --model sts3215 \
  --baudrate 1000000 \
--ID 1- Au fur et à mesure les brancher en série et/ou noter l'ID sur le moteur
Construction et assemblage mécanique
- Suivre le guide d'assemblage
https://github.com/huggingface/lerobot/blob/main/examples/10_use_so100.md
ROS2 et MoveIt2
Installer les paquets ROS2 du SO-ARM100 :
- Cloner le paquet dans un workspace ROS2 https://github.com/JafarAbdi/ros2_so_arm100
- Cloner le submodule https://github.com/TheRobotStudio/SO-ARM100 dans
so_arm100_description/SO-ARM100(https://www.freecodecamp.org/news/how-to-use-git-submodules/) - Ou simplement :
mkdir -p ~/ws_so_arm100/src
cd ~/ws_so_arm100/src
git clone --recurse-submodules https://github.com/JafarAbdi/ros2_so_arm100
cd ~/ws_so_arm100
sudo rosdep init
rosdep update && rosdep install --ignore-src --from-paths src -y
colcon build --symlink-install # dans une VM ajouter --parallel-workers 1
source install/setup.bash
ros2 launch so_arm100_moveit_config demo.launch.py hardware_type:=mock_components # hardware_type:=real for running with hardware
Tester la démo en simulation :
- Lancer un des scripts : https://github.com/JafarAbdi/ros2_so_arm100?tab=readme-ov-file#usage