Robotique Open Source
Sauf mention contraire, le contenu de ce wiki est placé sous les termes de la licence suivante : CC Attribution-Non Commercial-Share Alike 4.0 International Attribution - Pas d’Utilisation Commerciale - Partage dans les Mêmes Conditions 4.0 International https://creativecommons.org/licenses/by-nc-sa/4.0/deed.fr
- 1 - ROS2 - Démarrage
- Installation PC ROS2
- Tutoriels de base
- Découverte d'Ubuntu Linux et son Terminal Bash
- Usage avancé du bash Linux
- Déploiement de ROS2
- Déploiement de TP de simulation avec Dev Container
- 2 - ROS2 - Robotique mobile
- Turtlesim et modèle de Dubins
- TurtleBot3 - Bases en Simulation
- TurtleBot3 - Piloter le Robot
- Calibration de la caméra
- Suivi de ligne ROS2 Humble
- Behavior Trees Demo
- Installation et démarrage du Turtlebot 3
- 3 - ROS2 - Manipulation Mobile
- Assemblage du Turtlebot et OpenManipulator-X et configuration initiale
- Installation et démarrage du OpenManipulator-X & Turtlebot 3
- 4 - ROS2 - Manipulation Cobot
- Universal Robot ROS2 Driver
- Commander un robot UR avec le driver ROS2
- Programmer un robot avec MoveIt2 - Jumeau Numérique
- Manipulation avancée avec AICA - déploiement Cloud
- Manipulation avancée avec AICA - déploiement on Premise
- Roomba ROS2
- Bras Robot éducatif- Arduino, ROS2
- Etat de l'art Bras robot low-cost
- SO-ARM100 - Robotique éducative
- ROS2 avec SO-ARM101
- Pilotage des servomoteurs : TTL, RS232, RS485
- Transmission TTL et protocole RS485
- Introduction à Modbus
- 0 - Robotique et physical AI
- IA robotique - Architectures pour l'apprentissage profond
- Banc de machine learning avec SO-ARM101
- Assembler un PC d'IA en 2026
- Installation de machine avec RT Kernel et accélération graphique
- Machine Learning LeRobot avec SO-ARM101
- Démo AICA YOLO Portes Ouvertes 2026
- Machine Learning LeRobot avec SO-ARM101 - Legacy
1 - ROS2 - Démarrage
Installation PC ROS2
ROS est un Middleware Open Source pour développer des applications robotiques. Originellement développé sous Linux (Ubuntu), il est maintenant disponible sur plusieurs systèmes d'exploitation dont Debian et Windows.
Installation des prérequis et liens importants
Pour des raisons de stabilité et légèreté du système, il y a tout à penser que les déploiements de ROS dans des milieux industriels se font (robotique autonome et mobile) et se feront à l'avenir sur Ubuntu et de plus en plus Debian. L'industrie des serveurs a déjà largement adopté Debian pour sa stabilité et sa modularité. C'est pourquoi plutôt que d'apprendre la ligne de commande Windows, nous recommandons d'apprendre la ligne de commande Bash, utilisée dans Ubuntu/Debian. Pour cela, il faut installer un système (noyau) Linux, plusieurs options s'offrent à nous:
- Machine virtuelle
- Windows subsystem for Linux (WSL2)
- Machine virtuelle Linux, par exemple via VirtualBox
- Machine physique
- dual-boot Windows-Ubuntu -> Installation en quelques clics via une clé USB Live
- PC sous Ubuntu 22.04
- Pour une tour : Branchement d'un SSD SATA dédié au lieu du SSD Windows
- Branchement d'un SSD USB3 type Transcend ESD310C
Notes importantes pour les installations virtuelles (deux premières options d'installation) :
- Ces installations sont suffisantes pour effectuer des simulations et du développement tant qu'il n'y a pas de Hardware à tester. VirtualBox fonctionne à peu près pour des TPs avec une VM URSim mais c'est loin d'être optimal (plantages,...)
- L'accélération graphique n'est pas supportée par la carte graphique (GPU) mais par le processeur (CPU) (voir ce bug)
- un PC avec 32Go de RAM est recommandé si des composants imposants de ROS doivent être compilés, par exemple pour utiliser la version de développement MoveIt 2 Rolling. En effet Windows consomme à lui seul près de 4-8Go, Ubuntu >2Go et la compilation >4Go, on peut vite atteindre la saturation. 16Go peuvent suffire mais il faudra compiler sans parallélisation, et fermer des applications lourdes dans Windows comme Firefox.
Ubuntu via Windows SubSystem for Linux (WSL2)
WSL2 installe une machine virtuelle avec le noyau Linux complet, supporté et managé par Microsoft Windows. Il n'y a pas besoin de droits administrateur car le logiciel est disponible dans le store Windows.
Prérequis :
Installation de Ubuntu 22 :
- Ouvrir Windows Store
- Rechercher et installer
Ubuntu(c'est la version LTS actuelle qui sera installée, en ce moment 22.04.X) - Depuis le menu démarrer Windows, Lancer l'application
Ubuntu. Un Terminal s'ouvre (ligne de commande Linux Bash) - Définir l'utilisateur principal, par exemple
ros2et un mot de passe (8 caractères mini, majuscule, minuscule, chiffre, caractère spécial). - Mettre à jour Ubuntu
sudo apt update
sudo apt upgradeDepuis Windows, pour éteindre les Machines Virtuelles Ubuntu et ainsi libérer la mémoire RAM affectée :
- Lancer l'application
Windows PowerShell wsl --shutdownAutres commandes WSL depuisWindows PowerShell:wsl --status: devrait retournerDistribution par défaut : Ubuntu,Version par défaut : 2(WSL2)wsl --list(ouwsl -l -v) : liste les Machines Virtuelles Linux installées via WSL (et la version WSL utilisée)
Docker dans une VM WSL2
Pour utiliser docker dans une VM WSL2, par exemple Ubuntu :
-
Désinstaller toute version précédente de docker installée sur votre VM Ubuntu. Dans Terminal(Ubuntu) :
sudo apt remove docker*
-
Ajouter votre utilisateur au groupe docker
sudo groupadd dockersudo usermod -aG docker $USER
-
Passer sur une session
administrateur_windows -
Installer Docker Desktop for Windows https://docs.docker.com/desktop/windows/wsl/#turn-on-docker-desktop-wsl-2c
- Cocher WSL2 (devrait être coché par défaut si votre config WSL2 est OK)
-
Ajouter votre utilisateur_windows au groupe docker
-
Dans CMD/Powershell :
net localgroup docker-users "utilisateur_windows" /ADD
-
-
Repasser sur votre session
utilisateur_windows -
L'intégration Docker-WSL est activée sur la distribution WSL par défaut, normalement Ubuntu (22)
- pour s'en assurer,
wsl --set-default ubuntu - Au besoin il est possible de l'activer sur une distro spécifique dans Settings > Resources > WSL Integration
- pour s'en assurer,
-
Démarrer Terminal(Ubuntu)
Accélération GPU pour applications graphiques et machine learning
https://docs.docker.com/desktop/features/gpu/
Pour tester si le GPU est bien disponible, lancer la commande suivante dans le Terminal(Ubuntu) :
docker run --rm -it --gpus=all nvcr.io/nvidia/k8s/cuda-sample:nbody nbody -gpu -benchmarkLe résultat suivant indique que la carte graphique dédiée Nvidia Quadro P620 est bien exploitée pour les calculs :
> Windowed mode
> Simulation data stored in video memory
> Single precision floating point simulation
> 1 Devices used for simulation
GPU Device 0: "Pascal" with compute capability 6.1
> Compute 6.1 CUDA device: [Quadro P620]
4096 bodies, total time for 10 iterations: 4.417 ms
= 37.987 billion interactions per second
= 759.750 single-precision GFLOP/s at 20 flops per interactionSinon, regarder https://innovation.iha.unistra.fr/books/robotique-open-source/page/installation-de-machine-avec-rt-kernel-et-acceleration-graphique#bkmrk-gpu
Ubuntu via VirtualBox
Télécharger et installer VirtualBox pour Windows et l'Extension Pack : https://www.oracle.com/virtualization/technologies/vm/downloads/virtualbox-downloads.html
Ubuntu 24 requiert une version de VirtualBox >7.1 https://www.virtualbox.org/ticket/21955
La version 7.1.8 règle des soucis de la version 7.1.6 avec l'USB https://forums.virtualbox.org/viewtopic.php?t=113298
Déployer la VM avec ROS2 préinstallé (grâce aux instructions suivantes dans cette page)
- Télécharger la VM depuis seafile
- Ubuntu 22 ROS Humble Lien public de téléchargement (\Seafile\IHA-IDF\Smart_Prod\Formation_ROS2\UbuntuROS.ova)
- Ubuntu 24 ROS Jazzy : https://seafile.unistra.fr/f/4892e35890b941e388ef/?dl=1
- Lancer VirtualBox
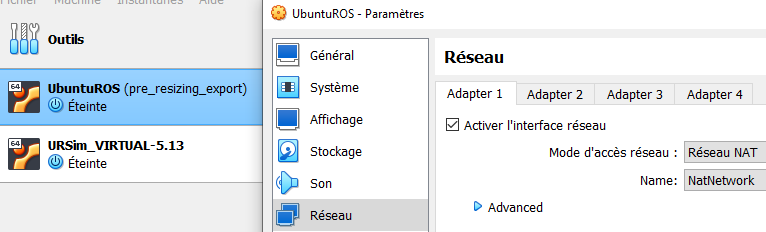
- Importer la VM : Outils -> Importer -> Rechercher le fichier UbuntuROS.ova
- Vérifier et adapter la configuration de la VM en ressources RAM, CPU, GPU et Réseau selon la configuration de votre PC
cf. https://innovation.iha.unistra.fr/books/robotique-open-source/page/installation-pc-ros2#bkmrk-configuration-virtua - Démarrer la VM
- Ignorer l'erreur sur le dossier partagé Linux-Windows
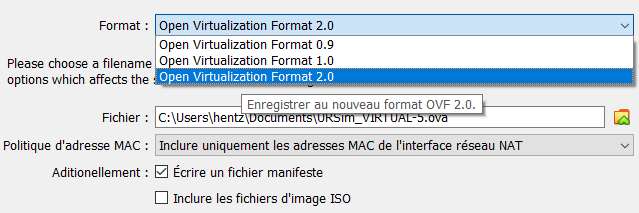
Exportation de VM au format OVF
Le système du TP est maintenu à jour et testé sur un PC Windows. Pour l'exporter sur les PC de salle TP, on veut avoir une image la plus petite possible.
- On commence par nettoyer Ubuntu puis on exporte un fichier
.ova

- Sélectionner le format
OVF 2.0pour une meilleure compressions
Setup pour TP MoveIt2+URSim à l'IUT de Haguenau
La première année j'ai expérimenté avec des PC Windows et VirtualBox :
- Une VM contient Ubuntu 22, ROS et MoveIt
- Une seconde contient Xubuntu 14/16 avec URSim
- Les deux VMs en Réseau NAT
Il faut des machines de guerre, régler finement la quantité de RAM et de coeurs alloués aux VM et à Windows, et malgré cela les VM plantent.
En 2025 je change donc de fusil d'épaule et utilise la salle réseau de l'IUT
- Avec des vieilles tours de 2013 : i5, 8G de RAM, petite carte graphique, double écran, 60G de SSD
- Réseau isolé donc possibilité de mettre OS au choix sur les PC, d'isoler ou non les PC et d'éventuels robots à piloter
Migration VM vers disque physique
Entre 2024 et 2025 je suis passé de TPs en VM VirtualBox vers des PC physiques. Dans les deux cas, je maintiens l'environnement de TP sur VirtualBox de mon PC Windows. Ceci présente l'avantage de pouvoir maintenir des états de machines en fonction du type de TP.
On peut déployer un disque virtuel de VM vers un disque physique :
- Nettoyer l'OS et éventuellement désactiver le SWAP pour encore gagner de l'espace
cf. https://innovation.iha.unistra.fr/books/robotique-open-source/page/installation-pc-ros2#bkmrk-all%C3%A9ger-ubuntu-%28pour - Réduire la taille de la partition via l'application Disks. Celle-ci pourra être agrandie après copie de la VM. Garder quelques Go de marge.
- Démarrer la VM sur une
.isoLive Ubuntu
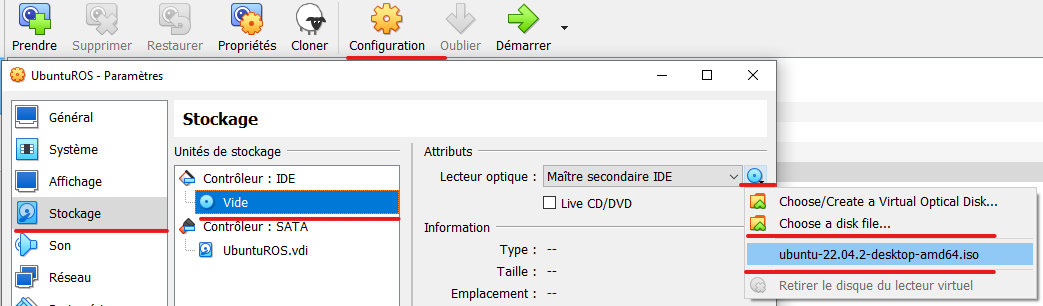
- Brancher un SSD en USB3 au PC (utiliser un adaptateur SATA-USB3 si nécessaire)
- Passer le périphérique USB à la VM
- Avant le démarrage
-
- Pendant que la VM tourne
- Ouvrir l'application Disks pour identifier les disques, en général :
- disque virtuel de la VM :
/dev/sda - SSD branché en USB :
/dev/sdb
- disque virtuel de la VM :
- Ouvrir un Terminal et lancer la commande de copie du disque virtuel vers le SSD physique :
sudo dd if=/dev/sda of=/dev/sdb bs=4096 status=progress && sync- Ouvrir Gparted (depuis une Live USB avec le SSD branché) pour vérifier que la partition principale, généralement
sdb3est bien identifiée comme formatée enext4. Agrandir la partition à la taille désirée. - Si le SSD ne boot pas sur un PC, essayer de réparer le grub avec
boot-repairdepuis une Live USB
Windows 10/11
Une installation native sous Windows 10 avec Visual Studio 2019 (Version Community gratuite) est possible :
Installation de ROS2 Humble
Les distributions stables publiées (pré-compilées) de ROS2 sont nommées par ordre alphabétique. Début 2023, on va installer ROS 2 Humble :
sudo apt update && sudo apt install locales
sudo locale-gen en_US en_US.UTF-8
sudo update-locale LC_ALL=en_US.UTF-8 LANG=en_US.UTF-8
export LANG=en_US.UTF-8
sudo apt install software-properties-common
sudo add-apt-repository universe
sudo apt update && sudo apt install curl
sudo curl -sSL https://raw.githubusercontent.com/ros/rosdistro/master/ros.key -o /usr/share/keyrings/ros-archive-keyring.gpg
echo "deb [arch=$(dpkg --print-architecture) signed-by=/usr/share/keyrings/ros-archive-keyring.gpg] http://packages.ros.org/ros2/ubuntu $(. /etc/os-release && echo $UBUNTU_CODENAME) main" | sudo tee /etc/apt/sources.list.d/ros2.list > /dev/null
sudo apt update && sudo apt upgrade
sudo apt install ros-humble-desktop-full
source /opt/ros/humble/setup.bash
echo 'source /opt/ros/humble/setup.bash' >> ~/.bashrc
Tester l'installation
https://docs.ros.org/en/humble/Installation/Ubuntu-Install-Debians.html#try-some-examples
- Ouvrir un premier Terminal :
ros2 run demo_nodes_cpp talker - Ouvrir un second Terminal :
ros2 run demo_nodes_cpp listener
Installation de Jazzy pour la Navigation et Manipulation
Jazzy est la LTS 2024-2029. Avec UR, Turtlebot3, Nav2, MoveIt2, etc.
## Install ROS
sudo apt update && sudo apt install locales
# Test locale
#locale
sudo locale-gen en_US en_US.UTF-8
sudo update-locale LC_ALL=en_US.UTF-8 LANG=en_US.UTF-8
export LANG=en_US.UTF-8
sudo apt install software-properties-common
sudo add-apt-repository universe
sudo apt update && sudo apt install curl
sudo curl -sSL https://raw.githubusercontent.com/ros/rosdistro/master/ros.key -o /usr/share/keyrings/ros-archive-keyring.gpg
echo "deb [arch=$(dpkg --print-architecture) signed-by=/usr/share/keyrings/ros-archive-keyring.gpg] http://packages.ros.org/ros2/ubuntu $(. /etc/os-release && echo $UBUNTU_CODENAME) main" | sudo tee /etc/apt/sources.list.d/ros2.list > /dev/null
sudo apt update && sudo apt upgrade
sudo apt install ros-dev-tools
sudo apt install ros-jazzy-desktop-full
echo 'source /opt/ros/jazzy/setup.bash' >> ~/.bashrc
source ~/.bashrc
# Test installation (first Terminal)
#ros2 run demo_nodes_cpp talker
# Test installation (second Terminal)
#ros2 run demo_nodes_cpp listener
## Install Nav2 (465Mo)
sudo apt install ros-jazzy-nav2-bringup # depends on ros-jazzy-navigation2
source ~/.bashrc
# Test installation
#ros2 launch nav2_bringup tb3_simulation_launch.py headless:=False
## Install TurtleBot3 Simulation
sudo apt install ros-jazzy-turtlebot3-simulations
echo 'export ROS_DOMAIN_ID=30 #TURTLEBOT3' >> ~/.bashrc
echo 'export TURTLEBOT3_MODEL=burger' >> ~/.bashrc
source ~/.bashrc
# Test installation
#ros2 launch turtlebot3_gazebo turtlebot3_world.launch.py
## Install dependencies to build ROS packages from source
sudo apt install python3-argcomplete python3-colcon-common-extensions python3-colcon-mixin libboost-system-dev build-essential
colcon mixin add default https://raw.githubusercontent.com/colcon/colcon-mixin-repository/master/index.yaml
colcon mixin update default
## Install TurtleBot3 from source
sudo apt install ros-jazzy-hls-lfcd-lds-driver ros-jazzy-turtlebot3-msgs ros-jazzy-dynamixel-sdk libudev-dev
mkdir -p ~/turtlebot3_ws/src && cd ~/turtlebot3_ws/src
#git clone -b humble-devel https://github.com/ROBOTIS-GIT/turtlebot3.git
git clone -b jazzy https://github.com/ROBOTIS-GIT/turtlebot3.git
git clone -b ros2-devel https://github.com/ROBOTIS-GIT/ld08_driver.git
cd ~/turtlebot3_ws/src/turtlebot3
rm -rf turtlebot3_cartographer turtlebot3_navigation2
cd ~/turtlebot3_ws/
colcon build --symlink-install
rosdep update && rosdep install --ignore-src --from-paths src -y
vcs --help
vcs status
sudo apt list ros-jazzy-gazebo-ros-pkgs
sudo apt list ros-jazzy-ros-gz
sudo apt install ros-jazzy-ros-gz
colcon build --symlink-install
ros2 launch nav2_bringup tb3_simulation_launch.py slam:=True nav:=True headless:=False use_sim_time:=True
exit
cd ..
cd turtlebot3_ws/
colcon build --symlink-install --parallel-workers 1
cd src/
git clone -b jazzy https://github.com/ROBOTIS-GIT/turtlebot3_simulations.git
#git clone -b humble https://github.com/ROBOTIS-GIT/turtlebot3_simulations.git
cd ..
colcon build --symlink-install --parallel-workers 1
sudo nano .bashrc
sudo nano ~/.bashrc
ros2 launch turtlebot3_gazebo turtlebot3_world.launch.py
sudo apt list ros-jazzy-turtlebot3-*
sudo apt install ros-jazzy-turtlebot3-fake-node
sudo apt install ros-jazzy-gazebo-msgs
cd src/
sudo apt update && rosdep install -r --from-paths . --ignore-src --rosdistro $ROS_DISTRO -y
rosdep update
sudo apt update && rosdep install -r --from-paths . --ignore-src --rosdistro $ROS_DISTRO -y
sudo curl https://packages.osrfoundation.org/gazebo.gpg --output /usr/share/keyrings/pkgs-osrf-archive-keyring.gpg
echo "deb [arch=$(dpkg --print-architecture) signed-by=/usr/share/keyrings/pkgs-osrf-archive-keyring.gpg] http://packages.osrfoundation.org/gazebo/ubuntu-stable $(lsb_release -cs) main" | sudo tee /etc/apt/sources.list.d/gazebo-stable.list > /dev/null
sudo apt-get update
sudo apt-get install gz-harmonic
cd ..
colcon build --symlink-install --parallel-workers 1
source in
source install/setup.bash
ros2 launch turtlebot3_gazebo turtlebot3_world.launch.py
## Install MoveIt2 Tutorials
mkdir -p ~/ws_moveit/src
cd ~/ws_moveit/src
git clone -b main https://github.com/moveit/moveit2_tutorials
vcs import --recursive < moveit2_tutorials/moveit2_tutorials.repos
sudo apt update && rosdep install -r --from-paths . --ignore-src --rosdistro $ROS_DISTRO -y
cd ..
colcon build --mixin release
source ~/ws_moveit2/install/setup.bash
# Test installation https://github.com/moveit/moveit2_tutorials/blob/humble/doc/examples/move_group_interface/move_group_interface_tutorial.rst
#ros2 launch moveit2_tutorials move_group.launch.py
# Test installation (second Terminal)
#source ~/ws_moveit2/install/setup.bash
#ros2 launch moveit2_tutorials move_group_interface_tutorial.launch.py
# Install UR ROS2 Driver
mkdir -p ur_ws/src
cd ur_ws
git clone -b main https://github.com/UniversalRobots/Universal_Robots_ROS2_Tutorials.git src/ur_tutorials
rosdep update && rosdep install --ignore-src --from-paths src -y
colcon build --symlink-install
source ~/ur_ws/install/setup.bash
# Test installation (first Terminal)
#ros2 launch ur_robot_driver ur_control.launch.py ur_type:=ur5e robot_ip:=yyy.yyy.yyy.yyy use_mock_hardware:=true launch_rviz:=false
# Test installation (second Terminal)
#source ~/ur_ws/install/setup.bash
#ros2 launch ur_moveit_config ur_moveit.launch.py ur_type:=ur5e launch_rviz:=true
# Install UR ROS2 Gazebo
git clone -b ros2 https://github.com/UniversalRobots/Universal_Robots_ROS2_GZ_Simulation.git src/ur_simulation_gz
rosdep update && rosdep install --ignore-src --from-paths src -y
colcon build --symlink-install
source ~/ur_ws/install/setup.bash
# Test installation https://github.com/UniversalRobots/Universal_Robots_ROS2_GZ_Simulation
#ros2 launch ur_simulation_gz ur_sim_moveit.launch.py
# OR
# Test installation (first Terminal)
#ros2 launch ur_simulation_gz ur_sim_control.launch.py
# Test installation (second Terminal)
#source ~/ur_ws/install/setup.bash
#ros2 run ur_robot_driver example_move.py
## Install URSim with docker (only on native Ubuntu PC)
sudo apt install docker-compose
sudo usermod -aG docker $USER
sudo service docker start
# Test installation
#docker run hello-world
#sudo service docker status
sudo usermod -aG docker robot
docker pull universalrobots/ursim_e-series
docker run hello-world
docker pull universalrobots/ursim_e-series
ros2 run ur_robot_driver start_ursim.sh -m ur5e
sudo apt install ros-jazzy-ur
sudo apt list python3-rosdep
sudo rosdep init
rosdep update
sudo apt update
sudo apt dist-upgrade
ros2 run ur_robot_driver start_ursim.sh -m ur5e
sudo apt list python3-colcon*
colcon mixin add default https://raw.githubusercontent.com/colcon/colcon-mixin-repository/master/index.yaml
colcon mixin update default
sudo apt list python3-vcstool
Bonus SOARM-100, VBox addons, etc
1 sudo apt upgrade
2 sudo snap remove firefox
3 sudo apt remove firefox
4 snap list
5 sudo rm -rf /var/cache/snapd/
6 sudo add-apt-repository ppa:mozillateam/ppa
7 sudo nano /etc/apt/preferences.d/mozillateamppa
8 sudo apt update
9 sudo apt install firefox-esr
10 sudo apt upgrade
11 exit
12 sudo apt install terminator
13 sudo apt update && sudo apt install locales
14 # Test locale
15 #locale
16 sudo locale-gen en_US en_US.UTF-8
17 sudo update-locale LC_ALL=en_US.UTF-8 LANG=en_US.UTF-8
18 export LANG=en_US.UTF-8
19 sudo apt install software-properties-common
20 sudo add-apt-repository universe
21 sudo apt update && sudo apt install curl
22 sudo curl -sSL https://raw.githubusercontent.com/ros/rosdistro/master/ros.key -o /usr/share/keyrings/ros-archive-keyring.gpg
23 echo "deb [arch=$(dpkg --print-architecture) signed-by=/usr/share/keyrings/ros-archive-keyring.gpg] http://packages.ros.org/ros2/ubuntu $(. /etc/os-release && echo $UBUNTU_CODENAME) main" | sudo tee /etc/apt/sources.list.d/ros2.list > /dev/null
24 sudo apt update && sudo apt upgrade
25 sudo apt install ros-dev-tools
26 sudo apt install ros-jazzy-desktop-full
27 echo 'source /opt/ros/jazzy/setup.bash' >> ~/.bashrc
28 source /opt/ros/jazzy/setup.bash
29 exit
30 mkdir -p ws_so_arm100/src
31 cd ws_so_arm100/src
32 git clone https://github.com/JafarAbdi/ros2_so_arm100
33 cd ..
34 git submodule init
35 cd src/
36 git submodule init
37 git clone --recurse-submodules https://github.com/JafarAbdi/ros2_so_arm100
38 rm -rf ros2_so_arm100/
39 git clone --recurse-submodules https://github.com/JafarAbdi/ros2_so_arm100
40 cd ..
41 rosdep update && rosdep install --ignore-src --from-paths src -y
42 rosdep init
43 sudo rosdep init
44 rosdep update && rosdep install --ignore-src --from-paths src -y
45 colcon build --symlink-install --parallel-workers 1
46 source install/setup.bash
47 ros2 launch so_arm100_moveit_config demo.launch.py hardware_type:=mock_components
48 exit
49 source install/setup.bash
50 ros2 run rqt_joint_trajectory_controller rqt_joint_trajectory_controller
51 exit
52 cd ws_so_arm100/
53 source install/setup.bash
54 ros2 launch so_arm100_moveit_config demo.launch.py hardware_type:=mock_components
55 ros2 launch so_arm100_moveit_config demo.launch.py hardware_type:=mock_components # hardware_type:=real for running with hardware
56 ros2 launch so_arm100_moveit_config moveit_rviz.launch.py
57 exit
58 ros2 launch so_arm100_description controllers_bringup.launch.py hardware_type:=mock_components # hardware_type:=real for running with hardware
59 source install/setup.bash
60 ros2 launch so_arm100_description controllers_bringup.launch.py hardware_type:=mock_components # hardware_type:=real for running with hardware
61 exit
62 cd ws_so_arm100/
63 source install/setup.bash
64 ros2 launch so_arm100_moveit_config demo.launch.py hardware_type:=mock_components # hardware_type:=real for running with hardware
65 nano src/ros2_so_arm100/so_arm100_description/package.xml
66 nano src/ros2_so_arm100/so_arm100_moveit_config/package.xml
67 rosdep update && rosdep install --ignore-src --from-paths src -y
68 nano src/ros2_so_arm100/so_arm100_moveit_config/package.xml
69 ros2 launch so_arm100_moveit_config demo.launch.py hardware_type:=mock_components # hardware_type:=real for running with hardware
70 exit
71 cd ws_so_arm100/
72 nano src/ros2_so_arm100/so_arm100_moveit_config/package.xml
73 cd
74 sudo apt install htop
75 sudo htop
76 exit
77 sudo apt install python3-argcomplete python3-colcon-common-extensions libboost-system-dev build-essential
78 mkdir -p ~/ws_moveit/src
79 cd ~/ws_moveit/src
80 git clone -b main https://github.com/moveit/moveit2_tutorials
81 vcs import --recursive < moveit2_tutorials/moveit2_tutorials.repos
82 sudo apt update && rosdep install -r --from-paths . --ignore-src --rosdistro $ROS_DISTRO -y
83 cd ..
84 colcon build --mixin release
85 sudo apt install python3-colcon-common-extensions
86 sudo apt install python3-colcon-mixin
87 colcon mixin add default https://raw.githubusercontent.com/colcon/colcon-mixin-repository/master/index.yaml
88 colcon mixin update default
89 colcon build --mixin release --parallel-workers 1
90 source install/setup.bash
91 exit
92 cd ws_moveit/
93 source install/setup.bash
94 ros2 launch moveit2_tutorials demo.launch.py rviz_config:=panda_moveit_config_demo_empty.rviz
95 exit
96 cd ..
97 nano .bashrc
98 cd ur_ws/
99 source install/setup.bash
100 ros2 launch ur_robot_driver test_scaled_joint_trajectory_controller.launch.py
101 ros2 launch ur_moveit_config ur_moveit.launch.py ur_type:=ur5e launch_rviz:=true
102 exit
103 mkdir -p ur_ws/src
104 cd ur_ws/
105 git clone https://github.com/UniversalRobots/Universal_Robots_ROS2_Tutorials.git src/ur_tutorials
106 rosdep update && rosdep install --ignore-src --from-paths src -y
107 git clone -b ros2 https://github.com/UniversalRobots/Universal_Robots_ROS2_GZ_Simulation.git src/ur_simulation_gz
108 rosdep update && rosdep install --ignore-src --from-paths src -y
109 colcon build --symlink-install --parallel-workers 1
110 source install/setup.bash
111 ros2 launch ur_robot_driver ur_control.launch.py ur_type:=ur5e robot_ip:=yyy.yyy.yyy.yyy fake_hardware:=true launch_rviz:=false
112 ros2 launch ur_robot_driver ur_control.launch.py ur_type:=ur5e robot_ip:=yyy.yyy.yyy.yyy mock_hardware:=true launch_rviz:=false
113 ros2 launch ur_robot_driver ur_control.launch.py ur_type:=ur5e robot_ip:=yyy.yyy.yyy.yyy use_mock_hardware:=true
114 ros2 launch ur_robot_driver ur_control.launch.py ur_type:=ur5e robot_ip:=yyy.yyy.yyy.yyy use_mock_hardware:=true launch_rviz:=false
115 exit
116 wget https://gitlab.com/paulcarroty/vscodium-deb-rpm-repo/raw/master/pub.gpg
117 sudo mv pub.gpg /usr/share/keyrings/vscodium-archive-keyring.asc
118 echo 'deb [ signed-by=/usr/share/keyrings/vscodium-archive-keyring.asc ] https://paulcarroty.gitlab.io/vscodium-deb-rpm-repo/debs vscodium main' | sudo tee /etc/apt/sources.list.d/vscodium.list
119 sudo apt update
120 sudo apt install codium
121 snap list
122 df -h
123 sudo rm -rf /var/cache/snapd/
124 sudo apt autoremove --purge snapd gnome-software-plugin-snap
125 rm -fr ~/snap
126 cat <<EOF | sudo tee /etc/apt/preferences.d/nosnap.pref
127 # To prevent repository packages from triggering the installation of Snap,
128 # this file forbids snapd from being installed by APT.
129 # For more information: https://linuxmint-user-guide.readthedocs.io/en/latest/snap.html
130 Package: snapd
131 Pin: release a=*
132 Pin-Priority: -10
133 EOF
134 sudo apt install gnome-software --no-install-recommends
135 sudo apt autoremove --purge
136 exit
137 sudo apt-get autoremove brltty
138 wget https://repo.anaconda.com/miniconda/Miniconda3-latest-Linux-x86_64.sh
139 sha256sum ~/Miniconda3-latest-Linux-x86_64.sh
140 bash ~/Miniconda3-latest-Linux-x86_64.sh
141 nano .bashrc
142 exit
143 conda create -y -n lerobot python=3.10
144 conda activate lerobot
145 git clone https://github.com/huggingface/lerobot.git ~/lerobot
146 conda install ffmpeg -c conda-forge
147 cd ~/lerobot && pip install -e ".[feetech]"
148 nano lerobot/common/robot_devices/robots/configs.py
149 python lerobot/scripts/find_motors_bus_port.py
150 exit
151 sudo reboot now
152 conda config --set auto_activate_base false
153 exit
154 nano .bashrc
155 exit
156 cd ws_so_arm100/
157 ls src/
158 source install/setup.bash
159 sudo apt list librang*
160 sudo apt list libserial*
161 ls /dev
162 ls /dev/tty*
163 exit
164 ./VBoxLinuxAdditions.run
165 sudo ./VBoxLinuxAdditions.run
166 sudo rcvboxadd reload
167 sudo shutdown now
168 sudo rcvoxadd reload
169 sudo apt install mainline
170 sudo add-apt-repository ppa:cappelikan/ppa
171 sudo apt update
172 sudo apt install mainline
173 exit
174 uname -r
175 sudo su
176 uname -r
177 sudo su
178 uname -r
179 sudo su
180 cd /media/admin_ros/VBox_GAs_7.1.8/
181 sudo ./VBoxLinuxAdditions.run
182 sudo rcvboxadd reload
183 df -h
184 sudo apt autoremove --purge
185 df -h
186 ncdu
187 sudo apt install ncdu
188 ncdu
189 rm -rf .cache/pip/
190 ncdu
191 ncdu /
192 sudo apt clean
193 df -
194 df -h
195 sudo nano /etc/fstab
196 sudo reboot
197 df -h
198 ls -l
199 rm -rf Miniconda3-latest-Linux-x86_64.sh
200 free -m
201 ncdu /
202 sudo nano /etc/fstab
203 sudo rm /swap.img
204 exit
205 df -h
206 exit
Installation d'autres versions de ROS2
Pour avoir accès à toutes les dernières fonctionnalités en cours de développement (partiellement publiées), il faut installer ROS2 Rolling, qui est une distribution en développement continu "rolling release". Par exemple en Avril 2023, l'API Python de MoveIt2 et son tutoriel ne sont disponibles que sous rolling.
On peut installer plusieurs versions de ros en parallèle. Chaque version sera installée dans /opt/ros/version. Pour faire cohabiter les deux versions, il faut "sourcer" le bon répertoire avant de lancer un programme ros2 launch ... ou de compiler un workspace colcon build .... Deux options s'offrent à nous :
- Si on bascule souvent de version : commenter les lignes
source /opt/ros/humble/setup.bashen bas du fichier~/.bashrc- Il faudra alors lancer la commande
source /opt/ros/humble/setup.bashà chaque nouvelle ouverture de Terminal Bash.
- Il faudra alors lancer la commande
- Si on travaille principalement avec une version : commenter la ligne correspondant à la version principale
source /opt/ros/humble/setup.bashen bas du fichier~/.bashrclorsqu'on veut utiliser la version secondaire.
Gestion de version avec Ansible
L'idéal serait de gérer l'état des VM/PC de TP avec ansible plutôt que des snapshot VirtualBox
Voir https://innovation.iha.unistra.fr/books/robotique-open-source/page/deploiement-de-ros2
https://github.com/richlamdev/ansible-desktop-ubuntu
Outils utiles
Terminal multi-fenêtres Terminator
- Installer Terminator : c'est un logiciel de Ligne de commande pratique pour programmer avec ROS
- Depuis Windows Store : Rechercher et installer
Terminator (Ubuntu) - Depuis la ligne de commande Linux :
sudo apt install terminator
- Depuis Windows Store : Rechercher et installer
- Depuis le menu démarrer Windows, Lancer
Terminator (Ubuntu)
Visual Studio Codium
Pour éviter d'alourdir la VM avec de la télémétrie Microsoft, on installe la version sans tracker de Visual Studio Code depuis un dépôt debian :
- Lancer la VM VirtualBox ou WSL (
Terminator (Ubuntu)) - Dans Terminator, lancer les commandes suivantes :
wget https://gitlab.com/paulcarroty/vscodium-deb-rpm-repo/raw/master/pub.gpg
sudo mv pub.gpg /usr/share/keyrings/vscodium-archive-keyring.asc
echo 'deb [ signed-by=/usr/share/keyrings/vscodium-archive-keyring.asc ] https://paulcarroty.gitlab.io/vscodium-deb-rpm-repo/debs vscodium main' \
| sudo tee /etc/apt/sources.list.d/vscodium.list
sudo apt update
sudo apt install codium
- Lancer VSCodium dans la VM VirtualBox ou directement depuis Windows, lancer
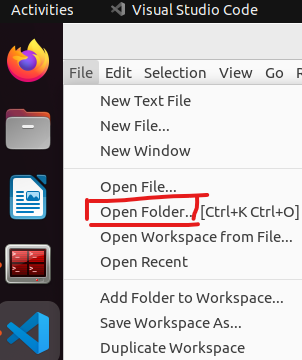
VSCodium (Ubuntu) - Ouvrir le dossier contenant le code source
/srcdu projet dont vous voulez étudier/modifier le code :File --> Open Folder --> ~/ws_moveit/src
Installer Firefox dans WSL
https://askubuntu.com/questions/1444962/how-do-i-install-firefox-in-wsl-when-it-requires-snap-but-snap-doesnt-work
sudo snap remove firefox
sudo apt remove firefox
sudo add-apt-repository ppa:mozillateam/ppa
# Create a new file, it should be empty as it opens:
sudo gedit /etc/apt/preferences.d/mozillateamppa
# Insert these lines, then save and exit
Package: firefox*
Pin: release o=LP-PPA-mozillateam
Pin-Priority: 501
# after saving, do
sudo apt update
sudo apt install firefox-esr
Alléger Ubuntu (pour VM ou clonage)
- Désinstaller snap :
- Vérifier qu'on n'a pas de paquet snap important avec
snap list - Purger snap et tous ses paquets
- Vérifier qu'on n'a pas de paquet snap important avec
sudo rm -rf /var/cache/snapd/
sudo apt autoremove --purge snapd gnome-software-plugin-snap
rm -fr ~/snap
# sudo apt-mark hold snapd
-
- Empêcher snap d'être réinstallé par Ubuntu
cat <<EOF | sudo tee /etc/apt/preferences.d/nosnap.pref
# To prevent repository packages from triggering the installation of Snap,
# this file forbids snapd from being installed by APT.
# For more information: https://linuxmint-user-guide.readthedocs.io/en/latest/snap.html
Package: snapd
Pin: release a=*
Pin-Priority: -10
EOF
-
- Installer le magasin d'applications de gnome sans snap/flatpak
sudo apt install gnome-software --no-install-recommends
- Installer le magasin d'applications de gnome sans snap/flatpak
- Supprimer les paquets apt plus nécessaires
sudo apt autoremove --purge - Supprimer le cache de compilation de VSCode
~/.cache/vscode-cpptools - Supprimer le cache de pip
~/.cache/pip - Supprimer les fichiers de compilation des workspaces qui ne seront pas utilisés en TP. Attention à conserver les paquets qui devront être compilés en TP (en utilisant
colcon build --package-select). - Désactiver le SWAP avec
swapoff -apuis commenter la ligne dans/etc/fstabpuis supprimer le fichier de swap/swap.img - Réduire la taille de la partition via l'application Disks. Celle-ci pourra être agrandie après copie de la VM.
Configuration VirtualBox
Windows consomme à lui seul près de 4-8Go, Ubuntu >2Go et la compilation >4Go, on peut vite atteindre la saturation. Un PC de 16Go peut suffire mais il faudra compiler sans parallélisation, et fermer des applications lourdes dans Windows comme Firefox.
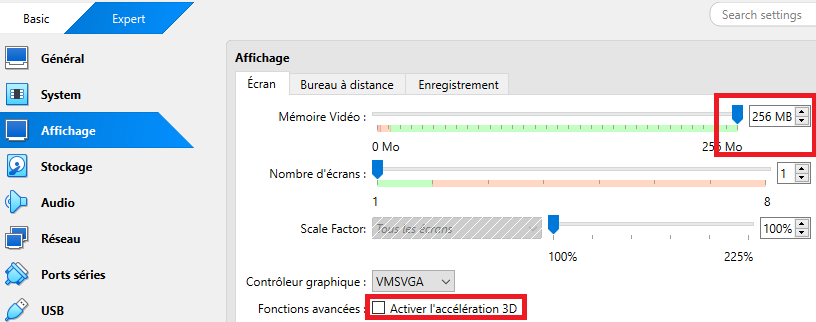
- Vérifier et adapter la configuration de la VM en ressources RAM, CPU, GPU et Réseau selon la configuration de votre PC
- 8GB mini de RAM si vous devez compiler des workspace ROS
- 4 CPU mini. 6-10 CPU si l'accélération graphique ne fonctionne pas et que vous faites du RViz ou Gazebo
Installation des Guest Add-ons pour gestion de l'accélération graphique, du copier-coller entre Windows et la VMhttps://doc.ubuntu-fr.org/virtualbox_additions_invite- A priori la nouvelle façon d'installer les add-on c'est simplement installer
sudo apt install virtualbox-guest-x11dans la VM. Puis démarrer la session Xorg, cf. prochain point.
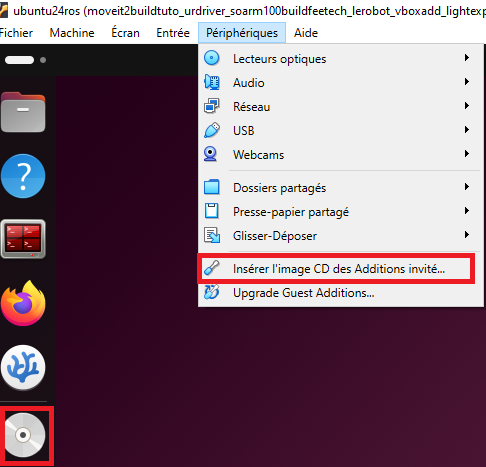
- Démarrage d'une session graphique Xorg qui est plus stable que Wayland sous VirtualBox
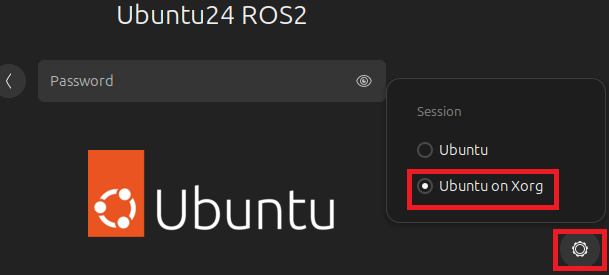
- Désactiver l'accélération graphique qui n'est pas bien supportée sous Ubuntu 24.04 avec VirtualBox 7.1.7
https://www.virtualbox.org/ticket/21955
https://forums.virtualbox.org/viewtopic.php?t=111676
Même passer au kernel 6.3 qui semblait non problématique n'a pas réglé le soucis
Astuce en cas de soucis suite à màj VirtualBox : https://forums.virtualbox.org/viewtopic.php?t=12692
- Supprimer les Extensions Pack
- Désinstaller
- Réinstaller
Sources
-----
Auteur: Gauthier Hentz, sur le wiki de l'innovation de l'IUT de Haguenau
Attribution-NonCommercial-PartageMemeConditions 4.0 International (CC BY-NC-SA 4.0)
Tutoriels de base
Pour comprendre les concepts de ROS2 par la pratique, il existe des tutoriels pour débutant. Ils reposent sur la simulation d'un robot mobile à deux roues principales développé par les développeurs de ROS en 2010 : Turtlebot. Le TurtleBot 3 est vendue par Robotis et peut être couplé à un bras manipulateur 5 axes OpenMANIPULATOR-X. Il est possible de simuler des applications de manipulation mobile avec Gazebo.
Pour réaliser les tutoriels de base, il nous faut un environnement de développement, deux options :
- Une machine virtuelle (VM) VirtualBox, ou disponible au téléchargement ici
- Le plus simple et rapide pour démarrer
- Si on n'a pas de Hardware ou qu'on ne souhaite travailler qu'en simulation
- Une installation simple ou dual-boot sur un PC
- Il faut alors installer de zéro
- Indispensable si on veut travailler avec du Hardware
Supposons que vous avez installé et testé votre environnement comme celui de la VM.
Connexion à la VM
- nom : ubuntu22ros2
- utilisateur :
etudiant - mdp : département de l'IUT
Nous pouvons directement passer aux tutoriels sur les outils ROS 2 en ligne de commande :
Ces premiers tutoriels ne nécessitent qu'une installation basique de ROS 2, on n'y regarde pas le code source.
Ensuite on passe aux tutoriels sur les bibliothèques clientes de ROS 2 en C++ et Python :
- Using
colconto build packages - Creating a workspace
- Creating a package
- Writing a simple publisher and subscriber (C++) --> Correction
- Writing a simple publisher and subscriber (Python)
- Writing a simple service and client (C++)
- Writing a simple service and client (Python)
- Creating custom msg and srv files
Ces tutoriels vous engagent à copier et analyser du code source en C++ et Python. Les fichiers créés sont placés dans le dossier de travail (workspace) /home/etudiant/ros2_ws/src, à ouvrir avec Visual Studio Code :
Vous trouverez des fichiers de correction commentés dans ros2_ws/src/cpp_pubsub/src/, en particulier :
- publisher_member_function.cpp
- subscriber_member_function.cpp
Pour les tester il faut lancer :
cd ~/ros2_ws
colcon build --packages-select cpp_pubsub
source install/setup.bash
ros2 run cpp_pubsub talkerLe noeud se met à publier/parler :
[INFO] [minimal_publisher]: Publishing: "Hello World: 0" [INFO] [minimal_publisher]: Publishing: "Hello World: 1" [INFO] [minimal_publisher]: Publishing: "Hello World: 2" [INFO] [minimal_publisher]: Publishing: "Hello World: 3" [INFO] [minimal_publisher]: Publishing: "Hello World: 4"
Puis dans un second Terminal :
ros2 run cpp_pubsub listener
Le noeud se met à écouter :
[INFO] [minimal_subscriber]: I heard: "Hello World: 10" [INFO] [minimal_subscriber]: I heard: "Hello World: 11" [INFO] [minimal_subscriber]: I heard: "Hello World: 12" [INFO] [minimal_subscriber]: I heard: "Hello World: 13" [INFO] [minimal_subscriber]: I heard: "Hello World: 14"
Tapez Ctrl+C dans chaque Terminal pour arrêter les noeuds ("stop spinning").
-----
Auteur: Gauthier Hentz, sur le wiki de l'innovation de l'IUT de Haguenau
Attribution-NonCommercial-PartageMemeConditions 4.0 International (CC BY-NC-SA 4.0)
Découverte d'Ubuntu Linux et son Terminal Bash
Navigating the Ubuntu GUI
In this exercise, we will familiarize ourselves with the graphical user interface (GUI) of the Ubuntu operating system.
Task 1: Familiarize Yourself with the Ubuntu Desktop
At the log-in screen, click in the password input box, enter rosindustrial for the password, and hit enter. The screen should look like the image below when you log in:
There are several things you will notice on the desktop:
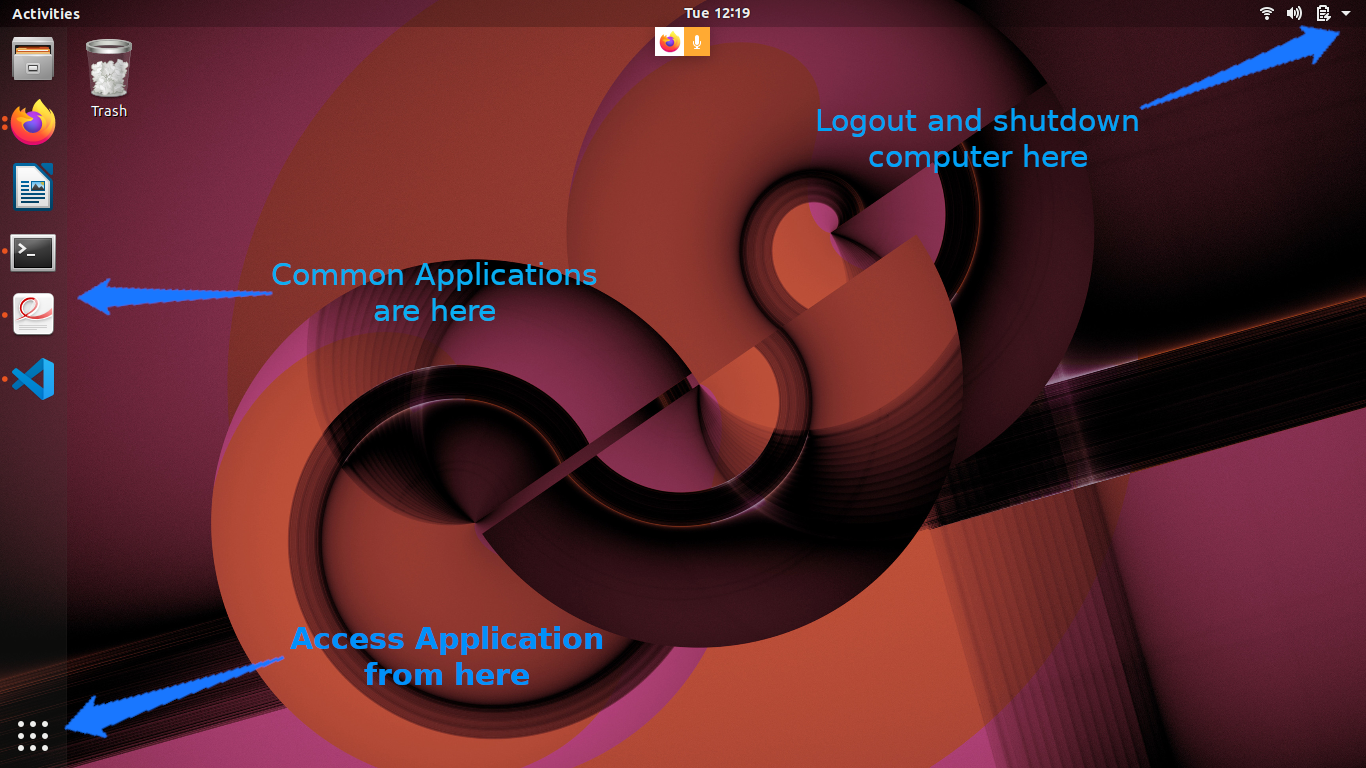
-
The gear icon on the top right of the screen brings up a menu which allows the user to log out, shut down the computer, access system settings, etc…
-
The bar on the left side shows running and “favorite” applications, connected thumb drives, etc.
-
The top icon is used to access all applications and files. We will look at this in more detail later.
-
The next icons are either applications which are currently running or have been “pinned” (again, more on pinning later)
-
Any removable drives, like thumb drives, are found after the application icons.
-
If the launcher bar gets “too full”, clicking and dragging up/down allows you to see the applications that are hidden.
-
To reorganize the icons on the launcher, click and hold the icon until it “pops out”, then move it to the desired location.
Task 2: Open and Inspect an Application
Click on the filing-cabinet icon in the launcher. A window should show up, and your desktop should look like something below:
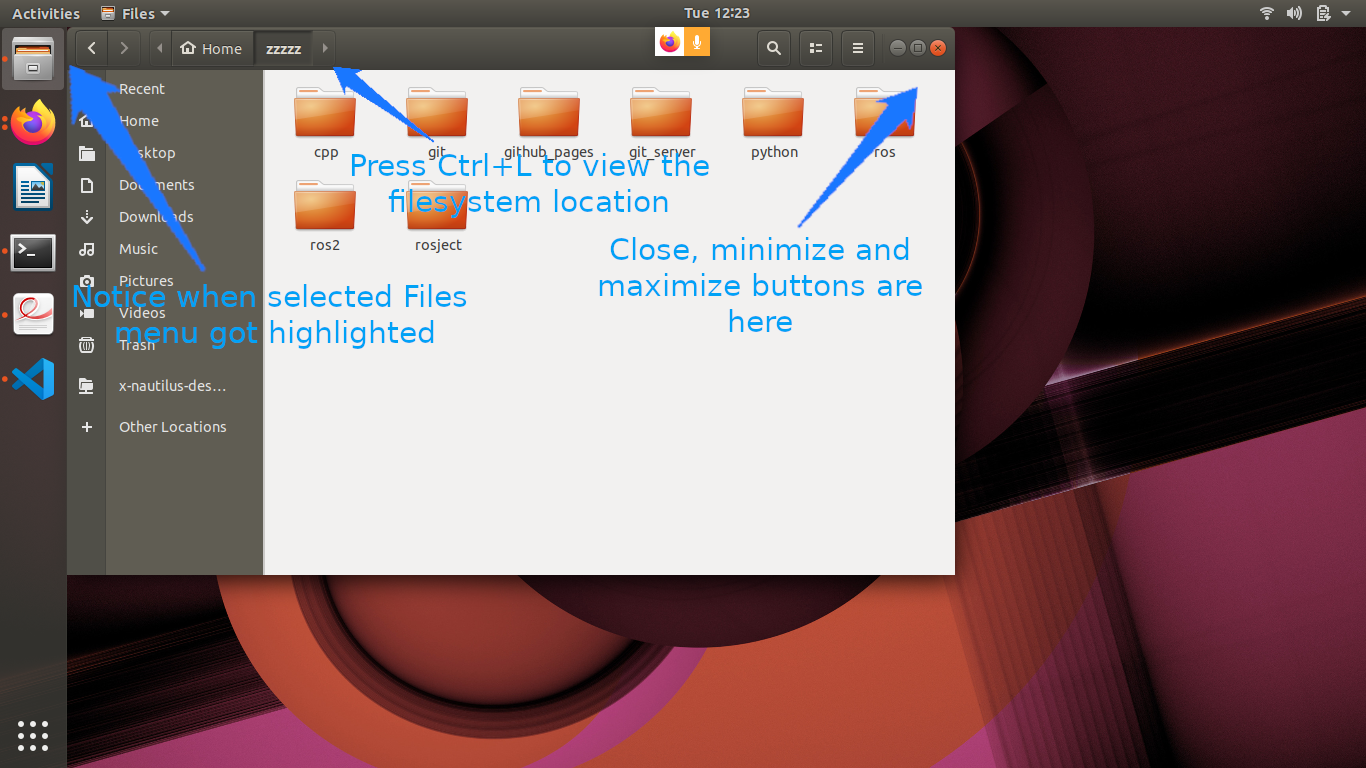
Things to notice:
-
The close, minimize, and maximize buttons typically found on the right-hand side of the window title bar are found on the left-hand side.
-
The menu for windows are found on the menu bar at the top of the screen, much in the same way Macs do. The menus, however, only show up when you hover the mouse over the menu bar.
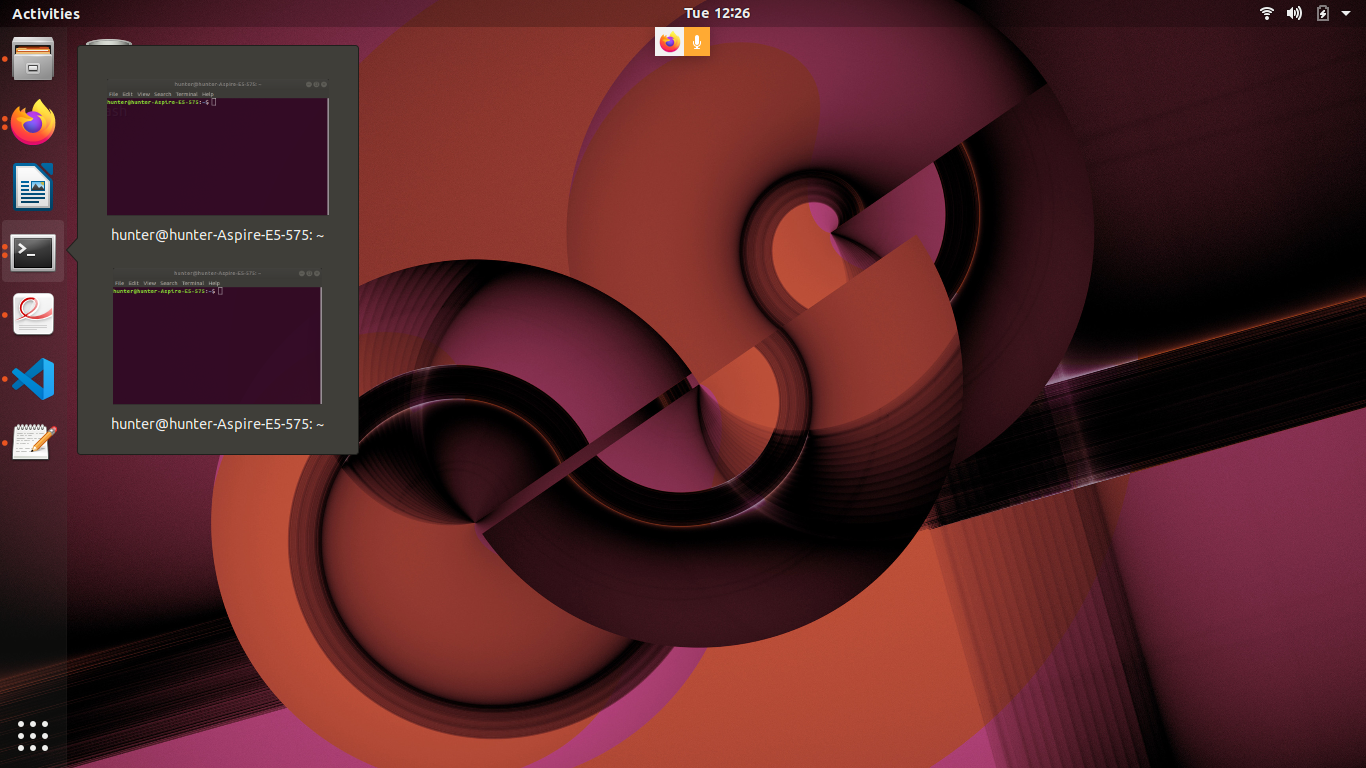
-
Notice that there are menu highlights of the folder icon. The dots on the left show how many windows of this application are open. Clicking on these icons when the applications are open does one of two things:
-
If there is only one window open, this window gets focus.
-
If more than one are open, clicking a second time causes all of the windows to show up in the foreground, so that you can choose which window to go to (see below):
Task 3: Start an Application & Pin it to the Launcher Bar
Click on the launcher button (top left) and type gedit in the search box. The “Text Editor” application (this is actually gedit) should show up (see below):
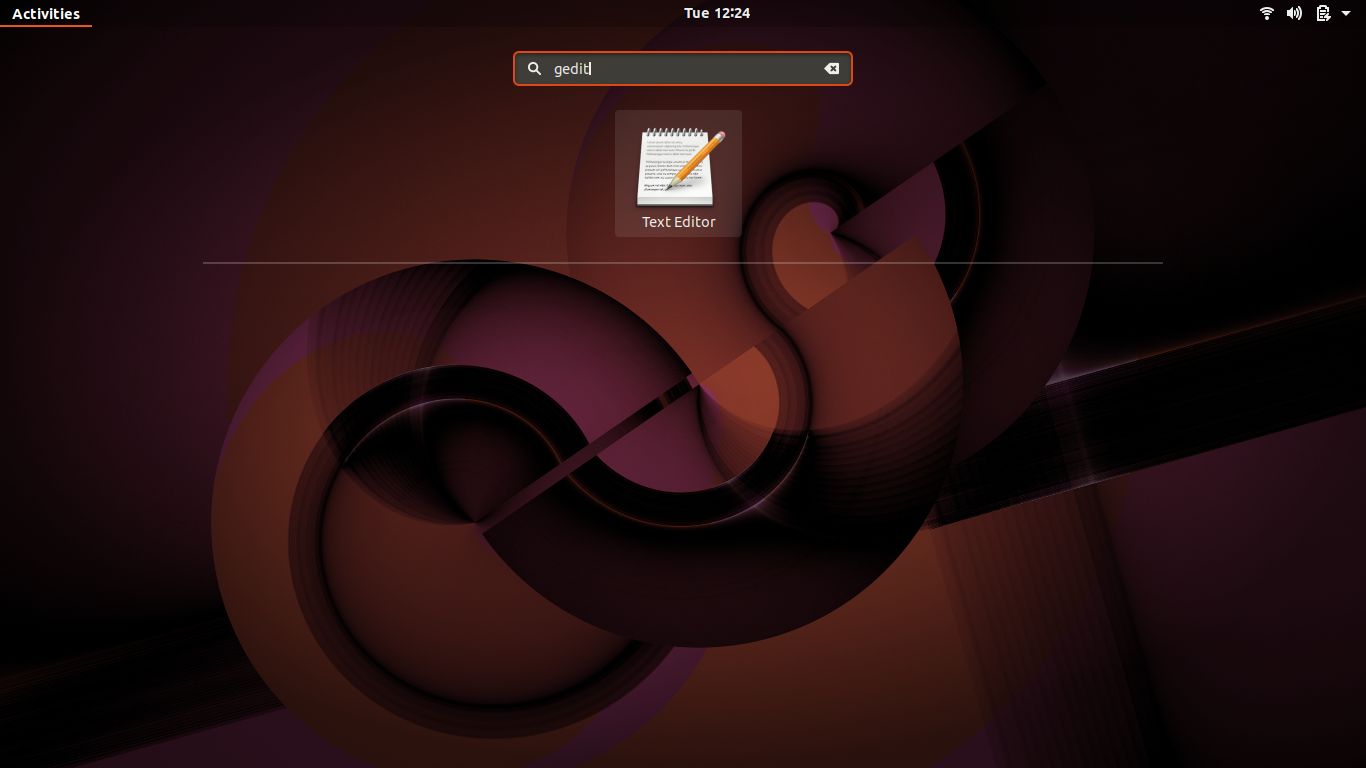
Click on the application. The text editor window should show up on the screen, and the text editor icon should show up on the launcher bar on the left-hand side (see below):

-
Right-click on the text editor launch icon, and select “Lock to Launcher”.
-
Close the gedit window. The launcher icon should remain after the window closes.
-
Click on the gedit launcher icon. You should see a new gedit window appear.
Le Terminal Linux
In this exercise, we will familiarize ourselves with the Linux terminal.
Starting the Terminal
-
Pour ouvrir le Terminal, recherchez le programme "terminator" ou cliquez sur l'icône:

-
Create a second terminal window, either by:
-
Right-clicking on the terminal and selecting the “Open Terminal” or
-
Selecting “Open Terminal” from the “File” menu
-
-
Create a second terminal within the same window by pressing “Ctrl+Shift+T” while the terminal window is selected.
-
Close the 2nd terminal tab, either by:
-
clicking the small ‘x’ in the terminal tab (not the main terminal window)
-
typing
exitand hitting enter.
-
-
The window will have a single line, which looks like this:
ros-industrial@ros-i-humble-vm:~$ -
This is called the prompt, where you enter commands. The prompt, by default, provides three pieces of information:
-
ros-industrial is the login name of the user you are running as.
-
ros-i-humble-vm is the host name of the computer.
-
~ is the directory in which the terminal is currently in. (More on this later).
-
-
Close the terminal window by typing
exitor clicking on the red ‘x’ in the window’s titlebar.

Navigating Directories and Listing Files
Prepare your environment
-
Open your home folder in the file browser.
-
Double-click on the
ex0.3folder we created in the previous step.-
We’ll use this to illustrate various file operations in the terminal.
-
-
Right click in the main file-browser window and select “Open in Terminal” to create a terminal window at that location.
-
In the terminal window, type the following command to create some sample files that we can study later:
-
cp -a ~/industrial_training/exercises/0.3/. .
-
ls Command
-
Enter
lsinto the terminal.-
You should see
test.txt, andnewlisted. (If you don’t see ‘new’, go back and complete the previous exercise). -
Directories, like
new, are colored in blue. -
The file
sample_jobis in green; this indicates it has its “execute” bit set, which means it can be executed as a command.
-
-
Type
ls *.txt. Only the filetest.txtwill be displayed. -
Enter
ls -linto the terminal.-
Adding the
-loption shows one entry per line, with additional information about each entry in the directory. -
The first 10 characters indicate the file type and permissions
-
The first character is
dif the entry is a directory. -
The next 9 characters are the permissions bits for the file
-
The third and fourth fields are the owning user and group, respectively.
-
The second-to-last field is the time the file was last modified.
-
If the file is a symbolic link, the link’s target file is listed after the link’s file name.
-
-
Enter
ls -ain the terminal.-
You will now see one additional file, which is hidden.
-
-
Enter
ls -a -l(orls -al) in the command.-
You’ll now see that the file
hidden_link.txtpoints to.hidden_text_file.txt.
-
pwd and cd Commands
-
Enter
pwdinto the terminal.-
This will show you the full path of the directory you are working in.
-
-
Enter
cd newinto the terminal.-
The prompt should change to
ros-industrial@ros-i-humble-vm:~/ex0.3/new$. -
Typing
pwdwill show you now in the directory/home/ros-industrial/ex0.3/new.
-
-
Enter
cd ..into the terminal. * In the previous exercise, we noted that..is the parent folder. * The prompt should therefore indicate that the current working directory is/home/ros-industrial/ex0.3. -
Enter
cd /bin, followed byls.-
This folder contains a list of the most basic Linux commands.
Note thatpwdandlsare both in this folder.
-
-
Enter
cd ~/ex0.3to return to our working directory.-
Linux uses the
~character as a shorthand representation for your home directory. -
It’s a convenient way to reference files and paths in command-line commands.
-
You’ll be typing it a lot in this class… remember it!
-
If you want a full list of options available for any of the commands given in this section, type man <command> (where <command> is the command you want information on) in the command line. This will provide you with built-in documentation for the command. Use the arrow and page up/down keys to scroll, and q to exit.
Altering Files
mv Command
-
Type
mv test.txt test2.txt, followed byls.-
You will notice that the file has been renamed to
test2.txt.
This step shows howmvcan rename files.
-
-
Type
mv test2.txt new, thenls.-
The file will no longer be present in the folder.
-
-
Type
cd new, thenls.-
You will see
test2.txtin the folder.
These steps show howmvcan move files.
-
-
Type
mv test2.txt ../test.txt, thenls.-
test2.txtwill no longer be there.
-
-
Type
cd .., thenls.-
You will notice that
test.txtis present again.
This shows howmvcan move and rename files in one step.
-
cp Command
-
Type
cp test.txt new/test2.txt, thenls new.-
You will see
test2.txtis now in thenewfolder.
-
-
Type
cp test.txt "test copy.txt", thenls -l.-
You will see that
test.txthas been copied totest copy.txt.
Note that the quotation marks are necessary when spaces or other special characters are included in the file name.
-
rm Command
-
Type
rm "test copy.txt", thenls -l.-
You will notice that
test copy.txtis no longer there.
-
mkdir Command
-
Type
mkdir new2, thenls.-
You will see there is a new folder
new2.
-
touch Command
-
Type
touch ~/Templates/"Untitled Document".-
This will create a new Document named “Untitled Document”
-
You can use the -i flag with cp, mv, and rm commands to prompt you when a file will be overwritten or removed.
Editing Text (and Other GUI Commands)
-
Type
gedit test.txt.-
You will notice that a new text editor window will open, and
test.txtwill be loaded. -
The terminal will not come back with a prompt until the window is closed.
-
-
There are two ways around this limitation. Try both…
-
Starting the program and immediately returning a prompt:
-
Type
gedit test.txt &.-
The
&character tells the terminal to run this command in “the background”, meaning the prompt will return immediately.
-
-
Close the window, then type
ls.-
In addition to showing the files, the terminal will notify you that
gedithas finished.
-
-
-
Moving an already running program into the background:
-
Type
gedit test.txt.-
The window should open, and the terminal should not have a prompt waiting.
-
-
In the terminal window, press Ctrl+Z.
-
The terminal will indicate that
gedithas stopped, and a prompt will appear.
-
-
Try to use the
geditwindow.-
Because it is paused, the window will not run.
-
-
Type
bgin the terminal.-
The
geditwindow can now run.
-
-
Close the
geditwindow, and typelsin the terminal window.-
As before, the terminal window will indicate that
geditis finished.
-
-
Running Commands as Root
-
In a terminal, type
ls -a /root.-
The terminal will indicate that you cannot read the folder
/root. -
Many times you will need to run a command that cannot be done as an ordinary user, and must be done as the “super user”
-
-
To run the previous command as root, add
sudoto the beginning of the command.-
In this instance, type
sudo ls -a /rootinstead. -
The terminal will request your password (in this case,
rosindustrial) in order to proceed. -
Once you enter the password, you should see the contents of the
/rootdirectory.
-
Warning: sudo is a powerful tool which doesn’t provide any sanity checks on what you ask it to do, so be VERY careful in using it
https://industrial-training-master.readthedocs.io/en/humble/_source/prerequisites/Navigating-the-Ubuntu-GUI.html
Usage avancé du bash Linux
Job management
Stopping Jobs
-
Type
./sample_job.-
The program will start running.
-
-
Press Control+C.
-
The program should exit.
-
-
Type
./sample_job sigterm.-
The program will start running.
-
-
Press Control+C.
-
This time the program will not die.
-
Stopping “Out of Control” Jobs
-
Open a new terminal window.
-
Type
ps ax. -
Scroll up until you find
python ./sample_job sigterm.-
This is the job that is running in the first window.
-
The first field in the table is the ID of the process (use
man psto learn more about the other fields).
-
-
Type
ps ax | grep sample.-
You will notice that only a few lines are returned.
-
This is useful if you want to find a particular process
-
Note: this is an advanced technique called “piping”, where the output of one program is passed into the input of the next. This is beyond the scope of this class, but is useful to learn if you intend to use the terminal extensively.
-
-
Type
kill <id>, where<id>is the job number you found with theps ax. -
In the first window, type
./sample_job sigterm sigkill.-
The program will start running.
-
-
In the second window, type
ps ax | grep sampleto get the id of the process. -
Type
kill <id>.-
This time, the process will not die.
-
-
Type
kill -SIGKILL <id>.-
This time the process will exit.
-
Showing Process and Memory usage
-
In a terminal, type
top.-
A table will be shown, updated once per second, showing all of the processes on the system, as well as the overall CPU and memory usage.
-
-
Press the Shift+P key.
-
This will sort processes by CPU utilization.
This can be used to determine which processes are using too much CPU time.
-
-
Press the Shift+M key.
-
This will sort processes by memory utilization
This can be used to determine which processes are using too much memory.
-
-
Press q or Ctrl+C to exit the program.
Déploiement de ROS2
Pour le déploiement d'environnements pédagogique et concours
On voit plusieurs approches :
- déploiement de machine native Ubuntu, par clonage de disque par exemple
- déploiement de VM VirtualBox
- déploiement de Docker container
Veut-on enseigner la robotique ou l'ingénierie logiciel sous Linux ? Selon moi, il faut différencier deux types de public :
- On veut enseigner la robotique Open Source, par exemple à des électroniciens
- on n'aborde pas l'installation ROS, la création de package dans un workspace et sa compilation
- on fournit une machine dont l'enseignant maitrise l'état
- tout est fait dans un IDE type VSCode.
- les apprenants peuvent se concentrer sur la génération de codes et d'algorithmes pour résoudre un problème robotique
- on reste en simulation ou on déploie sur un robot en fin de parcours
- on bascule d'une conteneur à un autre depuis VSCode pour éviter les erreurs de config
- On veut enseigner l'ingénierie logiciel appliquée à la robotique avec ROS
- initiation à Ubuntu et à la ligne de commande
- on déroule tout le tutoriel ROS en encourageant à faire un dual-boot (ou éventuellement un WSL) sur une machine personnelle
- on insiste sur les réflexes de compilation dans le terminal
- on laisse naviguer entre plusieurs workspaces sans Docker
Besoin pour la robotique industrielle
Par ordre croissant de complexité :
- Visualisation et planification trajectoire avec MoveIt2 via plugin motion_planning dans RViz2 https://moveit.picknik.ai/main/doc/tutorials/quickstart_in_rviz/quickstart_in_rviz_tutorial.html
- cellule SO-ARM100 ou Panda (moveit2_tutorial officiel) ou cellule UR5e
- MoveIt2 Python API https://moveit.picknik.ai/main/doc/examples/motion_planning_python_api/motion_planning_python_api_tutorial.html
- Connexion à docker container URSim https://innovation.iha.unistra.fr/books/robotique-open-source/page/universal-robot-ros2-driver#bkmrk-installation-du-simu
- Contrôle vrai SO-ARM100
- Contrôle vrai UR5e
- Contrôle local de trajectoire avec MoveIt Servo : téléopération via manette ou asservissement visuel (TOF sensor) https://moveit.picknik.ai/main/doc/how_to_guides/controller_teleoperation/controller_teleoperation.html
- Gazebo et simulation traitement de l'image 2D/3D
- Pour aller plus loin : Cartesian Path Planning, Hybrid Planning, MoveIt Task Constructor (https://moveit.picknik.ai/main/doc/tutorials/pick_and_place_with_moveit_task_constructor/pick_and_place_with_moveit_task_constructor.html , UR10e_welding_demo)
Besoin pour la robotique mobile
Par ordre croissant de complexité :
Pour le déploiement de robots dans l'industrie
Dev Container
https://github.com/robot-mindset
Pour un développement local
- Installer Visual Studio Code
- Installer Docker avec le support de l'accélération graphique
- Installer l'extension
Dev Container
Pour un développement sur un serveur/PC distant
- Installer le pack d'extensions
Remote Development
Lancer le conteneur de développement :
- Optionnel : se connecter à la machine de développement distante depuis Visual Studio Code
- Ouvrir la Command Palette
Ctrl+Shift+P - Lancer
Remote-SSH: Connect to host... - Configurer la connexion ssh par mot-de-passe ou clé si ce n'a pas encore été fait
- Ouvrir la Command Palette
- Cloner le dépôt https://github.com/rplayground/sandbox
- Lancer
Dev Container: Reopen in Container
https://articulatedrobotics.xyz/tutorials/docker/dev-containers/
Remote-SSH sur machine distante via une machine intermédiaire
https://stackoverflow.com/questions/59456119/ssh-session-within-ssh-session-vs-code
- On veut connecter Visual Studio Code à une machine
MyWorkstationsur un réseau local via un serveur publicMyServerqui est dans ce réseau local - On ajoute la configuration suivante dans
/home/user/.ssh/config
Host MyServer
HostName adress.server
User username
Host MyWorkstation
HostName workstation.adress.within.network.of.the.server
User usernameInWorkstation
ProxyJump server.adressDocker Containers + VSCode
https://github.com/gautz/unistra-aica-practical/tree/main/tmuxinator
https://github.com/ppswaroopa/ros2-dockergen
https://github.com/robot-mindset
Quelques conseils de Ragesh (https://robotair.io/) que j'ai rencontré au Fraunhofer :
https://github.com/athackst/workstation_setup
https://docs.ros.org/en/iron/How-To-Guides/Setup-ROS-2-with-VSCode-and-Docker-Container.html
https://www.allisonthackston.com/articles/vscode-docker-ros2.html
MoveIt2, docker https://fr.slideshare.net/secret/vdPbBCNB3LamRy https://moveit.picknik.ai/main/doc/how_to_guides/how_to_setup_docker_containers_in_ubuntu.html
Ansible
https://github.com/robot-mindset
https://www.linkedin.com/pulse/deploying-ros2-packages-using-ansible-ragesh-ramachandran/
https://blog.robotair.io/best-way-to-ship-your-ros-app-a53927186c35
https://github.com/swarmBots-ipa/ansible_automation
https://github.com/ipa-rar/ros2-playbooks
https://github.com/Laura7089/ros2-ansible
https://github.com/jeremyfix/ros2_ansible_turtlebot
https://github.com/rarrais/ansible-role-ros2
Multipass
https://artivis.github.io/post/2023/multipass_ros_blueprint/
YOCTO
JupyterLab
https://blog.jupyter.org/jupyterlab-ros-3dc9dab7f421
Scripts bash, Cluster SSH
https://github.com/robot-mindset
https://github.com/ROS-French-Users-Group/ros2_bash_deployment_scripts
https://github.com/runtimerobotics/ros2_oneline_install
Scripts de Loïc Cuvillon : https://seafile.unistra.fr/d/50662484c5f641709cd7/
Scripts Gauthier Hentz : https://innovation.iha.unistra.fr/books/robotique-open-source/page/installation-pc-ros2#bkmrk-installation-de-jazz
Discussions
https://discourse.ros.org/t/easy-way-to-distribute-an-instance-of-ubuntu-w-ros-to-students/31824/4
Singularity, Robolaunch, ROSblox https://discourse.ros.org/t/what-environments-do-you-use-for-training-and-courses/26473/6
Python https://discourse.ros.org/t/teaching-with-ros-or-zeroros-at-university/32124
Sources
Déploiement de TP de simulation avec Dev Container
On suppose qu'on veut déployer des TP qui font appel à des environnements de simulation, comme Gazebo ou URSim.
Pour faciliter le déploiement reproductible en général, et en particulier la réutilisation d'environnements de développement fournis par les développeurs, on utilise des conteneurs Docker. On a besoin d'accélération graphique via un GPU pour afficher ces simulations afin de ne pas surcharger le CPU.
Installation de Docker
On peut faire tourner le conteneur Docker sur n'importe quel environnement : Linux, Windows, Mac, ou sur un serveur
Développement local sur Linux avec X11 et pas Wayland
- Installer par exemple Ubuntu 24 ou Linux Mint 22 Mate
- Vérifier que le système de fenêtrage est X11 et pas Wayland
- Installer docker.io : le paquet debian de docker
sudo apt install -y docker.io --install-recommends -
Ajouter votre user au groupe docker, ATTENTION ça lui donne les droits admin
sudo usermod -aG docker $USER - Installer git
sudo apt install git
Développement local sur Windows avec X11 forwarding
- Vérifier les prérequis à WSL2 de votre Windows
- Installer Docker Desktop
- Vérifier que Docker est configuré et fonctionne avec WSL2
- Installer une distribution Linux via WSL2, par exemple Ubuntu 24 depuis le Microsoft Store
- Lancer un Terminal Ubuntu sur WSL2 (taper
ubuntudepuis le menu démarrer) - Installer git
sudo apt install git
Développement sur serveur distant
- Installer une distribution Linux Server, par exemple Yunohost 12
- Installer Docker en mode rootless
- Créer un utilisateur YunoHost, lui donner un accès ssh et les droits appropriés (ne pas l'ajouter au groupe admin YunoHost)
-
NE PAS ajouter votre user au groupe docker, car ça lui donnerait des droits admin
sudo usermod -aG docker $USER - Lancer les commandes
dockeravecsudo
Avec PWA
Ici, on suppose qu'on ne fait pas tourner d'algorithmes qui ont besoin de GPU, type Machine Learning, dans le conteneur.
Une première approche est de séparer la partie calcul CPU de la partie graphique GPU. On fait tourner les calculs dans le conteneur. On fait tourner les applications graphiques dans le navigateur Web de l'hôte via une PWA, par exemple via gzweb pour gazebo. Il nous faut alors un navigateur qui supporte l'accélération graphique des applications Web, seuls Chrome et dérivés supportent le WebGL :
- Installer Chrome sur Windows ou Chromium sur Linux, de préférence depuis le PPA
- Vérifier que WebGL est activé en vérifiant que le cube tourne sur https://get.webgl.org/
L'énorme avantage est que l'environnement de développement Docker n'a pas besoin d'accélération graphique. Pas besoin de perdre du temps à essayer de passer la carte graphique au conteneur. Un serveur sans accélération graphique suffit.
https://github.com/rplayground/sandbox
source /opt/ros/$ROS_DISTRO/setup.bash
source /usr/share/gazebo/setup.sh
GAZEBO_MODEL_PATH=$GAZEBO_MODEL_PATH:$(find /opt/ros/$ROS_DISTRO/share \
-mindepth 1 -maxdepth 2 -type d -name "models" | paste -s -d: -)
ros2 launch ./launch/security_demo_launch.py \
use_rviz:=False headless:=TruePour un développement local
- Installer Visual Studio Code, sur Linux depuis Snap ou le PPA Microsoft Noter que Codium sur Linux ne supporte par l'extension Dev Container nécessaire
- Désactiver la collecte des données :
Settings > Telemetry > Telemetry Level > off - Installer Docker
avec le support de l'accélération graphique, cf. ci-dessus - Installer l'extension
Dev Container. Noter que les extensions nécessaires au développement de ROS seront installées dans le VSCode-Server du container - Sur Windows : Lancer un Terminal Ubuntu sur WSL2 (taper ubuntu depuis le menu démarrer)
- Sur Linux : Lancer un Terminal
- Cloner le dépôt du Dev Container
git clone https://github.com/rplayground/sandbox - Se placer dans le dossier
cd ~/sandbox - Ouvrir le dossier dans Visual Studio Code
code . - Lancer
Dev Container: Reopen in Container
Pour un développement distant sur un serveur/PC
- Installer le pack d'extensions
Remote Development - Se connecter à la machine de développement distante depuis Visual Studio Code
- Ouvrir la Command Palette
Ctrl+Shift+P - Lancer
Remote-SSH: Connect to host... - Configurer la connexion ssh par mot-de-passe ou clé si ce n'a pas encore été fait
- Ouvrir la Command Palette
- Cloner le dépôt https://github.com/rplayground/sandbox
- Ouvrir le dossier sandbox
- Lancer
Dev Container: Reopen in Container
Tester l'installation
- Le dépôt https://github.com/rplayground/sandbox?tab=readme-ov-file#demo fournit un environnement préconfiguré avec
- Les paquets Nav2
- Les paquets turtlebot3_simulations
- Le serveur Gazebo et le client web gzweb
- Des utilitaires pour le démarrage des interfaces graphiques dans le navigateur
- Ouvrir un nouveau Terminal dans VisualStudio Code
- Configurer le Bash et lancer la démo de sécurité :
source /opt/ros/$ROS_DISTRO/setup.bash
source /usr/share/gazebo/setup.sh
GAZEBO_MODEL_PATH=$GAZEBO_MODEL_PATH:$(find /opt/ros/$ROS_DISTRO/share \
-mindepth 1 -maxdepth 2 -type d -name "models" | paste -s -d: -)
ros2 launch ./launch/security_demo_launch.py \
use_rviz:=False headless:=True- Depuis la palette de commandes
F1, taperTasks: Run Tasket sélectionnerStart Visualizations - Depuis le panneau des Ports, cliquer
Open in Browserpour le port8080et ouvrir le lien dans Chrome/Chromium
Il est possible de lancer d'autres environnements de simulation, par ex. turtlebot3_simulations :
- On choisi le modèle de turtlebot3 et on lance gazebo en mode headless
export ROS_DOMAIN_ID=30 #TURTLEBOT3 export LDS_MODEL=LDS-01 export TURTLEBOT3_MODEL=burger ros2 launch turtlebot3_gazebo turtlebot3_world.launch.py \ use_rviz:=False headless:=True
Comprendre les spécificités du container sandbox
- On remarque qu'on est connecté en
rootet que la sandbox est installée dans un workspace d'overlayroot@iha-portrob-1:/opt/overlay_ws/src/sandbox# - Le fichier de configuration du bash
cat /root/.bashrcn'a pas été modifié pour sourcer les exécutables ros - La distribution ROS installée est
echo $ROS_DISTROhumble - A chaque réinitialisation du container et ouverture de nouveau Terminal il faut donc lancer :
source /opt/ros/$ROS_DISTRO/setup.bash source /usr/share/gazebo/setup.sh GAZEBO_MODEL_PATH=$GAZEBO_MODEL_PATH:$(find /opt/ros/$ROS_DISTRO/share \ -mindepth 1 -maxdepth 2 -type d -name "models" | paste -s -d: -) - Que nous dit
devcontainer.json
{
"name": "Sandbox",
"image": "ghcr.io/rplayground/sandbox:main",
// "build": {
// "dockerfile": "../Dockerfile",
// "context": "..",
// "target": "visualizer",
// "cacheFrom": "ghcr.io/rplayground/sandbox:main"
// },
"runArgs": [
// "--cap-add=SYS_PTRACE", // enable debugging, e.g. gdb
// "--ipc=host", // shared memory transport with host, e.g. rviz GUIs
// "--network=host", // network access to host interfaces, e.g. eth0
// "--pid=host", // DDS discovery with host, without --network=host
// "--privileged", // device access to host peripherals, e.g. USB
// "--security-opt=seccomp=unconfined", // enable debugging, e.g. gdb
],
"workspaceFolder": "/opt/overlay_ws/src/sandbox",
"workspaceMount": "source=${localWorkspaceFolder},target=${containerWorkspaceFolder},type=bind",
"onCreateCommand": ".devcontainer/on-create-command.sh",
"updateContentCommand": ".devcontainer/update-content-command.sh",
"postCreateCommand": ".devcontainer/post-create-command.sh",
"customizations": {
"codespaces": {
"openFiles": [
"README.md"
]
},
"vscode": {
"settings": {},
"extensions": [
"eamodio.gitlens",
"GitHub.copilot",
"ms-iot.vscode-ros",
"streetsidesoftware.code-spell-checker"
]
}
}
}
- Que nous dit
Dockerfile
Installation de Docker avec accélération graphique
Ici, on peut faire tourner dans le conteneur des algorithmes qui ont besoin de GPU, type Machine Learning.
AMD/Intel sous Linux
NVidia Sous Linux
- Installer le Driver propriétaire NVidia (si les driver proprio n'ont pas été autorisés à l'installation d'Ubuntu)
sudo apt install curl- Installer le Nvidia Container Toolkit
curl -fsSL https://nvidia.github.io/libnvidia-container/gpgkey | sudo gpg --dearmor -o /usr/share/keyrings/nvidia-container-toolkit-keyring.gpg \
&& curl -s -L https://nvidia.github.io/libnvidia-container/stable/deb/nvidia-container-toolkit.list | \
sed 's#deb https://#deb [signed-by=/usr/share/keyrings/nvidia-container-toolkit-keyring.gpg] https://#g' | \
sudo tee /etc/apt/sources.list.d/nvidia-container-toolkit.list && \
sudo apt-get update && sudo apt-get install nvidia-container-toolkit- Redémarrer le PC
- Lancer docker avec l'argument
--gpus=allpour tester qu'il a bien accès au GPUdocker run --rm -it --gpus=all nvcr.io/nvidia/k8s/cuda-sample:nbody nbody -gpu -benchmark -
Le résultat suivant indique que la carte graphique dédiée
Nvidia Quadro P620est bien exploitée pour les calculs :
> Windowed mode
> Simulation data stored in video memory
> Single precision floating point simulation
> 1 Devices used for simulation
GPU Device 0: "Pascal" with compute capability 6.1
> Compute 6.1 CUDA device: [Quadro P620]
4096 bodies, total time for 10 iterations: 4.417 ms
= 37.987 billion interactions per second
= 759.750 single-precision GFLOP/s at 20 flops per interaction- Si ça ne s'affiche pas : https://docs.nvidia.com/datacenter/cloud-native/container-toolkit/latest/install-guide.html#configuring-docker
NVidia Sous Linux Public Server (rootless docker)
NVidia Sous Windows
Lancement Dev Container avec accélération graphique
- Ajouter dans
.devcontainer/devcontainer.json
{
"name": "Sandbox",
"hostRequirements": {
"gpu": "optional" // switch on CPU if no (NVidia?) GPU available
},
"runArgs": [
"--gpus=all" // enable NVidia GPU with NVidia driver
// "--device=/dev/dri" // enable Intel/AMD GPU
}Avec X11 Forwarding
On peut aussi afficher les fenêtres graphiques des applications qui tournent dans le Container directement sur l'hôte, par ex. gazebo-client
Pour cela il faut :
- Installer dans le conteneur le gestionnaire de fenêtres x11-apps (partie serveur)
- Avoir accès à un gestionnaire de fenêtres X11 sur l'hôte (partie client)
- Configurer correctement l'hôte et le Dev Container pour que le conteneur ait accès au client X11
- Cela peut poser des problèmes de sécurité car le conteneur risque d'avoir accès à tout ce qu'il se passe sur l'écran de l'hôte
On ne peut plus se contenter d'une distribution Linux Serveur type YunoHost pour le développement distant
Les calculs graphiques se font alors dans le container ??
Avec VNC
Ressources
https://articulatedrobotics.xyz/tutorials/docker/dev-containers/
2 - ROS2 - Robotique mobile
Turtlesim et modèle de Dubins
https://docs.ros.org/en/humble/Tutorials/Beginner-CLI-Tools/Introducing-Turtlesim/Introducing-Turtlesim.html
TurtleBot3 - Bases en Simulation
Astuces
Gazebo
- Réinitialiser la pose du robot
ctrl+Shift+R- Edit --> Reset Model Poses
Le robot ne spawn pas
On a remarqué que parfois certains processus de gazebo continuent à tourner ou sont redémarrés malgré l'arrêt du noeud ROS principal. Il faut alors tuer le processus avecla commande kill 1234, voir commandes utiles ci-dessous.
Commandes utiles
- Lister les processus système (programmes) qui tournent actuellement
ps -ef - Lister les processus système (programmes) qui tournent actuellement sous forme d'arbre hiérarchisé : un processus enfant est rattaché à une branche d'un processus parent dont il dépend
ps -ef --forest - Parmi ces processus, sélectionner ceux qui contiennent le mot-clé
gazebops -ef --forest | grep ros - Repérer l'ID du processus
- Envoyer le signal d'arrêt du processus
SIGTERM"mode gentil" : on demande au programme de s'arrêterkill 1234 - Si le processus continue tout de même à tourner, envoyer le signal de destruction du processus
SIGKILL"mode méchant" :kill -9 1234
Ressources
- https://www.classes.cs.uchicago.edu/archive/2022/fall/20600-1/warmup_project.html
- https://emanual.robotis.com/docs/en/platform/turtlebot3/simulation/#gazebo-simulation
TurtleBot3 - Piloter le Robot
https://emanual.robotis.com/docs/en/platform/turtlebot3/navigation/#navigation
Les 2 ordinateurs dans le FabLab sur le mur de gauche sont installés sous Ubuntu 22.04 avec ROS2 Humble et les paquets nécessaires au pilotage des TurtleBot3. Il faut utiliser le compte étudiant (et non le compte fablab qui se login automatiquement au démarrage) avec le même mdp que celui utilisé en TP.
Vous pouvez emprunter un des 2 TurtleBot quand vous voulez en demandant à M. Carron ou M. Hentz dans le bureau en face :
- TurtleBot3 Burger
- TurtleBot3 Waffle + OpenManipulator X
Pensez bien à les recharger pour les suivants.
Un réseau Wifi fab-lab-5g est disponible et les TurtleBot configurés pour s'y connecter. Attention ce réseau est limité à 20Go de données, donc ne pas l'utiliser pour autre-chose que la robotique. Les PC doivent être connectés sur le même réseau que les TurtleBot. Vous devez ensuite vous connecter au Robot via ssh pour démarrer le noeud ROS2 côté robot :
ssh ubuntu@192.168.3.10 (burger) ou ssh ubuntu@192.168.3.11 (waffle) avec le même mdp qu'en TP.
Les autres noeuds sont lancés sur le PC : télémanipulation, cartographie, navigation autonome, planification de trajectoire avec évitement d'obstacle etc.
Calibration de la caméra
- Générer un damier de calibration : 8 x 10 carrés de 20m
- avec https://calib.io/pages/camera-calibration-pattern-generator
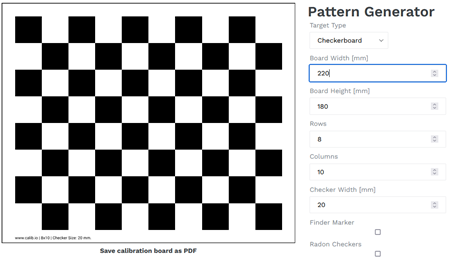
- Ce sont les sommets intérieurs des carrés qui sont utilisés, donc 7x9 sommets
Ressources
- Noeud ROS2 pour Raspberry Cam https://github.com/christianrauch/camera_ros
- https://index.ros.org/p/camera_ros/
- https://medium.com/swlh/raspberry-pi-ros-2-camera-eef8f8b94304
Suivi de ligne ROS2 Humble
Le suivi de ligne repose surtout sur du traitement de l'image avec OpenCV, et l'envoi de commandes de vitesse au robot. Le code sous ROS1 devrait donc être portable assez directement sous ROS2.
Environnement de simulation Gazebo
Modélisation
Créer un paquet
- Créer un paquet ROS2 python « autonomy » qui implémente follower_p.py
- Adapter le CMakeLists.txt et package.xml en vous inspirant de :
- turtlebot3_behavior_demos (/tb3_autonomy/scripts/test_vision.py)
- turtlebot3/turtlebot3_example/turtlebot3_example/turtlebot3_position_control/turtlebot3_position_control.py
- Lancer ros2 launch turtlebot3_gazebo turtlebot3_circuit_competition.launch.py
- Démarrer la simulation en plaçant le robot au début de la piste
- Caméra en vue de la ligne
- Lancer votre nœud python avec ros2 run autonomy follower_p.py
Ressources
Pour le suivi d'une ligne blanche :
- https://github.com/gabrielnhn/ros2-line-follower/blob/main/follower/follower/follower_node.py
sudo apt install python3-cv-bridge python3-opencv- ajouter au
~/.bashrc:export GAZEBO_MODEL_PATH=~/turtlebot3_ws/src/ros2-line-follower/follower/models
- Le TP2 de robotique de Loïc Cuvillon donné à Telecom Physique Strasbourg
- ROS1 / OpenCV : https://github.com/osrf/rosbook/blob/master/followbot/follower_line_finder.py
Behavior Trees Demo
Concepts
Démo avec le Turtlebot3
https://github.com/sea-bass/turtlebot3_behavior_demos
Usage sans docker
- Vérifier que Gazebo fonctionne en lançant le noeud de base :
ros2 launch turtlebot3_gazebo turtlebot3_world.launch.py - Éteindre le noeud
On lance l'environnement de simulation lié à la démo de Behavior Tree :
ros2 launch tb3_worlds tb3_demo_world.launch.py
Le robot navigue en des positions connues avec pour but de trouver un cube d'une couleur spécifiée (rouge, vert ou bleu). La détection d'objets est faite par un simple seuillage en couleurs HSV avec des valeurs calibrées.
Démos de Behavior Trees en Python
On regarde le fichier turtlebot3_behavior_demos/docker-compose.yaml pour déterminer les commandes Bash correspondant aux commande docker indiquées dans le dépôt.
Dans un second terminal, on lance une des démos suivantes :
Les fichiers source de la démo sont :
- tb3_demo_behavior_py.launch.py
- autonomy_node.py
- navigation.py
- test_move_base.py
- vision.py
- test_vision.py
- navigation.py
Installation et démarrage du Turtlebot 3
Remarques sur les architectures ROS pour un robot mobile
L'architecture utilisée par Robotis pour son Turtlebot3, qui est également plébiscitée par la communauté de robotique mobile ROS Navigation 2, repose sur un PC embarqué (ARM64, Raspberry 4) sur le robot pour les calculs temps réel, et un PC de calcul et développement logiciel (AMD64, PC portable ou fixe) pour les calculs lourds et ayant une moindre contrainte temporelle. Les deux PC communiquent via un réseau wifi. On installe typiquement Ubuntu Server (sans interface graphique donc plus léger) sur la Raspberry et Ubuntu Desktop sur le PC.
Avec l'utilisation d'une Raspberry >=4, les problèmes de ressources sont moins importants et on peut envisager d'installer un environnement de bureau (interface graphique) et faire les calculs lourds sur la Raspberry. Dans cette architecture, on peut envisager de se connecter à l'environnement de bureau de la Raspberry depuis un PC (Linux ou Windows) via le wifi et VNC.
Il est déconseillé d'utiliser les applications graphiques de ROS comme RViz et Gazebo sur architecture ARM64. Par exemple, Gazebo 11 n'est pas disponible sur ARM64 sous ROS Humble. Il l'est depuis peu sous Jazzy.
Préconisation
Nous préconisons l'architecture suivante pour les TP et projets :
- ROS2 Humble
- version LTS
- Robotis ne maintient les paquets du Turtlebot3 que pour ROS2 Humble (et non Jazzy)
- version Desktop sur un PC Ubuntu 22
- version Server sur une Raspberry Pi 4 (et non Pi 5 qui nécessite de compiler Humble depuis les sources)
- Connexion du PC et de la Raspberry via un hotspot wifi émis par un routeur sur lequel on a les droits administrateur
- Routeur wifi avec DHCP et possibilité de fixer les IP du PC et de la Raspberry. Accès internet via ethernet ou 4G/5G
- Développement sur le PC dans Visual Studio Code, configuré pour gérer les fichiers sur la Raspberry (via ssh a priori)
Pour simplifier l'expérience utilisateur :
- Si nécessaire, pour débogage du réseau par exemple, installation d'un environnement de bureau sur la Raspberry en suivant les instructions ci-dessous
- Il est dès lors possible de se connecter à la Raspberry via VNC pour développer directement dessus
- Si nécessaire, configuration du PC pour qu'une connexion Ethernet avec le robot permette le partage de sa connexion internet.
Installation Ubuntu Server
Configuration clavier en Français
sudo dpkg-reconfigure keyboard-configuration- Choisir toutes les options françaises par défaut
Version rapide
- Télécharger l'image compressée de la carte SD préinstallée
https://seafile.unistra.fr/smart-link/dcc9e405-88a0-41d2-ab5c-3e796a6cebf3/ - Insérer la carte SD et démonter les partitions existantes
sudo umount /media/user/writable /media/user/system-bootAttention, bien vérifier le disque associé à la carte SD avant de lancer la commande dd. Sinon on risque d'écraser le disque dur. En général disque dur = /dev/sda et carte SD = /dev/sdb
- Flasher la carte SD avec l'utilitaire
dd
sudo gunzip -c ~/turtlebot3-manipulator-humble.img.gz | sudo dd of=/dev/sdb status=progress-
Configurer la connexion automatique au réseau wifi et donner une IP fixe au robot (dans la plage DHCP autorisée par le routeur) :
- Éjecter et réinsérer la carte SD pour qu'elle se monte
- Modifier la
CONFIGURATION_RESEAU(les éléments en majuscule) dans le fichier suivant :sudo nano /media/user/writable/etc/netplan/99-hotspot-fablab.yaml
addresses: [IP_TURTLEBOT/24]
gateway4: IP_BOX
nameservers:
addresses: [DNS_BOX_OPERATEUR, 9.9.9.9, 89.234.141.66]
access-points:
"SSID_WIFI":
password: PASSWORD_WIFIRemarque : l'image a été créée après avoir suivi les instructions longues ci-dessous (et quelques workspace et package ros installés en plus) en lançant la commande suivante :
sudo dd if=/dev/sda status=progress | gzip -9 > ~/turtlebot3-manipulator-humble.img.gzReinitialiser le mot-de-passe
Voir la section 4 ici
- Connecter la carte SD sur un PC
- naviguer au point de montage, par exemple :
cd /media/user/writable - ouvrir le fichier
sudo nano /etc/passwd - modifier la ligne qui concerne votre user du système Ubuntu du turtlebot, par exemple ici
ubuntu
Avant :ubuntu:x:1000:1000:Ubuntu:/home/ubuntu:/bin/bash
Après (on supprime lex) :ubuntu::1000:1000:Ubuntu:/home/ubuntu:/bin/bash - Redémarrer le système dans le TurtleBot
- Se connecter avec le login
ubuntu - Aucun MDP n'est demandé
- Lancer le programme de changement de MDP
sudo passwd - Rentrer le nouveau MDP 2 fois
Installation d'un environnement graphique
Pour installer un environnement graphique sur la Raspberry Pi 4 préalablement installée en Ubuntu server. On choisit Mate qui est léger et assez moderne à la fois :
sudo apt install ubuntu-mate-desktopsudo reboot
cf. https://phoenixnap.com/kb/how-to-install-a-gui-on-ubuntu#ftoc-heading-4
Version longue
https://emanual.robotis.com/docs/en/platform/turtlebot3/sbc_setup/#sbc-setup
Depuis un ordinateur sous Ubuntu 22.04
- Insérer la carte SD dans le navigateur
- Installer rpi-manager
sudo apt install rpi-imager - Sélectionner
CHOOSE OS
- autre système Linux (Other general-purpose OS)
- Ubuntu Server 22.04 LTS (64bits)
- Sélectionner
CHOOSE STORAGEla carte micro SD - Cliquer sur
WRITE
Depuis une VM WSL Ubuntu 22
A faire
Configuration réseau
Configurer la connexion automatique au réseau wifi et donner une IP fixe au robot (dans la plage DHCP autorisée par le routeur) :
- Éjecter et réinsérer la carte SD pour qu'elle se monte
- Créer le fichier suivant :
sudo nano /media/user/writable/etc/netplan/99-hotspot-fablab.yaml
network:
renderer: networkd
ethernets:
eth0:
dhcp4: true
dhcp6: true
optional: true
wifis:
wlan0:
dhcp4: false
dhcp6: false
addresses: [192.168.100.40/24]
gateway4: 192.168.100.1
nameservers:
addresses: [192.168.100.1, 9.9.9.9, 89.234.141.66]
access-points:
fablab:
password: ...
version: 2- Désactiver la configuration du réseau par cloud-init en créant le fichier suivant :
sudo nano /media/user/writable/etc/cloud/cloud.cfg.d/99-disable-network-config.cfg
network: {config: disabled}Connexion au robot en ssh
Insérer la carte dans le robot, le démarrer assez proche du hotspot wifi configuré, se connecter en ssh depuis l'ordinateur :
- Utiliser l'adresse IP précédemment configurée
ssh ubuntu@192.168.100.40 - mdp :
ubuntu - changer le mdp par un suffisamment sécurisé
- se connecter en ssh avec le nouveau mdp
- pour lancer des commandes en root utiliser
sudoavec le même mdp - Ne pas attendre la connexion réseau pour démarrer :
systemctl mask systemd-networkd-wait-online.service - Désactiver la veille et l'hibernation :
sudo systemctl mask sleep.target suspend.target hibernate.target hybrid-sleep.target
Installation de ROS embarqué
Installer ROS 2 Humble sans interfaces graphiques (ros-humble-desktop) qui seront lancées sur l'ordinateur externe :
sudo apt update && sudo apt install locales
sudo locale-gen en_US en_US.UTF-8
sudo update-locale LC_ALL=en_US.UTF-8 LANG=en_US.UTF-8
export LANG=en_US.UTF-8
sudo apt install software-properties-common
sudo add-apt-repository universe
sudo apt update && sudo apt install curl
sudo curl -sSL https://raw.githubusercontent.com/ros/rosdistro/master/ros.key -o /usr/share/keyrings/ros-archive-keyring.gpg
echo "deb [arch=$(dpkg --print-architecture) signed-by=/usr/share/keyrings/ros-archive-keyring.gpg] http://packages.ros.org/ros2/ubuntu $(. /etc/os-release && echo $UBUNTU_CODENAME) main" | sudo tee /etc/apt/sources.list.d/ros2.list > /dev/null
sudo apt update && sudo apt upgrade
sudo apt install ros-humble-ros-base ros-dev-tools
source /opt/ros/humble/setup.bash
echo 'source /opt/ros/humble/setup.bash' >> ~/.bashrcInstaller le workspace du turtlebot et les dépendances :
sudo apt install python3-argcomplete python3-colcon-common-extensions libboost-system-dev build-essential
sudo apt install ros-humble-hls-lfcd-lds-driver
sudo apt install ros-humble-turtlebot3-msgs
sudo apt install ros-humble-dynamixel-sdk
sudo apt install libudev-dev
mkdir -p ~/turtlebot3_ws/src && cd ~/turtlebot3_ws/src
git clone -b humble-devel https://github.com/ROBOTIS-GIT/turtlebot3.git
git clone -b ros2-devel https://github.com/ROBOTIS-GIT/ld08_driver.git
cd ~/turtlebot3_ws/src/turtlebot3
rm -r turtlebot3_cartographer turtlebot3_navigation2
cd ~/turtlebot3_ws/
echo 'source /opt/ros/humble/setup.bash' >> ~/.bashrc
source ~/.bashrc
colcon build --symlink-install --parallel-workers 1
echo 'source ~/turtlebot3_ws/install/setup.bash' >> ~/.bashrc
source ~/.bashrcConfigurer le Port USB pour OpenCR :
sudo cp `ros2 pkg prefix turtlebot3_bringup`/share/turtlebot3_bringup/script/99-turtlebot3-cdc.rules /etc/udev/rules.d/
sudo udevadm control --reload-rules
sudo udevadm triggerID de domain ROS pour la communication DDS :
echo 'export ROS_DOMAIN_ID=30 #TURTLEBOT3' >> ~/.bashrc
source ~/.bashrcConfigurer le modèle du LIDAR :
echo 'export LDS_MODEL=LDS-02' >> ~/.bashrc
source ~/.bashrcRaspberry Pi 5 - Ubuntu Noble 24.04 - ROS2 Jazzy
ROS2 Jazzy est la nouvelle version LTS. Elle est installable sur Raspberry Pi 5.
Pour installer ROS2 Humble sur Ubuntu 24.04 il faut compiler depuis les sources :
sudo apt install -y git colcon python3-rosdep2 vcstool wget python3-flake8-docstrings python3-pip python3-pytest-cov python3-flake8-blind-except python3-flake8-builtins python3-flake8-class-newline python3-flake8-comprehensions python3-flake8-deprecated python3-flake8-import-order python3-flake8-quotes python3-pytest-repeat python3-pytest-rerunfailures python3-vcstools libx11-dev libxrandr-dev libasio-dev libtinyxml2-dev
mkdir -p ~/ros2_iron/src
cd ~/ros2_iron
vcs import --input https://raw.githubusercontent.com/ros2/ros2/iron/ros2.repos src
sudo rm /etc/ros/rosdep/sources.list.d/20-default.list
sudo apt upgrade
sudo rosdep init
rosdep update
rosdep install --from-paths src --ignore-src --rosdistro iron -y --skip-keys "fastcdr rti-connext-dds-6.0.1 urdfdom_headers python3-vcstool"
colcon build --symlink-install
cf. https://forums.raspberrypi.com/viewtopic.php?t=361746
3 - ROS2 - Manipulation Mobile
Assemblage du Turtlebot et OpenManipulator-X et configuration initiale
https://www.classes.cs.uchicago.edu/archive/2022/fall/20600-1/turtlebot_assembly_setup.html
A Word of Caution
This page is NOT intended for student use. This page is designed for course staff to build and maintaing the turtlebots. If you are a student, please ensure you have permission from course staff before making any of the changes detailed on this page to any of the turtlebots.
Setup Checklist
- Turtlebot Assembly Tips
- OpenMANIPULATOR Arm First-Time Configuration
- Connecting the Pi to a Wi-Fi Network
- Attaching/Detaching the OpenMANIPULATOR Arm
Turtlebot Assembly Tips
Turtlebot3
- DO NOT TIGHTEN the screws too much.
- Page 10: When connecting one pair of waffle-plates to another, make that the seams connecting each waffle-plate are parallel to one other.
- Page 17: When attaching the wheels to the dynamixels, do not tighten the screws too much.
- Page 28: Mount the LiDAR further up than the manual specifies so that the arm can fit on (see completed Turtlebots for reference).
OpenMANIPULATOR Arm
- OpenMANIPULATOR Dynamixel 12: when putting the back piece onto the servo, you will need to break off a plastic piece where the cable should be threaded through.
- Make sure the placement of the marking on the servo horns is identical to the diagram PRIOR to screwing anything down onto it.
OpenMANIPULATOR Arm First-Time Configuration
After assembling an OpenMANIPULATOR arm, its servos must first be configured properly before it can be used. By default, all the arm motors are set to the same ID (1) and the wrong baud rate, which causes collisions when trying to detect them.
- Setup OpenCR with Arduino IDE using OpenCR 1.0 manual, “Arduino IDE” section
- Download Dynamixel Wizard 2.0 if not already installed.
- Connect a SINGLE motor (no daisy-chains in the arm) to the OpenCR module and DISCONNECT ALL OTHER MOTORS (the wheel motors!!)
- Open up Dynamixel Wizard 2.0 and update the firmware for that motor by following this tutorial. The arm Dynamixel model is XM430-W350, and the wheel motors are XM430-W210.
- Scan for connected Dynamixels using the “Scan” button on the top menu. If the scan does not turn up any results, you may need to change the scan options in the "Options" menu. By default, an unconfigured arm motor will have ID 1, be on Protocol 2.0, and have a baud rate of 57600 bps.
- Change the ID for the detected motor from 1 to 11/12/13/14/15 (whichever you're doing the procedure for). Click on the “ID” item, and find the ID # you want in the lower right corner. Click it and press “Save”.
- Change the baud rate to 1M (if not already 1M). Click on the “Baud Rate (Bus)” item, and find the 1 Mbps option. Click it and press “Save”.
- Disconnect the motor (both in the wizard by clicking “Disconnect” up top and physically disconnecting from the board) and repeat the steps for the remaining ones.
Attaching/Detaching the OpenMANIPULATOR Arm
Physical Attachment/Detachment
Follow these steps below:
- The arm can be attached and detached by first removing the top layer of the the Turtlebot. There are 10 screws around the perimeter of the top layer that you will need to remove with a Phillips head / cross screwdriver.
- Once the top layer of the Turtlebot is loose, disconnect the cable that is attached to the LiDAR. This cable is multi-colored with several pins.
Note: ONLY remove this LiDAR cable in this step.Once the top layer is fully disconnected, flip the top layer upside-down for easy access.

- To connect the arm, there are four screws that you will need to insert through the bottom side of the top layer that connect to Dynamixel #11. The exact location of the screws are marked in the picture below. Use an hex/allen key to secure them.
- Once the arm is securely attached, thread the cable connected to DynaMIXEL #11 through the top layer (if not already threaded) and attach the other end to the remaining 3-pin slot on the OpenCR board. It should be the open slot adjacent to the already occupied slots.
- Reconnect the LiDAR cable and re-screw the top layer onto the robot.
To disconnect the arm, follow the same steps as above, but remove the four screws instead and disconnect the DynaMIXEL.
Updating Firmware and Files
Every time the arm is attached or detached, you will need to reconfigure environment variables and update the OpenCR firmware.
If you are attaching the arm, set the environment variable OPENCR_MODEL=om_with_tb3 and ensure that OPENCR_PORT=/dev/ttyACM0 in the ~/.bashrc file.
$ export OPENCR_PORT=/dev/ttyACM0
$ export OPENCR_MODEL=om_with_tb3Source the file and update the firmware with:
$ source ~/.bashrc$ cd ~/opencr_update && ./update.sh $OPENCR_PORT $OPENCR_MODEL.opencrIf you are detaching the arm, set the environment variable OPENCR_MODEL=waffle and ensure that OPENCR_PORT=/dev/ttyACM0 in the ~/.bashrc file.
Enter the OpenCR board into firmware recovery mode by pressing and holding SW2, and simultaneously pressing RESET (you will need to remove the top layer of the turtlebot in order to access those OpenCR buttons). If you want to read more about the OpenCR bootloader, please refer to this page in the OpenCR 1.0 manual.
Source the file and update the firmware with:
$ source ~/.bashrc$ cd ~/opencr_update && ./update.sh $OPENCR_PORT $OPENCR_MODEL.opencrCommon Errors During Setup
Firmware Recovery Mode and Device Firmware Update for OpenCR Board
We found the firmware recovery mode not clearly detailed in the Turtlebot3 manual. Here are the steps for firmware recovery:
- Push and hold SW2
- Press RESET
- Release SW2
- Arduino code should upload successfully with
jump_with_fw
Firmware recovery is different from device firmware update (DFU), where the steps are:
- Push and hold BOOT
- Press RESET
- Release BOOT
Troubleshooting /dev/ttyACM0 Connection Issues
If the /dev/ttyACM0 port isn't found or running bringup on the Pi is hanging:
- Make sure
$OPENCR_MODELis correct (wafflefor no arm,om_with_tb3for arm) - Disconnect and reconnect the USB cable connecting the Pi and OpenCR board
- Enter firmware recovery (SW2 + RESET)
- Reinstall the firmware with ./update.sh $OPENCR_PORT $OPENCR_MODEL.opencr (see more detailed steps above in the prior section on attaching/detaching the arm)
- [If the above doesn’t work] Restart
roscore - [If the above doesn’t work] Reupload the sketch using the Arduino IDE (install instructions) in
Examples > OpenCR > Etc > usb_to_dxlto the OpenCR board (which you'll need to directly connect to your computer)
If the hydro rosserial / groovy Arduino error appears:
- Configure the arm motors as described in the previous section on attaching/detaching the arm
- Enter firmware recovery (SW2 + RESET)
- Reinstall the firmware with ./update.sh $OPENCR_PORT $OPENCR_MODEL.opencr
- Set up the wheel motors by uploading the sketch using the Arduino IDE (install instructions) in
Examples > TurtleBot3 > turtlebot3_setup > turtlebot3_setup_motorto the OpenCR board (which you'll need to directly connect to your computer)
Installation et démarrage du OpenManipulator-X & Turtlebot 3
Suivre d'abord https://innovation.iha.unistra.fr/books/robotique-open-source/page/installation-et-demarrage-du-turtlebot-3
Montage et Configuration des Dynamixels
https://www.classes.cs.uchicago.edu/archive/2022/fall/20600-1/turtlebot_assembly_setup.html
- Installer Arduino IDE :
sudo apt install arduino - https://emanual.robotis.com/docs/en/parts/controller/opencr10/#install-on-linux
- Connecter OpenCR https://emanual.robotis.com/docs/en/platform/turtlebot3/manipulation/#arduino-ide
- Installer Dynamixel Wizard https://emanual.robotis.com/docs/en/software/dynamixel/dynamixel_wizard2/
- Lancer Dynamixel Wizard
cd ~/ROBOTIS/DynamixelWizard2 bash DynamixelWizard2.sh - Si une erreur de dépendance apparait, désinstaller/réinstaller/upgrader dynamixelWizard via l'executable
~/ROBOTIS/DynamixelWizard2/maintenancetool
https://emanual.robotis.com/docs/en/software/dynamixel/dynamixel_wizard2/#uninstall-linux
Pour l'Open-Manipulator
Configurer les dynamixel (baud et ID 11 à 15) https://www.classes.cs.uchicago.edu/archive/2022/fall/20600-1/turtlebot_assembly_setup.html#arm-first-time :
- Connect a SINGLE motor (no daisy-chains in the arm) to the OpenCR module and DISCONNECT ALL OTHER MOTORS (the wheel motors!!)
- Open up Dynamixel Wizard 2.0 and update the firmware for that motor by following this tutorial. The arm Dynamixel model is XM430-W350, and the wheel motors are XM430-W210.
- Scan for connected Dynamixels using the “Scan” button on the top menu. If the scan does not turn up any results, you may need to change the scan options in the "Options" menu. By default, an unconfigured arm motor will have ID 1, be on Protocol 2.0, and have a baud rate of 57600 bps.
- Change the ID for the detected motor from 1 to 11/12/13/14/15 (whichever you're doing the procedure for). Click on the “ID” item, and find the ID # you want in the lower right corner. Click it and press “Save”.
- Change the baud rate to 1M (if not already 1M). Click on the “Baud Rate (Bus)” item, and find the 1 Mbps option. Click it and press “Save”.
- Disconnect the motor (both in the wizard by clicking “Disconnect” up top and physically disconnecting from the board) and repeat the steps for the remaining ones
Pour le Turtlebot
Via Arduino IDE ou DynamixelWizard en s'inspirant de : https://emanual.robotis.com/docs/en/platform/turtlebot3/faq/#setup-dynamixels-for-turtlebot3
- Moteur gauche : ID=1
- Moteur droit : ID=2
- Baud rate : 1M
Test depuis un PC sans la raspberry
Téléopération du OpenManipulator-X seul
Suivre le tutoriel Foxy en remplaçant foxy par humble et foxy-devel par ros2 en utilisant l'interface de communication OpenCR : https://emanual.robotis.com/docs/en/platform/openmanipulator_x/quick_start_guide/
Pour tester le bon fonctionnement du bras et de sa pince, on connecte la carte OpenCR directement à un PC ayant ROS Humble préinstallé :
- Installer et compiler le workspace
sudo apt install ros-humble-rqt* ros-humble-joint-state-publisher
mkdir -p ~/openmanipulator_ws/src/
cd ~/openmanipulator_ws/src/
git clone -b ros2 https://github.com/ROBOTIS-GIT/DynamixelSDK.git
git clone -b ros2 https://github.com/ROBOTIS-GIT/dynamixel-workbench.git
git clone -b ros2 https://github.com/ROBOTIS-GIT/open_manipulator.git
git clone -b ros2 https://github.com/ROBOTIS-GIT/open_manipulator_msgs.git
git clone -b ros2 https://github.com/ROBOTIS-GIT/open_manipulator_dependencies.git
git clone -b ros2 https://github.com/ROBOTIS-GIT/robotis_manipulator.git
cd ~/openmanipulator_ws && colcon build --symlink-install- Corriger le bug de compilation et re-compiler. Dans
src/open_manipulator/open_manipulator_x_controller/src/open_manipulator_x_controller.cpp, lignes 67-68, remplacer :
par :this->declare_parameter("sim");this->declare_parameter("control_period");
this->declare_parameter("sim", false);this->declare_parameter("control_period", 0.010); - Lancer
arduino - Uploader l'exemple
File > Examples > OpenCR > 10.Etc > usb_to_dxlvers OpenCR
- Si cela réussit, jump_to_fw apparaît, sinon essayer d'uploader une seconde fois
- Lancer le contrôleur du robot. Attention les moteurs vont bouger et se bloquer dans la position initiale
ros2 launch open_manipulator_x_controller open_manipulator_x_controller.launch.py usb_port:=/dev/ttyACM0 - Dans un second terminal, lancer le noeud de téléopération :
ros2 run open_manipulator_x_teleop teleop_keyboard - Piloter le robot dans l'espace Cartésien ou articulaire avec les touches indiquées
Programmation hors-ligne du OpenManipulator-X et TurtleBot3 depuis MoveIt
On suit le tutoriel https://emanual.robotis.com/docs/en/platform/turtlebot3/manipulation/#operate-the-actual-openmanipulator en installant tout ce qui est censé être installé sur le raspberry [SBC]/[TurtleBot3] sur le PC [Remote PC].
- Installer le workspace et compiler :
sudo apt install ros-humble-dynamixel-sdk ros-humble-ros2-control ros-humble-ros2-controllers ros-humble-gripper-controllers ros-humble-moveit
cd ~/turtlebot3_ws/src/
git clone -b humble-devel https://github.com/ROBOTIS-GIT/turtlebot3_manipulation.git
cd ~/turtlebot3_ws && colcon build --symlink-install- Ajouter au
~/.bashrc:
export ROS_DOMAIN_ID=30 #TURTLEBOT3
export LDS_MODEL=LDS-02
export TURTLEBOT3_MODEL=waffle_pi
export OPENCR_PORT=/dev/ttyACM0
export OPENCR_MODEL=turtlebot3_manipulation- AVANT TOUT FLASHAGE DE OPENCR, se mettre en mode debug en
- Rester appuyé sur le bouton SW2
- Appuyer quelques secondes sur RESET
- Relacher RESET
- Relacher SW2
- ATTENTION SI LE MODE DEBUG n'est pas activé, il se peut
jump_fwsoit affiché mais que le flashage ait échoué. - Configurer OpenCR pour turtlebot3_manipulation depuis Arduino
File > Examples > Turtlebot3 ROS2 > turtlebot3_manipulationou avec le prebuild :
rm -rf ./opencr_update.tar.bz2
wget https://github.com/ROBOTIS-GIT/OpenCR-Binaries/raw/master/turtlebot3/ROS2/latest/opencr_update.tar.bz2
tar -xvf opencr_update.tar.bz2
cd ./opencr_update
./update.sh $OPENCR_PORT $OPENCR_MODEL.opencr- Démarrer ROS Control :
ros2 launch turtlebot3_manipulation_bringup hardware.launch.py - Le setup a fonctionné si le robot apparaît dans la bonne configuration dans RViz !
- Dans un second terminal démarrer au choix :
- MoveIt pour la programmation hors-ligne et planification de trajectoire :
ros2 launch turtlebot3_manipulation_moveit_config moveit_core.launch.py- Piloter le robot en bougeant les flèches dans RViz et en cliquant sur "Plan and Execute"
- MoveIt servo
ros2 launch turtlebot3_manipulation_moveit_config servo.launch.py- et la téléopération avec le clavier (dans un 3ème terminal)
ros2 run turtlebot3_manipulation_teleop turtlebot3_manipulation_teleop - Piloter le robot dans l'espace Cartésien ou articulaire avec les touches indiquées
- et la téléopération avec le clavier (dans un 3ème terminal)
- MoveIt pour la programmation hors-ligne et planification de trajectoire :
Configuration OpenCR
Pour le Turtlebot : https://emanual.robotis.com/docs/en/platform/turtlebot3/opencr_setup/#opencr-setup
Pour l'OpenManipulator-X : https://emanual.robotis.com/docs/en/platform/turtlebot3/manipulation/#opencr-setup
Dépendances manquantes :
sudo apt install ros-humble-hardware-interface
ros-humble-ros2-control ?
ros-humble-joint-state-publisher ?Dépendances manquantes côté Raspberry :
sudo apt install rros-humble-gripper-controllers ros-humble-xacroDépendances manquantes côté PC :
sudo apt install ros-humble-moveit-servoIssues :
https://forum.robotis.com/t/ros-2-foxy-openxmanuipaltor-bringup-issues/2142/9
https://github.com/ROBOTIS-GIT/open_manipulator/issues/212
https://github.com/ROBOTIS-GIT/open_manipulator/issues/209
-----
Auteur: Gauthier Hentz, sur le wiki de l'innovation de l'IUT de Haguenau
Attribution-NonCommercial-PartageMemeConditions 4.0 International (CC BY-NC-SA 4.0)
4 - ROS2 - Manipulation Cobot
Universal Robot ROS2 Driver
Le Driver ROS2 pour les cobots Universal Robot a été développé en collaboration entre Universal Robots, le Forschungszentrum für Informatik (INRIA allemand) et PickNik Robotics. Plus précisément par nos voisins de Karlsruhe, en particulier Felix Exner (https://github.com/fmauch)). Le FZI est également à l'origine d'une proposition d'interface ROS standard pour les trajectoires Cartésiennes, qui est désormais implémentée dans les contrôleurs ROS Cartésiens d'Universal Robots. La proposition repose sur un état de l'art très intéressant des interfaces de programmation des marques de robot majeures.
Installation des paquets UR pour ROS2
- Réaliser l'installation de ROS2.
- Installer les paquets ros2 de Universal Robots
sudo apt install ros-humble-ur- Installer rosdep pour installer automatiquement les paquets Debian dont dépendent les paquets ROS
sudo apt install python3-rosdep- Si vous avez plusieurs versions de ROS2 installées, vérifiez que vous avez "sourcé" la bonne version de ROS2
- Mettre à jour les paquets dont ROS2 et les paquets UR dépendent
sudo rosdep init
rosdep update
sudo apt update
sudo apt dist-upgradeInstallation du simulateur hors-ligne URSim
https://github.com/UniversalRobots/Universal_Robots_ROS2_Driver#getting-started
https://github.com/UniversalRobots/Universal_Robots_ROS2_Driver#install-from-binary-packages
Le moyen le plus simple de découvrir et commencer à utiliser un robot UR avec ROS2 est d'utiliser la simulation de la console de programmation (teach panel) de son contrôleur. URSim est le simulateur hors-ligne de Universal Robots. Il permet de reproduire le comportement réel d'un robot quasiment à l'identique en se connectant à son adresse IP. Il est possible d'installer URSim 5 sur un Ubuntu <18 (non inclus!) ou dans une machine virtuelle (VirtualBox). Il faut se créer un compte pour télécharger le fichier URSim 5.13. Ubuntu 18 n'est plus supporté, et MoveIt2 tourne sur Ubuntu 22.
Sur Ubuntu 22
En attendant la sortie de URSim/Polyscope 6, la manière la plus simple d'installer URSim 5 sur Ubuntu 22 est via conteneur Docker créé par UR Lab (pas maintenu officiellement).
Installer Docker
Depuis les dépôts officiels Ubuntu :
sudo apt update
sudo apt install docker-composeAjouter votre utilisateur au groupe docker afin de manipuler les containers sans avoir à utiliser sudo systématiquement :
sudo usermod -aG docker $USERFermer et rouvrir la session. Tester la bonne installation :
sudo service docker start
docker run hello-worldInstaller le conteneur URSim
On suit le tutoriel fourni dans la documentation du driver UR ROS. Il existe une image docker fournie sur hub.docker.com, c'est très simple :
- Télécharger l'image docker
docker pull universalrobots/ursim_e-series- Lancer l'image sur 192.168.56.101 avec l'URCap external_control préinstallé. Les programmes installés et les changements d'installation seront stockés de manière persistante dans
${HOME}/.ursim/programs. Par exemple-m ur5e
ros2 run ur_robot_driver start_ursim.sh -m <ur_type>- Ouvrir l'interface URSim en suivant les instructions qui s'affichent dans la fenêtre de terminal
- Voir URSim en utilisant une application VNC, en se connectant à
192.168.56.101:5900 - Voir URSim en utilisant une application serveur web VNC http://192.168.56.101:6080/vnc.html
- Voir URSim en utilisant une application VNC, en se connectant à
Sur Windows 10/11
Pour les systèmes non-Linux, UR fournit une VM LUbuntu 14.04 qui peut tourner sous VirtualBox (gratuit) ou sur VMware (gratuit pour usage non commercial).
Installer VirtualBox
Télécharger et configurer la Machine Virtuelle
- Télécharger l'archive de la VM sur seafile ou en créant un compte chez UR
- Extraire l'archive dans
C:\Users\user\VirtualBox VMs\URSim_VIRTUAL-5.13.1.1131001 - Dans l'interface VirtualBox cliquer sur
Ajouter

- Sélectionner le Fichier machine virtuelle (
.vbox)C:\Users\user\VirtualBox VMs\URSim_VIRTUAL-5.13.1.1131001\URSim_VIRTUAL-5.13.1.1131001.vbox - La VM est entièrement préconfigurée, il suffit de la lancer

- La session Lubuntu est
- user :
ur - mdp :
easybot
- user :
- Lancer URSim pour l'UR5e

- Démarrer le robot en cliquant sur le bouton d'allumage "Power"
- Pour éteindre le robot

- Ou simplement éteindre la VM


Ajouter l'URCap External Control
- Installer Terminator qui permet de faire des copier-coller
sudo apt install terminator - Se placer dans le dossier d'échange qui fonctionne comme une clé USB
cd /home/ur/ursim-current/programs.UR5 - Lancer Terminator et télécharger le fichier
.urcapwget https://github.com/UniversalRobots/Universal_Robots_ExternalControl_URCap/releases/download/v1.0.5/externalcontrol-1.0.5.urcap - Démarrer URSim, ajouter l'URCap et redémarrer URSim

Configurer le réseau pour que les VMs communiquent
- Créer un réseau NAT dans les outils réseau

- Laisser la config par défaut

- Configurer chaque VM qui doit communiquer en
Réseau NAT, par défaut elles seront en DHCP sur le réseau10.0.2.0/24

- Récupérer l'adresse IP de la VM URSim avec
ip a, ici10.0.2.15

- Tester la communication de la VM ROS vers la VM URSim avec
ping 10.0.2.15

- Tester la communication de la VM URSim vers la VM ROS avec
ping 10.0.2.4 - Tester la communication entre ROS et URSim, voir la section dédiée
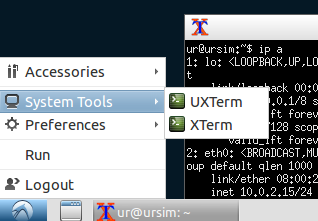
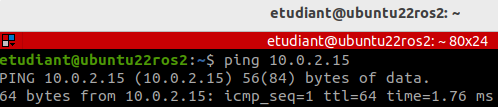
Démarrage et configuration URSim
- démarrer le robot
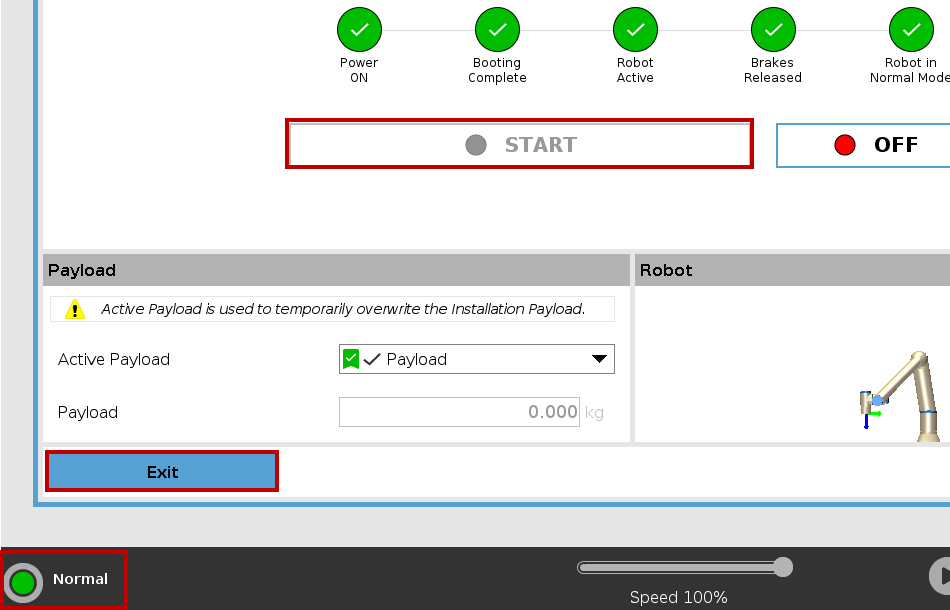
- Configuer l'IP de la VM ROS pour l'autoriser à prendre le contrôle externe

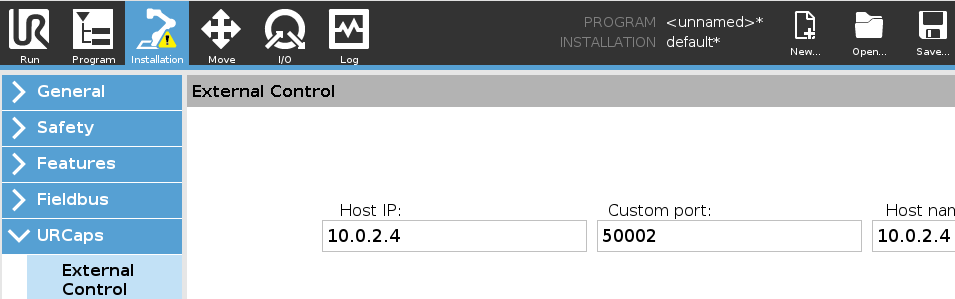
Programmation hors-ligne avec URSim et MoveIt2/RViz
- Réaliser l'installation de ROS2.
- Installer rosdep pour installer automatiquement les paquets Debian dont dépendent les paquets ROS
sudo apt install python3-rosdep- Si vous avez plusieurs versions de ROS2 installées, vérifiez que vous avez "sourcé" la bonne version de ROS2
- Mettre à jour les paquets dont ROS2 dépend
sudo rosdep init
rosdep update
sudo apt update
sudo apt dist-upgradesudo apt install python3-colcon-common-extensions sudo apt install python3-colcon-mixin colcon mixin add default https://raw.githubusercontent.com/colcon/colcon-mixin-repository/master/index.yaml colcon mixin update default
NOTES IMPORTANTES
- si vous utilisez Linux Mint 21.1 VERA (Mate ou Cinammon, basée sur Ubuntu 22 Jammy), il faudra toujours préciser la version d'Ubuntu `--os=ubuntu:jammy` dont on veut récupérer les paquets avec la commande `rosdep` :
sudo apt update && rosdep install -r --from-paths . --ignore-src --rosdistro $ROS_DISTRO -y --os=ubuntu:jammy- Si vous travaillez dans une VM d'un ordinateur ayant moins de 20GO de RAM (WSL par exemple). Ou sur un ordinateur Ubuntu ayant moins de 10GO de RAM, il faudra lancer la compilation `colcon` sans parallélisation des tâches (1 paquet compilé à la fois) `--parallel-workers 1` :
colcon build --mixin release --parallel-workers 1Déploiement du code source des Tutoriels de MoveIt
- Créer un répertoire de travail "workspace" pour la compilation du projet avec colcon
mkdir -p ~/ws_moveit2/src
- Se déplacer dans le workspace colcon et récupérer le code source des tutoriels MoveIt :
cd ~/ws_moveit2/src git clone https://github.com/ros-planning/moveit2_tutorials -b humble --depth 1
Optionnel : Installation d'un environnement de développement MoveIt2 avec les dernières améliorations et résolutions de bug
Installation de MoveIt2 Humble sur Ubuntu 22.04 :
- Installer vcstool qui est un outil Python pour gérer les dépôts git composant un paquet ROS.
sudo apt install python3-vcstoolcd ~/ws_moveit2/src
vcs import < moveit2_tutorials/moveit2_tutorials.reposNote : si `vcs import` vous demande vos identifiants GitHub, tapez Entrer jusqu'à ce que ça continue. Pas besoin d'identifiant pour récupérer un dépôt GitHub public.
Installation des dépendances et compilation
- Installer les dépendances ROS2 Humble (paquets debian stables).
sudo apt update && rosdep install -r --from-paths . --ignore-src --rosdistro $ROS_DISTRO -y
- Compiler MoveIt Tutorials (20+ minutes si vous avez choisi de déployer l'environnement de développement)
cd ~/ws_moveit2
colcon build --mixin release- Sourcer les paquets compilés :
cd ~/ws_moveit2
source ~/ws_moveit2/install/setup.bash- Optionnel, si vous utilisez principalement ce workspace : Sourcer automatiquement le workspace colcon au lancement d'un Terminal
echo 'source ~/ws_moveit2/install/setup.bash' >> ~/.bashrc
Tester la communication entre ROS et URSim
- Lancer URSim, par exemple avec un UR5e
ros2 run ur_robot_driver start_ursim.sh -m ur5e- Ouvrir l'interface URSim dans le navigateur : http://192.168.56.101:6080/vnc.html --> cliquer sur Connect
- Faire tourner le driver UR ROS2
ros2 launch ur_robot_driver ur_control.launch.py ur_type:=ur5e robot_ip:=192.168.56.101
- Si vous bougez le robot dans URSim vous le verrez bouger dans RViz.
Envoyer des commandes au contrôleur
Avant d'envoyer des commandes, vérifier l'état des contrôleurs en utilisant ros2 control list_controllers
-
Envoyer un objectif (goal) au contrôleur de trajectoire articulaire (Joint Trajectory Controller) en utilisant le noeud de démonstration du paquet ros2_control_demos. Dans nouveau Terminal (sans oublier de sourcer) :
ros2 launch ur_robot_driver test_scaled_joint_trajectory_controller.launch.pyAprès quelques secondes le robot devrait bouger.
-
Pour tester un autre contrôleur, il suffit de l'ajouter en argument de la commande
initial_joint_controller, par exemple en utilisant joint_trajectory_controller :ros2 launch ur_robot_driver ur_control.launch.py ur_type:=ur5e robot_ip:=192.168.56.101 initial_joint_controller:=joint_trajectory_controller launch_rviz:=true -
Et envoyer la commande avec le noeud de démo :
ros2 launch ur_robot_driver test_joint_trajectory_controller.launch.pyAprès quelques secondes le robot devrait bouger (ou sauter si la simulation est utilisée).
-----
Auteur: Gauthier Hentz, sur le wiki de l'innovation de l'IUT de Haguenau
Attribution-NonCommercial-PartageMemeConditions 4.0 International (CC BY-NC-SA 4.0)
Commander un robot UR avec le driver ROS2
Installation d'Ubuntu avec des capacités temps-réel
Pour un usage basique, un Ubuntu (ou Linux Mint) classique permet de piloter le robot :
- Installer Ubuntu LTS 22.04
- Le noyau linux est capable de temps réel sans modification depuis sa version 6.12
Pour éviter des instabilités il est conseillé d'installer un noyau Linux avec des capacités temps-réel (PREEMPT_RT kernel). En particulier avec un robot de la Série-E, la fréquence de contrôle plus élevée peut entraîner des trajectoires non fluides sans noyau temps-réel.
- Vérifier qu'il reste au moins 25Go d'espace disque
- On se place dans un dossier pour la compilation
mkdir -p ~/rt_kernel_build
cd ~/rt_kernel_buildtar xf linux-4.14.139.tar
cd linux-4.14.139
xzcat ../patch-4.14.139-rt66.patch.xz | patch -p1
make oldconfigRécupérer les sources du noyau temps-réel
-
- Regarder les versions LTS du noyau Linux : https://www.kernel.org/category/releases.html
- Regarder la version actuelle et les versions proposées par Ubuntu : Update Manager -> view -> Linux Kernel
- Regarder les versions maintenues activement du noyau PREEMPT_RT -> https://wiki.linuxfoundation.org/realtime/preempt_rt_versions
- Choisir la version du noyau Linux PREEMPT_RT maintenue activement correspondant à une version LTS et proposée par Ubuntu
- Exemple pour un Lenovo Thinkpad T480, Ubuntu 22.04
- Actuellement installé : 5.19 (non-LTS)
- Proposé : 5.19 et 5.15 (LTS)
- On choisit 5.15 car LTS et activement maintenu en PREEMPT_RT
- Pour Ubuntu 24.04 : 6.1 (LTS) https://cdn.kernel.org/pub/linux/kernel/projects/rt/6.1/
- Récupérer les sources pour
5.15.107-rt62
wget https://cdn.kernel.org/pub/linux/kernel/projects/rt/5.15/patch-5.15.107-rt62.patch.xz
wget https://cdn.kernel.org/pub/linux/kernel/projects/rt/5.15/patch-5.15.107-rt62.patch.sign
wget https://www.kernel.org/pub/linux/kernel/v5.x/linux-5.15.107.tar.xz
wget https://www.kernel.org/pub/linux/kernel/v5.x/linux-5.15.107.tar.sign-
- Décompresser les fichiers téléchargés
xz -dk patch-5.15.107-rt62.patch.xz
xz -d linux-5.15.107.tar.xzgpg2 --locate-keys torvalds@kernel.org gregkh@kernel.org
gpg2 --keyserver hkp://keys.gnupg.net --search-keys salisbury-
- Vérifier l'intégrité des fichiers source
gpg2 --verify linux-5.15.107.tar.signgpg: Good signature from "Greg Kroah-Hartman <gregkh@kernel.org>" [unknown]
gpg: WARNING: This key is not certified with a trusted signature!
gpg: There is no indication that the signature belongs to the owner.
gpg2 --verify patch-5.15.107-rt62.patch.signgpg: Good signature from "Tom Zanussi <tom.zanussi@linux.intel.com>" [unknown]
gpg: aka "Tom Zanussi <zanussi@kernel.org>" [unknown]
gpg: aka "Tom Zanussi <tzanussi@gmail.com>" [unknown]
gpg: WARNING: This key is not certified with a trusted signature!
gpg: There is no indication that the signature belongs to the owner.
Compiler le noyau temps réel
- Extraire l'archive tar, appliquer la patch et configurer le noyau temps-réel
tar xf linux-5.15.107.tar
cd linux-5.15.107
xzcat ../patch-5.15.107-rt62.patch.xz | patch -p1
make oldconfig- Choisir l'option
4. Fully Preemptible Kernel (RT) (PREEMPT_RT_FULL) (NEW)pour l'optionPreemption Model
Preemption Model
1. No Forced Preemption (Server) (PREEMPT_NONE)
> 2. Voluntary Kernel Preemption (Desktop) (PREEMPT_VOLUNTARY)
3. Preemptible Kernel (Low-Latency Desktop) (PREEMPT)
4. Fully Preemptible Kernel (RT) (PREEMPT_RT_FULL) (NEW)
choice[1-4]: 4
- Compiler le noyau
make -j `getconf _NPROCESSORS_ONLN` deb-pkg
- Après la compilation, installer les paquets
linux-headersetlinux-imagedans le dossier parent (pas les paquets-dbg)
sudo apt install ../linux-headers-5.15.107-rt62_*.deb ../linux-image-5.15.107-rt62_*.debDéfinir les permissions utilisateur pour exécuter des tâches temps-réel
- Le Driver ROS2 va planifier des threads avec les permissions de votre utilisateur. Il faut donc autoriser votre utilisateur à utiliser lancer des threads avec une priorité temps-réel. On créé le groupe des utilisateurs temps-réel et on y ajoute l'utilisateur :
sudo groupadd realtime
sudo usermod -aG realtime $(whoami)- S'assurer que
/etc/security/limits.confcontient :
@realtime soft rtprio 99 @realtime soft priority 99 @realtime soft memlock 102400 @realtime hard rtprio 99 @realtime hard priority 99 @realtime hard memlock 102400
Note: Pour que ces changements soient pris en compte il faut se déconnecter et se reconncter. On redémarrera plus tard.
https://github.com/HowardWhile/Ubunutu22.04-RT-Kernel
Configurer GRUB pour toujours booter le noyau temps-réel
- Lister les noyaux disponibles
awk -F\' '/menuentry |submenu / {print $1 $2}' /boot/grub/grub.cfg
menuentry Ubuntu
submenu Advanced options for Ubuntu
menuentry Ubuntu, with Linux 5.15.107-rt62
menuentry Ubuntu, with Linux 5.15.107-rt62 (recovery mode)
- Définir le noyau
5.15.107-rt62par défaut avec un pattern"submenu_name>entry_name"
sudo sed -i 's/^GRUB_DEFAULT=.*/GRUB_DEFAULT="Advanced options for Ubuntu>Ubuntu, with Linux 5.15.107-rt62"/' /etc/default/grub
$ sudo update-grubVérification de la capacité de préemption temps-réel
uname -v | cut -d" " -f1-4#1 SMP PREEMPT RT
Optionnel : Désactiver le CPU speed scaling
Les threads planifiés en temps-réel s'exécutent sans problème. Cependant, des composants externes tels que les systèmes de visual servoing, non planifiés pour le temps réel peuvent être interrompus par les fonctionnalités d'économie d'énergie des processeurs récents qui changent leur fréquence d'horloge de manière dynamique.
- Pour vérifier et modifier les modes d'économie d'énergie :
sudo apt install cpufrequtils
cpufreq-infocurrent CPU frequency is XXX MhZ
- Désactiver le changement de fréquence automatique :
sudo systemctl disable ondemand
sudo systemctl enable cpufrequtils
sudo sh -c 'echo "GOVERNOR=performance" > /etc/default/cpufrequtils'
sudo systemctl daemon-reload && sudo systemctl restart cpufrequtilsConfiguration du robot UR
https://docs.ros.org/en/ros2_packages/rolling/api/ur_robot_driver/installation/robot_setup.html
Récupération de la calibration usine
Les robots sont calibrés en usine. Pour que les calculs cinématiques effectués dans ROS soient exacts, il faut récupérer les données de calibration. Sinon la précision des trajectoires envoyées depuis ROS et exécutées sur le robot risquent d'être de l'ordre du centimètre (au lieu du dixième de millimètre en temps normal).
-----
Auteur: Gauthier Hentz, sur le wiki de l'innovation de l'IUT de Haguenau
Attribution-NonCommercial-PartageMemeConditions 4.0 International (CC BY-NC-SA 4.0)
Programmer un robot avec MoveIt2 - Jumeau Numérique
Prérequis : être arrivé au bout du tutoriel sur le Driver UR ROS2
Comment fonctionne la manipulation avec MoveIt ?
MoveIt2 est la plateforme de manipulation robotique pour ROS2. Il implémente un nombre important des dernières innovations en termes de :
- Planification de trajectoire
- Manipulation
- Perception 3D
- Cinématique
- Contrôle
- Navigation
https://moveit.picknik.ai/humble/doc/concepts/concepts.html
Premiers pas avec MoveIt dans RViz
Pour débuter avec MoveIt, on peut utiliser ses fonctionnalités de planification de trajectoire via le plugin MoveIt Display du logiciel de visualisation 3D de ROS RViz. C'est un outils très puissant pour débuguer des applications robotiques ROS. On verra que RViz est alors un jumeau numérique du vrai robot.
Les tutoriels pour débuter et approfondir ses compétences avec MoveIt sont en Anglais et fonctionnent avec le robot Panda de Franka Emika.
Nous reprenons ici le tutoriel pour débuter avec MoveIt, et l'appliquons à un UR5e avec le driver UR ROS2.
Avec un hardware simulé par ROS
Faire tourner le driver UR ROS2 :
- Jusqu'à ROS2 Humble
ros2 launch ur_robot_driver ur_control.launch.py ur_type:=ur5e robot_ip:=yyy.yyy.yyy.yyy fake_hardware:=true launch_rviz:=false - A partir de ROS2 Jazzy
ros2 launch ur_robot_driver ur_control.launch.py ur_type:=ur5e robot_ip:=yyy.yyy.yyy.yyy use_mock_hardware:=true launch_rviz:=false
Avec la simulation URSim
Sous Ubuntu 22 - docker
- Démarrer la simulation URSim pour un UR5e
ros2 run ur_robot_driver start_ursim.sh -m ur5e- Ouvrir l'interface URSim dans le navigateur : http://192.168.56.101:6080/vnc.html --> cliquer sur Connect
- Faire tourner le driver UR ROS2
ros2 launch ur_robot_driver ur_control.launch.py ur_type:=ur5e robot_ip:=192.168.56.101 launch_rviz:=falseSous Windows - VirtualBox
- Télécharger la VM URSim avec External Control préinstallé
- Configurer le réseau NAT VirtualBox, récupérer les adresses IP avec
ip aet tester la communication avecping 10.0.2.X, cf. : - Démarrer URSim
- Démarrer le robot virtuel
- Tester la communication entre ros_control et l'URCap external control, cf. https://innovation.iha.unistra.fr/books/robotique-open-source/page/universal-robot-ros2-driver#bkmrk-https%3A%2F%2Fgithub.com%2Fr
ros2 launch ur_robot_driver ur_control.launch.py ur_type:=ur5e robot_ip:=10.0.2.5 initial_joint_controller:=joint_trajectory_controller launch_rviz:=true
Avec le vrai robot
- Faire tourner le driver UR ROS2
ros2 launch ur_robot_driver ur_control.launch.py ur_type:=ur5e robot_ip:=192.168.0.10 launch_rviz:=falseLancer MoveIt et RViz
ros2 launch ur_moveit_config ur_moveit.launch.py ur_type:=ur5e launch_rviz:=true
https://ur-documentation.readthedocs.io/en/latest/index.html ?
Déplacer le Robot avec le Plugin MoveIt dans RViz
- On veut lancer une requête de planification de trajectoire
- On utilise le plugin MotionPlanning qui permet de configurer la requête via une interface graphique
Résultat
ros2_moveit2_ros2control_commande_externet_UR5e.mp4
Planification de trajectoire avec OMPL
Ajouter un obstacle
- Choisir une configuration cible faisable, sans collision
ros2_moveit2_OMPL_RRTconnect_evitement_collision_automatique
Tester différents algorithmes d'OMPL
- Algorithmes RRT d'exploration rapide stochastique d'arbre
ros2_moveit2_OMPL_RRTstar_evitement_collision_longueur_optimisee
Résultat
En optimisant la trajectoire avec RRTstar, on obtient un mouvement fluide, qui évite les collision avec l'environnement et de longueur minimisée. Voir la vidéo réalisée en salle robotique de l'IUT.
-----
Auteur: Gauthier Hentz, sur le wiki de l'innovation de l'IUT de Haguenau
Attribution-NonCommercial-PartageMemeConditions 4.0 International (CC BY-NC-SA 4.0)
Manipulation avancée avec AICA - déploiement Cloud
Prérequis
On déploie les TP avec une architecture client-serveur.
Avantages :
- Fonctionne sur postes Windows même peu puissants
- Pas besoin d'installer Docker, WSL, VirtualBox ou d'avoir de droits admin
- Déploiement d'autant d'environnements AICA qu'on veut sur une VM en un script
Côté serveur
- Une VM (machine virtuelle ou serveur physique) Linux
- Avec un accès SSH pour un utilisateur dans le groupe
sudo - De préférence avec GPU NVidia, les drivers propriétaires et
nvidia-container-toolkitinstallés - Avec
docker.ioinstallé
- Avec un accès SSH pour un utilisateur dans le groupe
Côté client
- Un PC avec une connexion rapide à la VM
- Chrome/Chromium installé avec support de WebGL
- VSCode/Codium installé avec l'extension
ms-vscode-remote.remote-ssh(sur Codium testerjeanp413.open-remote-ssh)
Si notre client est un PC Linux on peut avoir une expérience AICA complète en affichant RViz et AICA Launcher sur le PC : https://docs.aica.tech/docs/reference/manual-installation-launch#display-sharing
Installation de AICA sur le serveur via ssh
https://docs.aica.tech/docs/reference/manual-installation-launch
- Ouvrir VSCode
- Se connecter à la VM via SSH
- Ouvrir un Terminal dans VSCode
- Copier le dossier
dockerdans votre espace utilisateur/home/user/ - Copier la licence
aica-license-1.tomldansdocker/aica/ - Connecter la VM au dépôt Docker de AICA
cat /home/user/docker/aica/aica-license.toml | sudo docker login registry.licensing.aica.tech -u USERNAME --password-stdin - Build le ou les environnements docker nécessaires pour le TP depuis le fichier
launcher.tomlen leur donnant un nom, par ex.aica-yolo-web:
cd docker/aica sudo docker build -f /home/user/docker/aica/aica-launcher-yolo-web.toml -t aica-yolo-web .
TP3 - Vision par IA avec Yolo
Pour déploiement sur un serveur avec GPU NVidia et nvidia-container-toolkit :
#syntax=ghcr.io/aica-technology/app-builder:v2
[core]
"image" = "v5.1.0"
[packages]
# add components
#"@aica/components/rl-policy-components" = "v2.0.0"
"@aica/components/advanced-perception" = "v1.0.0" # contains YoloExecutor
"@aica/components/core-vision" = "v1.1.2" # contains CameraStreamer
"@aica/foss/toolkits/ml" = "v1.0.0-cpu24.04" # prerequisite for YoloExecutor
# other extensions
# add hardware collectionsPour déploiement sur un serveur sans GPU :
#syntax=ghcr.io/aica-technology/app-builder:v2
[core]
"image" = "v5.1.0"
[packages]
# add components
#"@aica/components/rl-policy-components" = "v2.0.0"
"@aica/components/advanced-perception" = "v1.0.0" # contains YoloExecutor
"@aica/components/core-vision" = "v1.1.2" # contains CameraStreamer
"@aica/foss/toolkits/ml" = "v1.0.0-cpu24.04" # prerequisite for YoloExecutor
# other extensions
"@aica/foss/web-video-server" = "v0.1.0" # enables web streaming of video topics
# add hardware collectionsSi elles ne sont pas déjà dispo dans docker/ télécharger et compiler les composants dépendants, par ex. :
"my-local-package" = "docker-image://my-custom-component-package"Démarrer une instance du conteneur aica-yolo-web nommée aica en lui passant le dossier persistant aica-yolo-web/persistent/ qui sera disponible dans un dossier persistent/ :
sudo docker run -it --rm --privileged --net=host -v /home/user/docker/aica/aica-license.toml:/license:ro -v /home/user/docker/aica/aica-yolo-web/persistent/:/persistent:rw -e AICA_SUPER_ADMIN_PASSWORD=12345678 --name aica aica-yolo-web- L'argument
-e AICA_SUPER_ADMIN_PASSWORD=12345678n'est nécessaire qu'au premier démarrage pour pouvoir créer un compte Admin.
Il peut y avoir des Warnings qui ne sont à ignorer et apparaissent si Cloud Storage n'est pas configuré ou si la vérification de license prend plus que quelques secondes :
[2024-11-18 13:38:16 +0000] [135] [INFO] Starting sync of cloud applications
[2024-11-18 13:38:16 +0000] [135] [WARNING] Sync failed
[2024-11-18 13:08:42 +0000] [151] [INFO] Waiting for licensing status... 5
[WARN] [1731935323.407252919] [EventEngine.ServiceHandler]: (404): Could not determine any license status- Dans l'onglet
Portsde VSCode, ajouter le port8080 - Dans le navigateur Chrome Ouvrir localhost:8080
- Se connecter avec les identifiants
super-admin,12345678 - Créer un compte Admin (Profile > change password) et bien noter les identifiants.
- La configuration de cette instance AICA sera sauvegardée dans
aica.sqlite,aica.sqlite-shmetaica.sqlite-wal - Pour garder et dupliquer la config, on peut copier les fichiers
.sqlitedans le dossierpersistent/
Attacher un Terminal à l'intérieur l'instance aica de aica-yolo-web :
sudo docker container exec -it -u ros2 aica /bin/bash
ros2 node listOn voit bien que le contenu du dossier de la VM aica-yolo-web/persistent/ est dispo dans le conteneur dans le dossier persistent/ :
ls persistent
aica.sqlite aica.sqlite-shm aica.sqlite-walDétacher le Terminal du conteneur avec CTRL+D ou en tapant exit.
Stopper le conteneur : docker container ps puis docker container stop <container_name>.
Déroulé du TP3
Define a workcell setup
AICA studio -> Hardware -> modify URDF of e.g. UR5e
Build a custom package for Workcell or moveit python API script
https://github.com/aica-technology/community/blob/main/extensions/topic_based_ros2_control/aica-package.toml
source = "git://github.com/hellantos/ur5e_cell#start-of-training:ur5e_cell_description"
Manipulation avancée avec AICA - déploiement on Premise
Pour déploiement sur un PC Linux avec GPU et nvidia-container-toolkit :
#syntax=ghcr.io/aica-technology/app-builder:v2
[core]
"image" = "v5.0.1"
[packages]
# add components
#"@aica/components/rl-policy-components" = "v2.0.0"
"@aica/components/core-vision" = "v1.1.2"
"@aica/foss/toolkits/cuda" = "v1.0.0-cuda24.12"
"@aica/foss/toolkits/ml" = "v1.0.0-gpu24.12"
# add hardware collections
"@aica/collections/ur-collection" = "v4.2.0"Pour déploiement sur un serveur sans accélération graphique :
#syntax=ghcr.io/aica-technology/app-builder:v2
[core]
"image" = "v5.0.1"
[packages]
# add components
#"@aica/components/rl-policy-components" = "v2.0.0"
"@aica/components/core-vision" = "v1.1.2"
"@aica/foss/toolkits/ml" = "v1.0.0-cpu24.04"
# add hardware collections
"@aica/collections/ur-collection" = "v4.2.0"cat /home/user/aica/aica-license.toml | sudo docker login registry.licensing.aica.tech -u USERNAME --password-stdin
sudo docker build -f /home/user/aica/aica-application.toml -t aica-runtime .
sudo docker run -it --rm --privileged --net=host -v /home/user/aica/aica-license.toml:/license:ro aica-runtime
Roomba ROS2
Connexion physique
http://www.robotappstore.com/Knowledge-Base/3-Serial-Port-Baud-Rate-Configuration/17.html
https://fr.aliexpress.com/item/1005004346786275.html
https://www.yoctopuce.com/FR/article/piloter-un-roomba-avec-un-module-yoctopuce
https://www.adafruit.com/product/2438
https://www.crc.id.au/hacking-the-roomba-600/
ROS2
Roomba ROS2
https://hackaday.io/project/178565-roomba-rpi
https://github.com/process1183/roomba-rpi
https://github.com/process1183/roomba-ros2
https://hackaday.io/project/183524-controll-yer-roomba-600-series-with-esp8266
CRASHbot, Ubuntu 18 for NVidia Jetson nano, ROS Melodic, AutonomyLab create-robot
https://www.hackster.io/andrewrgross/crashbot-part-1-planning-a-ros-roomba-helper-robot-d1c8cc
Roomblock Ubuntu 16 ROS Kinetic
https://www.instructables.com/Roomblock-a-Platform-for-Learning-ROS-Navigation-W/
https://github.com/tork-a/roomblock
Ressources
https://github.com/AutonomyLab/create_robot/tree/humble
https://github.com/process1183/roomba-ros2
https://github.com/process1183/roomba-rpi
Application
https://www.hackster.io/search?i=projects&q=roomba
https://www.hackster.io/andrewrgross/crashbot-part-1-planning-a-ros-roomba-helper-robot-d1c8cc
https://www.hackster.io/ssbaker/making-roomba-smarter-800-series-40c5e2
https://www.hackster.io/FANUEL_CONRAD/automatic-soap-dispenser-75abd6
Bras Robot éducatif- Arduino, ROS2
Etat de l'art Bras robot low-cost
Modèles commerciaux fermés
Niryo Ned 2
- 6DOF + Pince
https://niryo.com/fr/produit/bras-robotise-6-axes/
https://github.com/NiryoRobotics
DAGU Six-servo Robot Arm
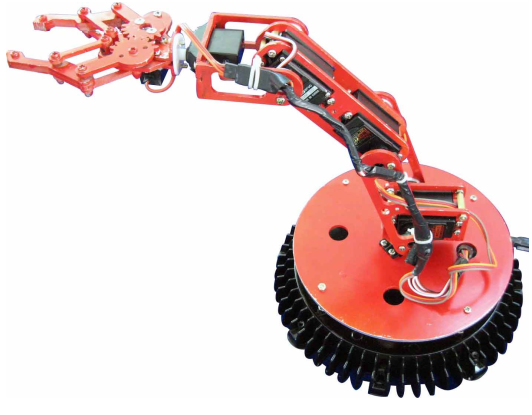
- 5DOF Manipulateur + 1DOF Pince
- 6 servos
- 3x 13 kg.cm torque metal gear, 40.4 * 19.8 * 36 mm, 48g, 0.22s/60°
- 1x 3.2 kg.cm, 39.5 x20.0x35.5mm, 41g, 0.27s/60°
- 2x 2.3 kg.cm, 28 x14x29.8mm, 18g, 0.13/60°
- Carte de contrôle AREXX Intelligence Centre
https://seafile.unistra.fr/d/693101e6046d4819a3af/
https://arexx.com/product/robot-arm/
Modèles Open Source
https://github.com/AntoBrandi/Robotics-and-ROS-2-Learn-by-Doing-Manipulators
Trossen Robotics ALOHA
Stationary
https://docs.trossenrobotics.com/trossen_arm/main/specifications.html
https://docs.trossenrobotics.com/aloha_docs/2.0/specifications.html#aloha-stationary
https://docs.trossenrobotics.com/aloha_docs/2.0/operation/stationary.html
Solo
| Dimensions | 1019D x 1066H x 1225W mm |
| Leader Arms | WidowX 250 S - Aloha Version |
| Follower Arms | ViperX 300 S - Aloha Version |
| Camera | 2x Intel RealSense D405 |
| Chassis | Modular |
| Computer | Coming Soon |
| USB Hubs | Yes 1X |
https://docs.trossenrobotics.com/aloha_docs/2.0/specifications.html#aloha-solo
https://docs.trossenrobotics.com/aloha_docs/2.0/operation/solo.html
Trossen Robotics (Interbotix) X-Series Arms
https://docs.trossenrobotics.com/interbotix_xsarms_docs/specifications.html
Waveshare RoArm
- 5DOF + pince Waveshare
- https://github.com/waveshareteam/roarm_ws
- https://www.waveshare.com/product/roarm-m3.htm?sku=30444
ROBOTIS OMX
Follower:
- 5DOF + pince
- https://ai.robotis.com/omx/introduction_omx.html
Leader:
ROBOTIS Open Manipulator-P
ROBOTIS Open Manipulator-X
https://emanual.robotis.com/docs/en/platform/openmanipulator_x/specification/#specification
- 4 DOF Manipulateur + 1 DOF Pince
- 6x Dynamixel XM430-W350 https://emanual.robotis.com/docs/en/dxl/x/xm430-w350/
- Carte de contrôle Robotis OpenCR1.0 https://emanual.robotis.com/docs/en/parts/controller/opencr10/
SO-ARM100
https://github.com/TheRobotStudio/SO-ARM100
- 5 DOF Manipulateur + 1 DOF Pince
- 6 servos Feetech STS3215 https://www.feetechrc.com/en/2020-05-13_56655.html
- Waveshare Serial Bus Servo Driver Board https://www.waveshare.com/wiki/Bus_Servo_Adapter_(A)
- OU
- Feetech FE-URT-1 https://www.feetechrc.com/FE-URT1-C001.html
https://github.com/huggingface/lerobot/blob/main/examples/10_use_so100.md
https://github.com/JafarAbdi/ros2_so_arm100
pince compatible SO-ARM
Poppy Ergo JR
6DOF mais architecture semble optimisée pour faible le coût, qui n'a plus trop de sens avec le coût des servos Feetech. Une architecture 5DOF ou "typique industrielle" de type épaule poignet semble plus intéressante.
https://www.poppy-education.org/robots/poppy-ergo-jr/
Cartes de contrôle
OpenCR1.0
https://emanual.robotis.com/docs/en/parts/controller/opencr10/
- STM32F746ZGT6 / 32-bit ARM Cortex®-M7 with FPU (216MHz, 462DMIPS)
Reference Manual, Datasheet - Programmer : ARM Cortex 10pin JTAG/SWD connector
USB Device Firmware Upgrade (DFU)
Serial - Digital I/O
- 32 pins (L 14, R 18) *Arduino connectivity
- 5Pin OLLO x 4
- GPIO x 18 pins
- PWM x 6
- I2C x 1
- SPI x 1
- Communication Ports
- USB x 1 (Micro-B USB connector/USB 2.0/Host/Peripheral/OTG)
- TTL x 3 (B3B-EH-A / DYNAMIXEL)
- RS485 x 3 (B4B-EH-A / DYNAMIXEL)
- UART x 2 (20010WS-04)
- CAN x 1 (20010WS-04)
Waveshare Serial Bus Servo Driver Board
https://www.waveshare.com/wiki/Bus_Servo_Adapter_(A)
- Supports connecting to a host or MCU
- up to 253 ST/SC series serial bus servos
- RS485
- UART pour contrôle depuis Arduino, ESP32, STM32 (RX-RX, TX-TX)
- USB pour contrôle via Raspberry, Jetson ou PC
- 9~12.6V voltage input (the input voltage and the servo voltage must be matched)
Feetech FE-URT-1
https://www.feetechrc.com/FE-URT1-C001.html
AREXX Intelligence Centre
https://seafile.unistra.fr/d/693101e6046d4819a3af/
- atmega168 MCU
- RS232
- default baud rate is 115.2k
- Wifi wireless control reserve the ISP downloaded, you can download the MCU controller program using the STK500 ISP cable

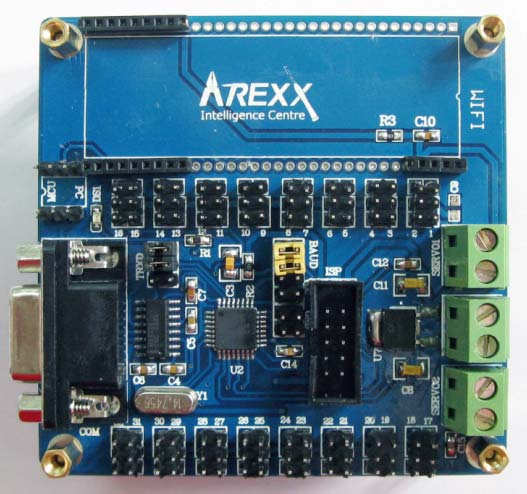
- dual - Power Supply
- 6 ~ 12 V SCM power
- 4.8 ~ 6 V, 1.2A servo motor power [servo motor power supply Road 1-16 respectively, a 17-32 road supply port])
Servomoteurs
Dynamixel XM430-W350
https://emanual.robotis.com/docs/en/dxl/x/xm430-w350/
- 4.1 [N.m] (at 12.0 [V], 2.3 [A])
- 46 [rev/min] (at 12.0 [V])
- 10.0 ~ 14.8 [V]
- Operating Modes
- Current Control Mode
- Velocity Control Mode
- Position Control Mode (0 ~ 360 [°])
- Extended Position Control Mode (Multi-turn)
- Current-based Position Control Mode
- PWM Control Mode (Voltage Control Mode)
- baud rate 9,600 [bps] ~ 4.5 [Mbps]
- TTL Half Duplex Asynchronous Serial Communication with 8bit, 1stop, No Parity
- RS485 Asynchronous Serial Communication with 8bit, 1stop, No Parity
Feetech STS3215
https://www.feetechrc.com/en/2020-05-13_56655.html
SO-ARM100 - Robotique éducative
Les bases d'un bras robot
https://docs.phospho.ai/learn/overview
Pilotage bras robot avec Scratch
https://www.poppy-education.org/activites/initiation-ergo-jr-et-scratch/
Pilotage du SO-ARM100 avec Phospho
https://docs.phospho.ai/learn/overview
Simulation et pilotage du SO-ARM100 avec ROS2
Attention avant d'utiliser le robot avec ROS2, il faut avoir calibré les servomoteurs, par ex. avec le script de calibration du projet LeRobot
https://github.com/JafarAbdi/ros2_so_arm100
https://discourse.openrobotics.org/t/interactive-so-101-ik-in-ros-2-with-viser-robokin/53850
Jumeau numérique
Pilotage de la simulation ou du vrai robot
https://github.com/tessel-la/robo-boy
Adapter le tuto suivant au SO-ARM100 : https://innovation.iha.unistra.fr/books/robotique-open-source/page/programmer-un-robot-avec-moveit2-jumeau-numerique
Contrôle des moteurs par un GUI de "jogging"
Joint Trajectory Controller
ros2 run rqt_joint_trajectory_controller rqt_joint_trajectory_controller
https://github.com/tessel-la/robo-boy
Contrôle de l'outil sans collisions via le plugin MoveIt de RViz
Cartesian Trajectory
ros2 launch so_arm100_moveit_config moveit_rviz.launch.py
Réalisation d'un programme en Python
# set plan start state to current state panda_arm.set_start_state_to_current_state() # set pose goal with PoseStamped message pose_goal = PoseStamped() pose_goal.header.frame_id = "panda_link0" pose_goal.pose.orientation.w = 1.0 pose_goal.pose.position.x = 0.28 pose_goal.pose.position.y = -0.2 pose_goal.pose.position.z = 0.5 panda_arm.set_goal_state(pose_stamped_msg=pose_goal, pose_link="panda_link8") # plan to goal plan_and_execute(panda, panda_arm, logger)
En utilisant l'environnement de développement Jupyter Notebook https://moveit.picknik.ai/main/doc/examples/jupyter_notebook_prototyping/jupyter_notebook_prototyping_tutorial.html
Pilotage du bras robot par LeRobot (IA, VR, etc.)
Environnement Python sous Windows ou Linux
Contrôle du bras par clavier ou manette
Avec LeRobot+Phospho https://docs.phospho.ai/basic-usage/teleop
ou avec ROS2+MoveIt2 https://moveit.picknik.ai/main/doc/examples/jupyter_notebook_prototyping/jupyter_notebook_prototyping_tutorial.html
Contrôle du bras par Oculus Quest
Compatible LeRobot (WIndows et Ubuntu) :
- alternative gratuite et open source à phospho
- https://github.com/vladfatu/telerobot
Depuis Windows :
- Appli Oculus Phospho https://docs.phospho.ai/examples/teleop
- 222€ https://www.meta.com/en-gb/experiences/phospho-teleoperation/8873978782723478/
Depuis Ubuntu avec ROS2 et moveit_servo :
- https://github.com/ZorAttC/franka_vr
- https://moveit.picknik.ai/main/doc/examples/realtime_servo/realtime_servo_tutorial.html
- https://github.com/rail-berkeley/oculus_reader
- Enable Oculus Quest development mode
- Always allow USB debugging from this computer
- Connexion USB (ADB) ou wifi
Autre : https://github.com/lts0429/teleoperation
Contrôle du bras via un modèle d'IA
https://docs.phospho.ai/basic-usage/inference
- Créer un compte huggingface.ia
- Sign In dans phosphobot
- Dans les paramètres, ajouter la clé d'API huggingface
- Par défaut l'inférence du modèle d'IA qui permet de piloter le robot depuis l'image des caméras tournera sur un GPU sur les serveurs de huggingface ou phospho
- On peut faire tourner l'inférence du modèle d'IA sur le PC local s'il a une bonne carte graphique NVidia
- Suivre ces instructions : https://github.com/phospho-app/phosphobot/tree/main/inference#setup-a-server
- Démarrer le serveur d'inférence uv
uv run ACT/server.py --model_id=<CHEMIN_VERS_LE_MODELE_LOCAL>- Appeler le serveur d'inférence depuis un script python : https://docs.phospho.ai/basic-usage/inference#2-call-your-inference-server-from-a-python-script
Pilotage ST3215 depuis un ESP32 (embarqué, micro-ROS)
Sans utiliser la carte de contrôle Feetech/Waveshare
(5€) : https://github.com/sepastian/ESP32_ST3215
Pilotage bluetooth depuis un smartphone
Utiliser l'ESP32 pour faire l'interface bluetooth vers une télécommande smartphone ? Avec ou sans carte de contrôle officielle (cf. ci-dessus) ?
Micro-ROS avec bras robot
- approche pour grasping référencée capteur via un TOF-sensor
https://micro.ros.org/docs/tutorials/demos/openmanipulator_demo/
- Télécommander une pose relative de la pince via un capteur https://micro.ros.org/docs/tutorials/demos/moveit2_demo/
6-DoF Inertial Measurement Unit (LSM6DSL), composed of an accelerometer and a gyroscope, and a 3-DoF magnetometer (LIS3MDL). The fusion of the measurements fetched by these sensors outputs the pose, or relative orientation of the board with respect to a fixed reference frame.
ROS2 avec SO-ARM101
ROS2 et MoveIt2
Installer les paquets ROS2 du SO-ARM100 :
- Cloner le paquet dans un workspace ROS2 https://github.com/JafarAbdi/ros2_so_arm100
- Cloner le submodule https://github.com/TheRobotStudio/SO-ARM100 dans
so_arm100_description/SO-ARM100(https://www.freecodecamp.org/news/how-to-use-git-submodules/) - Ou simplement :
mkdir -p ~/ws_so_arm100/src
cd ~/ws_so_arm100/src
git clone --recurse-submodules https://github.com/JafarAbdi/ros2_so_arm100
cd ~/ws_so_arm100
sudo rosdep init
rosdep update && rosdep install --ignore-src --from-paths src -y
colcon build --symlink-install # dans une VM ajouter --parallel-workers 1
source install/setup.bash
ros2 launch so_arm100_moveit_config demo.launch.py hardware_type:=mock_components # hardware_type:=real for running with hardwareTester la démo en simulation :
- Lancer un des scripts : https://github.com/JafarAbdi/ros2_so_arm100?tab=readme-ov-file#usage
Pilotage des servomoteurs : TTL, RS232, RS485
Modes de contrôle des servomoteurs
Regarder la classification des constructeurs permet de se rendre compte des différentes manières de piloter un servomoteur :
- Feetech https://www.feetechrc.com/
- Robotis :
Cela va donc du contrôle PWM jusqu'aux bus et protocoles industriels :
- Servos de modélisme asservis en position "servo 180°" ou en vitesse "servo 360°" via signal PWM
- Feetech "PWM series servo" https://www.feetechrc.com/pwm%20series%20servo.html
- https://arduino.blaisepascal.fr/conversion-numeriqueanalogique-pwm/
- https://arduino.blaisepascal.fr/communication-2/
- https://arduino.blaisepascal.fr/premiers-pas/faire-tourner-les-servos-2/
- https://arduino.blaisepascal.fr/servo-suiveur/
- https://arduino.blaisepascal.fr/les-servomoteurs/
- https://arduino.blaisepascal.fr/controle-dun-servomoteur/
- Feetech "PWM series servo" https://www.feetechrc.com/pwm%20series%20servo.html
- Servos pédagogiques Dynamixel "série X" ou Feetech "Smart Serial Bus Servo"
- TTL, ex. Feetech STS3235
- RS485, ex. Feetech SMS..
- TTL, ex. Feetech STS3235
- Servos professionnels Dynamixel "série P" ou Feetech "Modbus RTU Series Servo", par ex.
Introduction au contrôle PLC
https://celka.fr/ocw/plc-control/modbus/intro-modbus/intro/
Protocoles de communication
Dynamixel :
- Dynamixel Protocol 2.0 https://emanual.robotis.com/docs/en/dxl/protocol2/
- Modbus RTU pour les Dynamixel Pro (PH, RH, PM) https://emanual.robotis.com/docs/en/dxl/p/ph42-020-s300-r/#protocol-type13
Feetech :
- Modbus RTU pour les modèles : https://www.feetechrc.com/modbus-rtu%20series%20servo.html
- Exemple servo 24V 24kg https://www.feetechrc.com/24v-24kgcm-modbus-rtu%E8%88%B5%E6%9C%BA.html
- Exemple servo 24V 24kg https://www.feetechrc.com/24v-24kgcm-modbus-rtu%E8%88%B5%E6%9C%BA.html
https://esp32io.com/tutorials/esp32-rs485
Transmission TTL et protocole RS485
Transmission série
Avantages
- Câble plus fin, plus souple, moins coûteux.
- Connecteur simplifié, meilleur marché, plus vite monté.
- Plus de problème de synchronisation de signaux
- On ne transmet qu’un seul signal. Seules les horloges doivent être de fréquence très voisine, ce qui n’est pas difficile en électronique.
- Isolation diaphonique.
- Plus de risque d’interférence entre signaux, il n’y a qu’un seul signal.
- Utilisable sur des longueurs nettement plus importantes (km).
Inconvénients
- Débit
- A une même fréquence, on transporte un seul bit à la fois.
- Electronique plus compliquée du côté émetteur et encore plus compliquée côté récepteur (synchronisation d’horloge).
- UART : Universal Asynchronous Receiver Transmitter.
- L’UART peut être désynchronisé, l’information reçue est alors invalide.
Transmission série synchrone
Transmission série asynchrone
Exemple : port série RS232 du PC
Exemple d’un adapteur FTDI USB-RS232
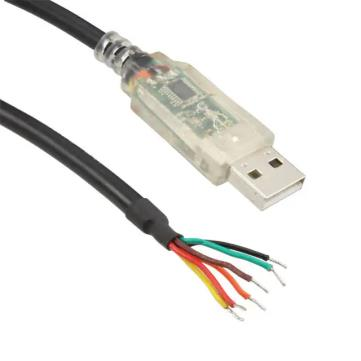
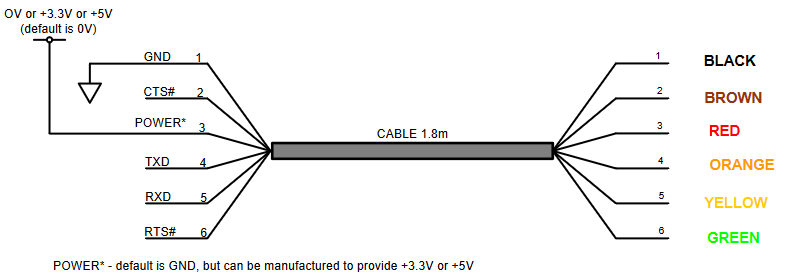
Transmission série asynchrone TTL
Exemple de trame série (TTL)
‘1’ logique = +5V
‘0’ logique = 0V
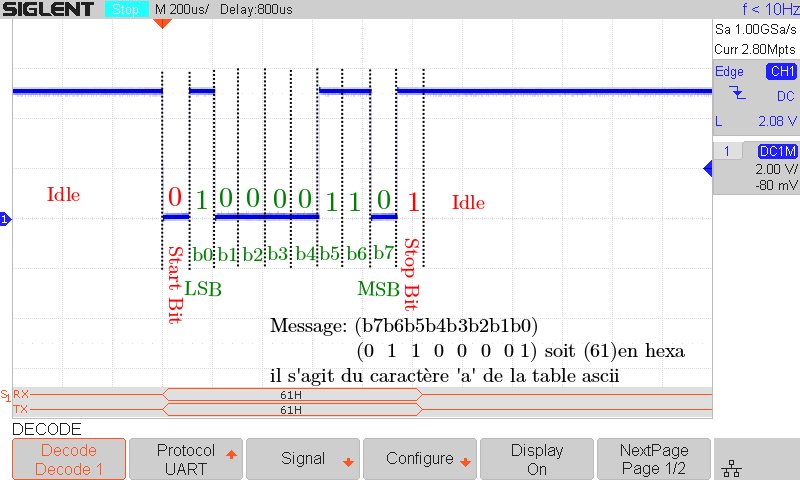
Transmission série asynchrone RS485 vs RS232
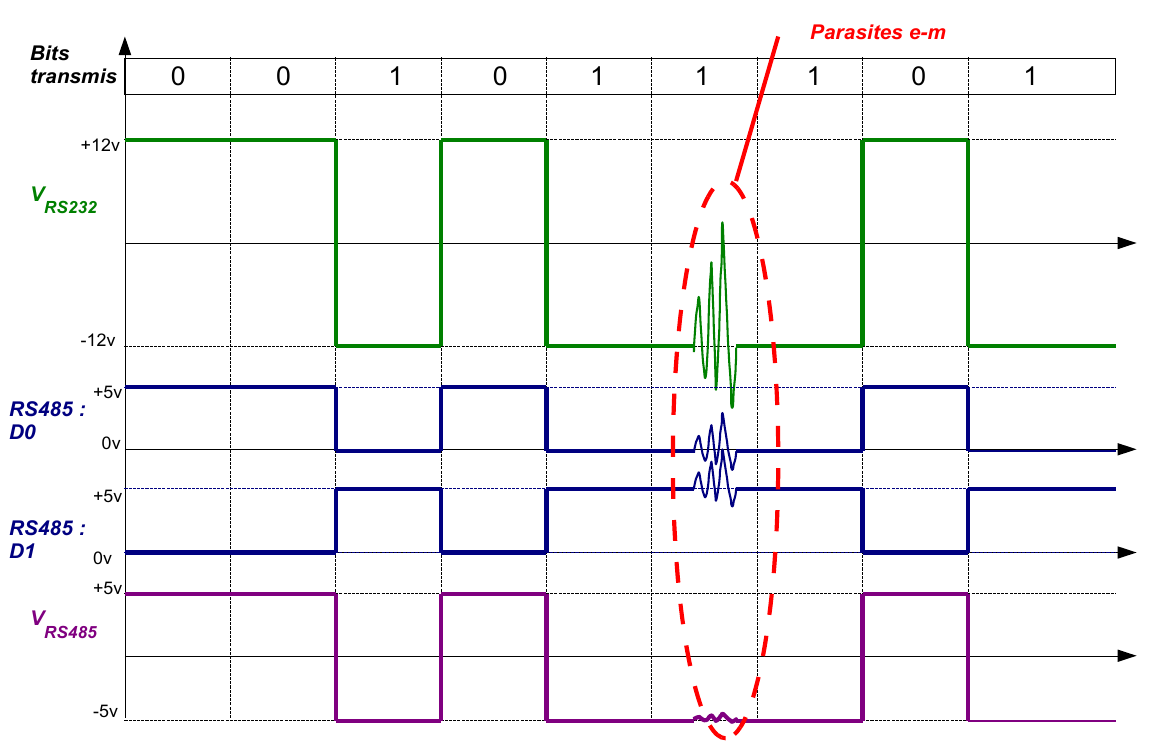
Transmission série asynchrone RS485
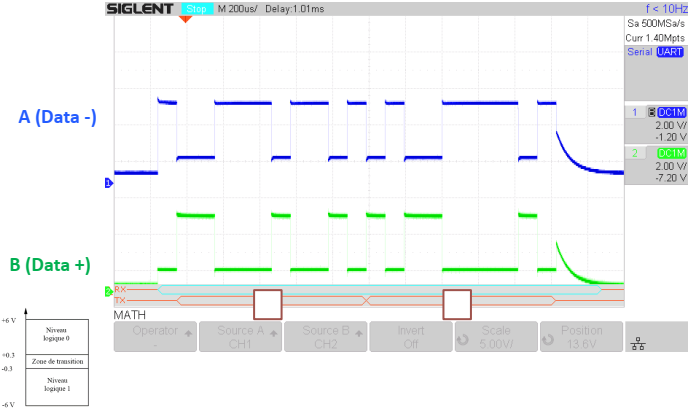
Liaisons multipoints
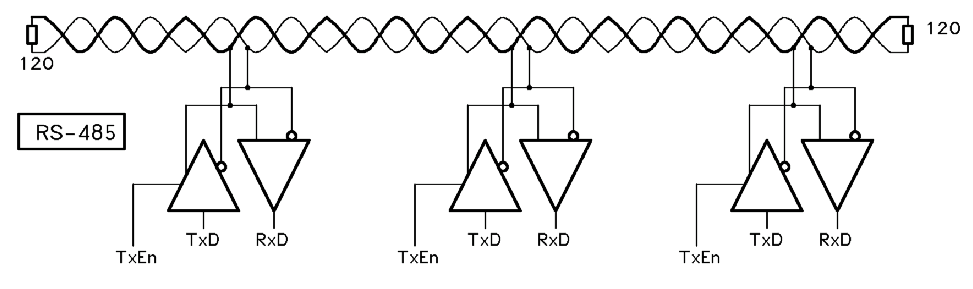
Penser aux résistances de Terminaison de 120 Ω au début et à la fin de la liaison RS485.
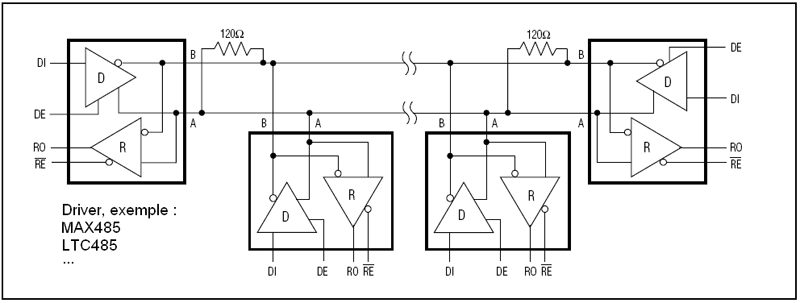
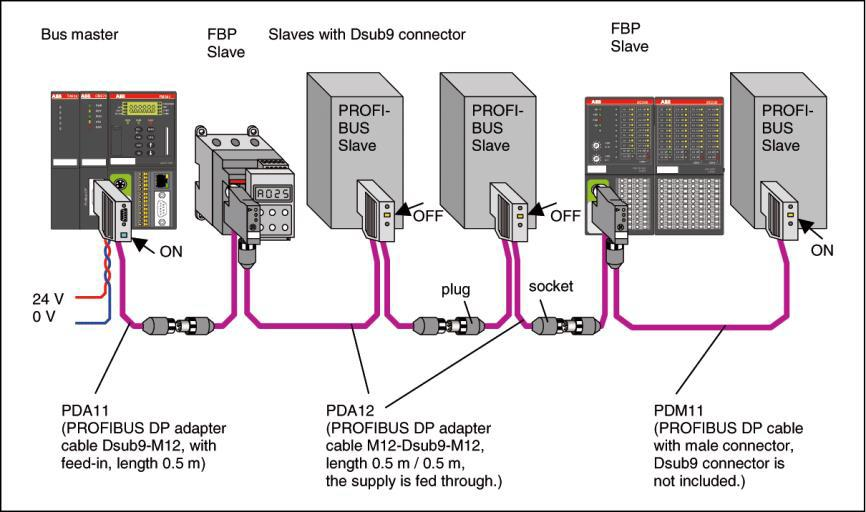
Half Duplex
Définition
- Liaison bidirectionnelle.
- 1 canal de transmission est partagé :
- Il est utilisé dans un sens et dans l’autre.
- Une règle doit définir comment gérer l’accès au média.
- Moins cher, plus facile, mais plus lent.
Exemple
- De nombreux bus de terrain, RS485,

Topologie : Bus
Principe
- Connections de toutes les stations sur un même câble
- Toujours half duplex.
- 2 topologies selon les possibilités techniques
- connexion en T "par prise vampire"
-
- chaînage
Avantages
- Simplicité d’adjonction de stations.
- Fonctionne même en cas de panne d’une station.
- Transmission en diffusion ( broadcasting , multicasting
- Longueur de câble réduite.
Inconvénients
- 1 seule station peut émettre à la fois.
- Les résistances de terminaison sont externes (à câbler).
- Liaison en chaîne : échange d’appareil impossible sans arrêt du système.
- Liaison en T : coûts de connexion plus importants.
Exemples
- Connexion en prise vampire : ASi
- Profibus, Modbus
Source : Cours IUT Haguenau - Département GEII - Automatisme Spé. 4 - Réseaux Locaux Industriels - Philippe Celka, le 28.02.2022
Philippe Celka Copyright © 2025 CC Attribution-Non Commercial-Share Alike 4.0 International
Introduction à Modbus
Protocole Modbus
Introduction
Modbus est un protocole de communication non propriétaire créé par Modicon en 1979. Les spécifications du protocole sont données librement sur le site de la Modbus Organization. Ce consortium a été créé par Schneider suite au rachat de Modicon en 1997 pour promouvoir Mobdus auprès des fabricants et utilisateurs.
Modbus est très populaire dans les environnement industriels car c’est un protocole simple, facile à intégrer, efficace, fiable, ouvert et royalty-free ! Vous pouvez très facilement intégrer Modbus dans vos projets à base d’ESP32, Raspberry, STM32 …
Le protocole Modbus était à l’origine un protocole sur bus série (Modbus RTU). Il a évolué pour s’intégrer aux technologies TCP/IP quand Ethernet est monté en puissance. On le retrouve dans les domaines de:
- gestion technique des bâtiments
- systèmes de management de l’énergie
- processus complexes d’automatisation industrielle
C’est une couche applicative (niveau 7 OSI) qui se base sur les liaison séries ou sur les trames Ethernet et les couches TCP/IP.
Stack de communication Modbus :
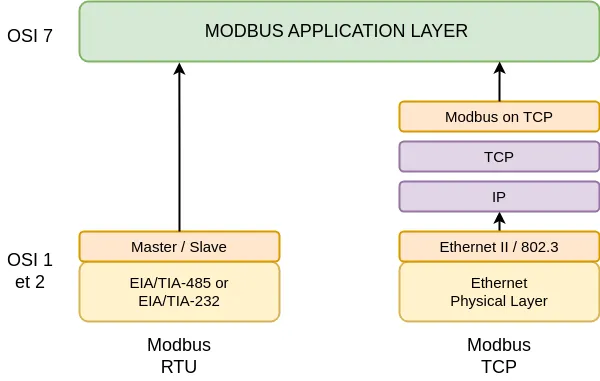
On distingue les différents modes de communication :
- Modbus TCP : communication TCP/IP basée sur le modèle client/serveur
- Modbus RTU : transmission série asynchrone via RS-485, RS-232 ou RS-422.
- Modbus ASCII : similaire au protocole RTU, format sur 7 bit (utilisation très rare)
Nous débuterons l’analyse du protocole suivant la chronologie avec l’étude du Mobdus RTU (Remote Terminal Unit) sur liaison série.
Modbus RTU
Principe du protocole Master / Slave utilisé en Modbus Serial
Principe de fonctionnement :
- Seul un Master (au même moment) est connecté au bus, et un ou plusieur (247 maxi) Slaves sont également connecté sur le bus.
- Une communication Modbus est toujours initié par le Master. Les Slaves ne vont jamais transmettre de données sans requête du Master.
- Les Slaves ne peuvent pas communiquer entre eux.
Le Master peut initier une transaction avec le Slave suivant deux modes :
- mode unicast le Master s’adresse à un Slave individuel. Après réception de la requête et traitement de celle-ci, le Slave renvoie la réponse au Master. Dans ce mode, une transaction Modbus consiste en deux messages: la requête du Master (request) et la réponse du Slave (reply). Chaque Slave doit posseder une adresse unique (de 1 à 247) de manière à ce qu’il puisse être interrogé indépendament des autres Slaves.
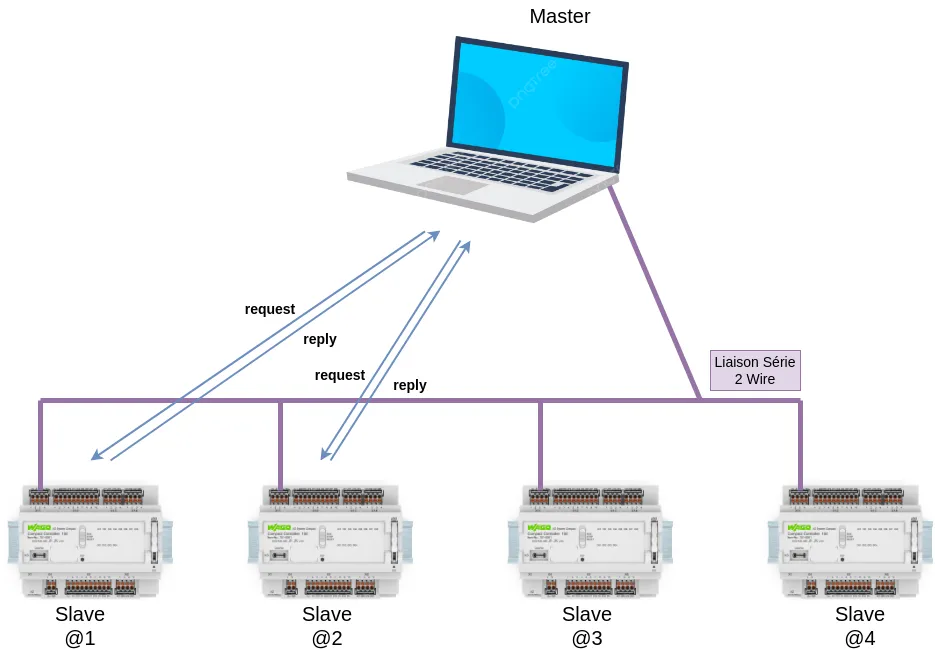
Le fait d’interroger les Slaves les uns à la suite des autres consiste à effectuer du “Polling”.
- mode broadcast le Master envoie un message à l’ensemble des Slaves. Les messages de broadcast sont forcément de type écriture. L’adresse 0 est reservée pour identifier un échange de type broadcast.
Description du protocole
Le protocole Modbus définie un Protocol Data Unit (PDU) indépendant des couches de communication. Il s’agit de la structure du message de base :

Function Code représente le type d’ordre (lire, écrire) et les datas sont les paramètres de l’ordre (lire 4 registres mémoire depuis l’adresse 0x3214 par exemple).
Empaqueter le protocole Modbus sur un bus série ou Ethernet nécessite des champs additionels au PDU.

Sur une liaison Modbus série, l’Address field contient uniquement l’adresse du Slave.
Le champ CRC contient un code de contrôle d’intégrité de message pour détecter les erreurs de transmission.
Les règles d’adressage Modbus
Les adresses des appareils (devices) Modbus sont codés sur 1 octet (8 bits). Il y a donc 256 adresses possibles.
| 0 | From 1 to 247 | From 248 to 255 |
|---|---|---|
| Broadcast address | Slave individual addresses | Reserved |
-
L’adresse 0 est réservée comme adresse de broadcast.
-
Le Master Modbus n’a pas d’adresse spécifique. Seuls les Slaves doivent posséder une adresse qui doît être unique sur le bus série.
-
Le fait que les spécifications Modbus indiquent qu’il est possible d’affecter des adresses comprises entre 1 et 247 ne veut pas forcément dire que tous les fabricants permettent cet interval (certains fabricants limitent les adresses de 1 à 100).
Les types de données
Il y a deux types de données en Modbus, le bit et le Word (16 bits).
| Type d’objet | Accès | Exemple | |
|---|---|---|---|
| Discrete Input | bit | Read-Only | Entrée TOR, fin de course, contact auxilliaire de disjoncteurs, … |
| Coil | bit | Read-Write | Sortie TOR, bit interne, RAZ d’un compteur d’énergie, … |
| Input Register | Word (16 bits) | Read-Only | Entrée analogique, lecture d’un capteur, … |
| Holding Register | Word (16 bits) | Read-Write | Sortie analogique, variable de programme (ex : temporisation, opérande d’un calcul,…) Valeur de paramétrage d’un équipement (ex: consigne de vitesse d’un variateur de fréquence,…) |
- Input et Input Register correspondent à des entrées. Ce sont des variables que l’on peut uniquement accéder en lecture (Read-Only).
- Coil (bobine) et Holding Register correspondent à des sorties que l’on peut forcer (write) mais également lire (read).
Un registre est codé sur 16 bits. Holding Register correspond ainsi à 16 Coil en mode Read-Write tandis que Input Register correspond à 16 entrées que l’on peut seulement acceder en lecture (Read-only).
Rappel :
- 1 Word = 2 bytes = 16 bits
- 1 Register est codé sur un Word soit 16 bits
Les fonctions Modbus
Les “Function Code” correspondent aux types d’ordres, lire ou écrire par exemple, ainsi que le type d’accès (accès au niveau bit ou au niveau registre de 16 bits). Les fonctions sont identifiées par un code sur 8 bits qui peut être représenté en décimal ou en hexa.
Bit access
| Code | Hex | Nom de fonction | Commentaire |
|---|---|---|---|
| 02 | 0x02 | Read Discrete Inputs | Physical Discrete Inputs |
| 01 | 0x01 | Read Coils | Internal Bits or Physical coils |
| 05 | 0x05 | Write Single Coil | Internal Bits or Physical coils |
| 15 | 0x0F | Write Multiple Coils | Internal Bits or Physical coils |
16-bit access (register)
| Code | Hex | Nom de fonction | Commentaire |
|---|---|---|---|
| 04 | 0x04 | Read Input Register | Physical Input Registers |
| 03 | 0x03 | Read Holding Registers | Internal Registers or Physical Output Registers |
| 06 | 0x06 | Write Single Register | Internal Registers or Physical Output Registers |
| 16 | 0x10 | Write Multiple Registers | Internal Registers or Physical Output Registers |
Les tableaux ci-dessus ne sont pas exhaustif, il y a également des Function Code pour réaliser du diagnostique. Il faut savoir que les fabricants de matériel Modbus n’intègre pas forcément toutes les fonctions possibles. Les fonctions Modbus disponibles sont données dans la documentation technique du constructeur.
Description d’une trame Modbus série
Une communication Modbus série est définie par
- vitesse en bit/s ( 9600, 19200, 115200, autre )
- 1 bit de start
- 8 bits de données (LSB envoyé en premier)
- 1 bit de parité
- 1 ou 2 bit de stop
Classiquement, en Modbus RTU, c’est la parité paire (Even) qui est utilisée. Si l’on choisit de ne pas implémenter le contrôle de parité (None) il faut placer 2 bits de stop.
Une trame Modbus RTU est composée a minima de 4 octets et au maximun de 256 octets. Chaque octet (byte) qui compose une trame Modbus est codé de la manière suivante :

Une trame Modbus RTU
Une trame Modbus RTU est ainsi composée :
- 1 byte pour Slave Address
- 1 byte pour Function Code
- 0 à 252 byte pour Data
- 2 bytes pour le CRC

La taille maximale d’une trame Modbus RTU est de 256 bytes.
Le CRC est calculé avec l’algo CRC-16-MODBUS.
Acquisition d’une trame Modbus de type request
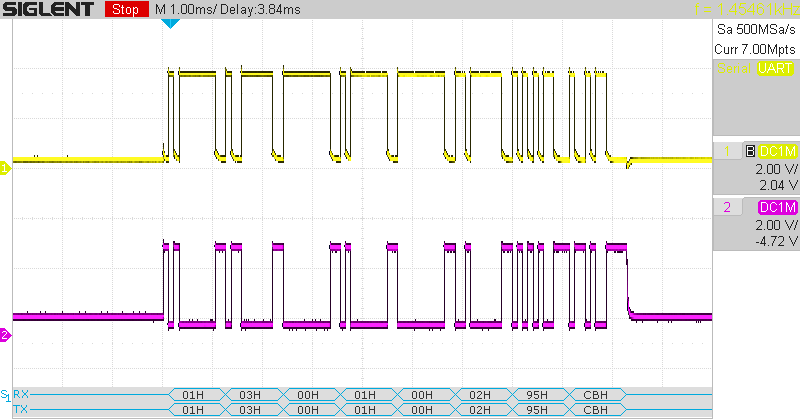
Le décodage de trame Modbus intégré donne au format hexa la trame suivante :
01 03 00 01 00 02 95 CB
On en déduit :
- Slave Address :
01 - Function Code :
03-> Read Holding Register - Data :
00 01 00 02 - CRC :
95 CB
Pour Data, suivant les caractéristiques de la fonction 03 Read Holding Register, les deux premiers bytes 00 01 corresponde à l’adresse de registre de départ et les deux suivants 00 02 correspondent aux nombre de registres que l’on souhaite lire à partir du registre de départ.
En résumé: la trame Modbus RTU suivante effectue la requête suivante -> Au Slave 01, donne la valeur des 00 02 premiers registres à partir de l’adresse mémoire 00 01.
Branchement Modbus RTU en configuration 2 Wire
Le branchement Modbus RTU classique est le “2 Wire” en conformité avec le standard RS-485. Sur un “2W-Bus”, seul un driver à la fois a la possibilité de transmettre un message.
- LT : Line Terminator, c’est les résistance de terminaison (polarisation) du Bus. Elles font classiquement 120Ω ou 150Ω
- Les résistances de terminaison sont placées au début du bus et à la fin du bus.
- Balanced Pair : Paire de fils torsadés qui constituent le support de transmission.
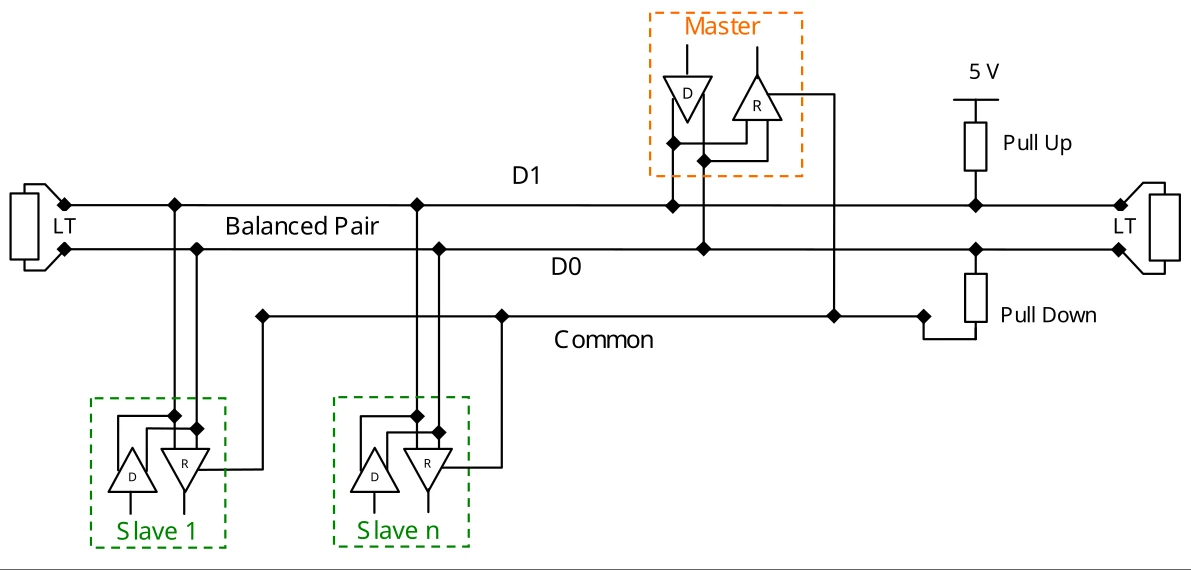
On parle de topologie 2 fils (2-Wire), mais on se rend compte sur le schéma, que finalement, 3 fils sont utilisés avec la masse (Common).
| Modbus Name | RS-485 Name | Autre Nom | Description |
|---|---|---|---|
| D1 | B | D+ ou Data+ | Transceiver Terminal 1 (V1>V0 for binary 1 [OFF] state) |
| D0 | A | D- ou Data- | Transceiver Terminal 0 (V0>V1 for binary 0 [ON] state) |
| Common | C | 0v ou GND | Commun, Masse (0V) |
En RS-485, à 9600 bit/s sur une paire torsadée en AWG26, on arrive à une longueur de bus maximale de 1000 m!
Les résistances de polarisation (RPull−Up et RPull−Down) permettent de limiter le bruit sur le bus quand il n’y a pas de communication. Les valeurs de ces résistances sont comprises entre 450Ω et 650Ω.
Remarques : Il existe également des configurations de branchement en 4 fils (4-Wire) mais c’est rare.
Connectique Modbus RTU
En Modbus RTU RS-485, trois types de connecteurs connecteurs sont souvent utilisés :
- bornier à visser (ou borne automatique)
- connecteur DB9
- connecteur RJ45
Bornier à visser :
Sur le Wago Controller 100, la connexion se fait par un bornier automatique et utilise les abréviations D+ (D1 ou B) et D- (D0 ou A). L’abréviation GND est utilisée pour le commun (0V) et SH (Shield) pour une connexion au blindage.
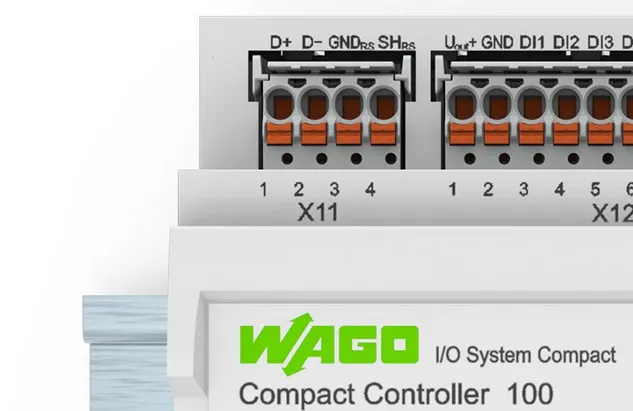
Connecteur DB9 :
L’automate PFC200 de chez Wago utilise une connectique DB9 qui permet de réaliser des liaisons RS-485 ou RS232. Pour le Modbus RTU, c’est la RS-485 qui est classiquement utilisée.
| PFC200 WAGO | Connecteur DB9 |
|---|---|
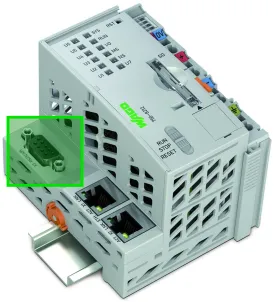 |
 |
La documentation constructeur donne les informations suivantes pour la connectique DB9 du PFC200 en mode RS485.
| Contact | Signal RS-485 | Description |
|---|---|---|
| 1 | NC | Not assigned |
| 2 | NC | Not assigned |
| 3 | A (Tx/Rx+) | Transmitt/receive Data+ |
| 4 | NC | Not assigned |
| 5 | FB_GND | Ground |
| 6 | FB_5V | Power Supply |
| 7 | NC | Not assigned |
| 8 | B (Tx/Rx-) | Transmitt/receive Data- |
| 9 | NC | Not assigned |
| Housing | Shield | Shield |
Connecteur RJ45
Bien qu’il s’agisse d’un connecteur RJ45, il s’agit d’une liaison série qui est transportée et il faut donc l’associer à une interface série et non au port RJ45 de votre PC ou de votre switch ! Les fabricants adoptent parfois la connectique RJ45 car les câbles sont peu chers avec un branchement qui est facile et rapide.
La documentation Wago donne l’association des broches du connecteur RJ45 :
| Pin | Function |
|---|---|
| 1 | Ub |
| 2 | Ub |
| 3 | n.c. |
| 4 | A (Data+) |
| 5 | B (Data-) |
| 6 | n.c. |
| 7 | GND |
| 8 | GND |
Connexion RJ45 et DB9 selon spécifications Modbus
| Pin on RJ45 | Pin on DB9 | Level of requirement | Modbus | RS-485 | Description |
|---|---|---|---|---|---|
| 3 | 3 | optional | PMC | - | Port Mode Control |
| 4 | 5 | required | D1 | B | Transceiver terminal 1, V1 Voltage (V1>V0 for binary 1 [OFF] state) |
| 5 | 9 | required | D0 | A | Transceiver terminal 0, V0 Voltage (V0>V1 for binary 0 [ON] state) |
| 7 | 2 | recommended | VP | - | Positive 5..24 Vdc Power Supply |
| 8 | 1 | required | Common | C | Signal and Power Supply Common |
On se rend compte que Wago n’a pas suivi les recommandations de câblage fixées par la Modbus Organization, de nombreux fabricants font de même. Quand il s’agit d’appareillages d’un même constructeur, cela ne pose pas de soucis, par contre, il faut parfois inverser les signaux A et B quand on mélange les appareillages de fabricants différents sur un même bus Modbus RTU. En Modbus TCP, comme c’est sur du câble Ethernet, on n’a pas ce problème.
Exemple : Modbus RTU avec un capteur de Température et Humidité
Dans cet exemple, je vais connecter un capteur de température et d’humidité PKTH100B-CZ1 qui communique en Modbus RTU avec mon ordinateur portable.
Pour que le PC portable puisse communiquer en RS-485, je lui ajoute un convertisseur FTDI USB-RS485, ainsi qu’un Oscilloscope pour visualiser les trames Modbus-RTU (côté didactique)
| Capteur PKTH100B-CZ1 | FTDI USB-RS485 | Oscilloscope |
|---|---|---|
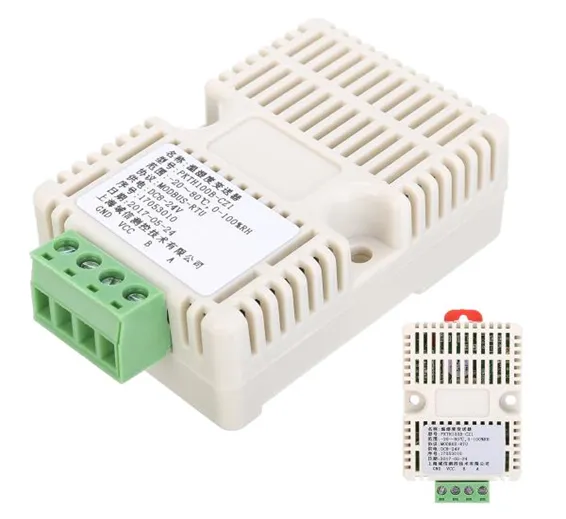 |
 |
 |
L’analyse de la documentation du câble FTDI USB-RS485 nous donne les informations suivantes :
Les câble USB-RS485
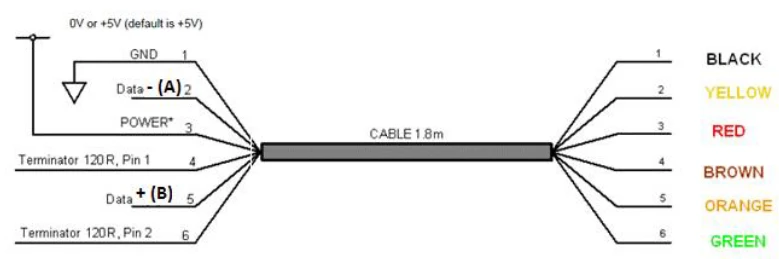
| Signal | Couleur de fil |
|---|---|
| GND | Noir |
| (A) Data - | Jaune |
| +5V | Rouge |
| R de 120Ω pin 1 | Brun |
| (B) Data + | Orange |
| R de 120Ω pin 2 | Vert |
Le capteur
| Terminals number | 1 | 2 | 3 | 4 |
|---|---|---|---|---|
| Identifying | GND | VCC | B | A |
| Description | Power- | Power+ | RS485- | RS485+ |
On remarque que sur la documentation du capteur, le signal A est nommé RS485+ tandis que sur la document du convertisseur USB-RS485, le signal A est nommé Data - …
On va rester pragramatique et brancher le fil A (jaune) sur le bornier A (4) du capteur et le fil B (Orange) du convertisseur vers la borne B (3) du capteur. Si jamais cela ne fonctionne pas, il suffira d’inverser ;)
Les masses devant être communes, on branchera le fil GND (noir) du convertisseur à la borne GND (1) du capteur.
Pour alimenter le capteur, j’utilise une alimentation de laboratoire de 24Vdc. Pareil, je brancherai le +24Vdc de l’alimentation à la borne VCC (2) du capteur et le 0V de l’alimentation à la borne GND (1) du capteur.
Pour les résistances de terminaison de 120Ω, je fais le choix de ne pas les placer dans un premier temps car la longueur de bus est très faible.
La manipulation
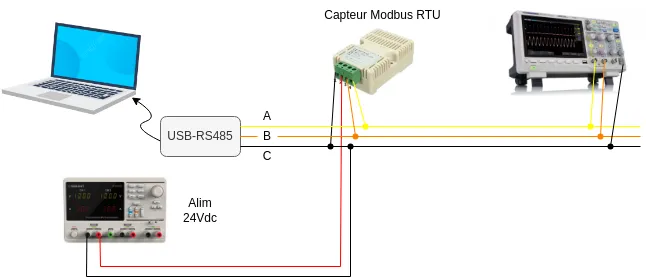
La documentation (en chinois) indique les paramètres suivants :
- Vitesse de transmission : 9600 bit/s
- 8 bits de données
- Parity : None
- 1 Stop bit (non respect de la norme)
- Slave Address (factory) : 1
La document indique également que la requête à envoyer est une fonction de type 03 Read Holding Resgister à l’adresse de Slave 1 et que l’on lit à partir du registre mémoire 0 un nombre de 2 registres.
La trame à envoyer avec le CRC est la suivante : 01 03 00 00 00 02 C4 0B
J’utilise le logiciel QModMaster pour générer facilement la trame et et bien sur, cela ne fonctionne pas :(
On va essayer d’inverser les fils A et B -> boum, ça fonctionne…bref
Les différentes étapes de la configuration de qModMaster
On le numéro du port Com utilisé par le convertisseur USB-RS485 avec le gestionnaire de périphériques Windows. On remarque que dans mon cas, c’est le COM5 qui lui a été attribué. Cela nous permet de paramétrer la liaison série RTU dans QModMaster avec le bon numéro de Com et l’on saisie également les paramètres de liaison du capteur de température (9600 bit/s 8bits de données 1 bit de stop et parity None)
| Gestionnaire de périphériques | Config Serial dans QModMaster |
|---|---|
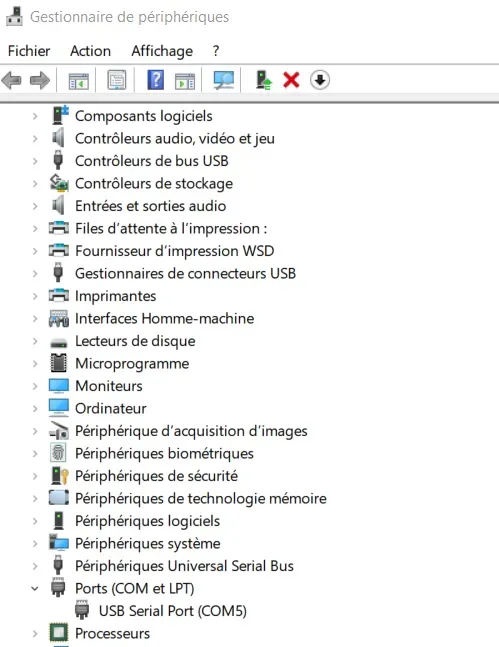 |
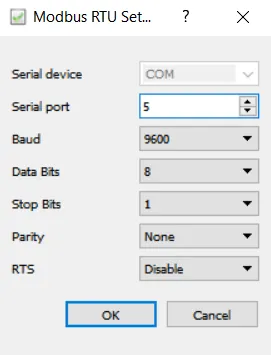 |
Dans QModMaster, je choisis le Mode RTU, le Slave Address à 1, le Function Code à 0x03 pour Read Holding Register, le Start Address à 0 et Number of Coils (Registers) à 2.
Dans le Bus Monitor, on remarque que la trame de request vaut : 01 03 00 00 00 02 C4 0B -> ce qui était demandé par la doc, donc on est OK !
La trame de réponse (reply) du capteurs vaut : 01 03 04 01 28 02 22 FA BE
| QModMaster | Bus Monitor |
|---|---|
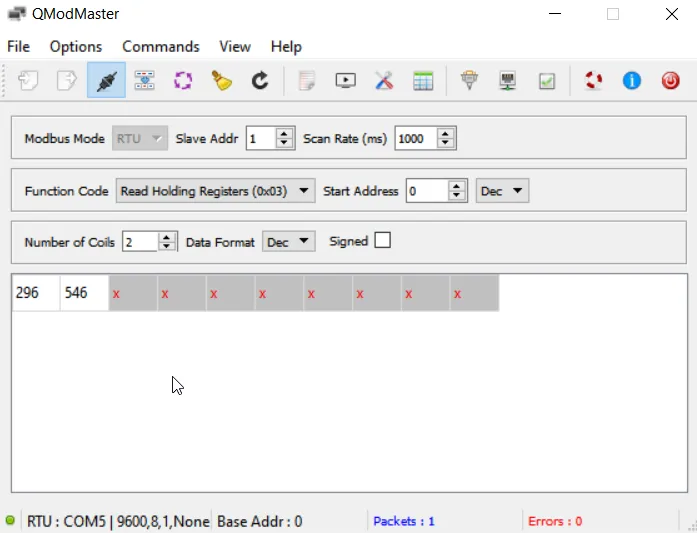 |
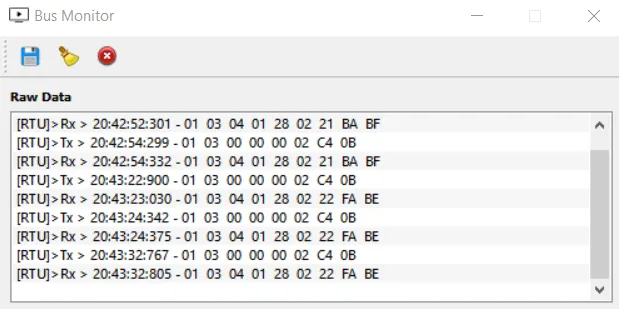 |
Le décodage du résultat est donné directement par QModMaster:
- Le premier registre vaut :
296en décimal - Le second registre vaut :
546en décimal
La documentation du capteur indique que la valeur du premier registre correspond à la température multipliée par 10. On en déduit qu’il fait 29,6°C en cette journée d’août -> c’est OK
L’humidité multipliée par 10 est dans le second registre. On en déduit que l’humidité relative Hr=54.6% ce qui est conforme.
Méthode de décodage à partir de la trame de réponse
La trame de réponse (reply) du capteurs vaut : 01 03 04 01 28 02 22 FA BE . On peut décoder le contenu de la manière suivante :
01: correspond à l’adresse du capteuur qui donne la réponse03: indique qu’il répond à une réquête de type 03 Read Holding Register04: c’est la valeur de la fonction 03 + 1 pour dire que tout c’est bien passé !01 28: c’est la valeur en hexa du contenu du premier registre avec01l’octet de poids fort et28l’octet de poids faible. Converti en décimal, on obtient29602 22: correspond à la valeur en hexa du second registre. Converti en décimal, on obtient546.FA BE: correspond au CRC de la trame de réponse.
Capture des trames Modbus RTU avec l’oscilloscope
On peut observer la trame de request générée par QModMaster qui vaut 01 03 00 00 00 02 C4 0B
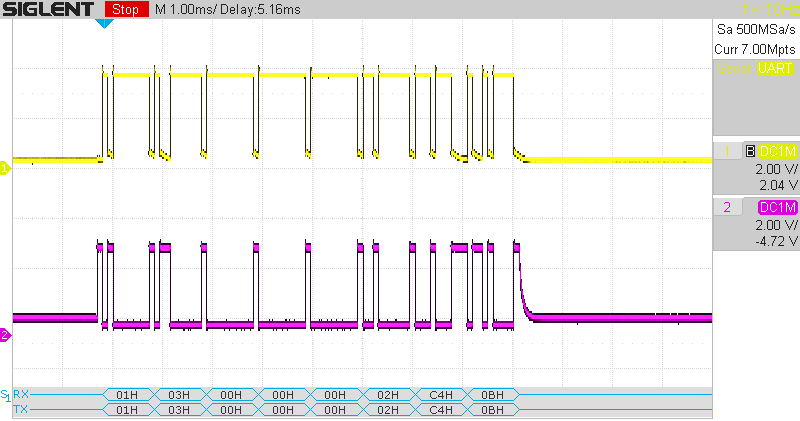
Et la trame de réponse du capteur qui vaut 01 03 04 01 28 02 22 FA BE

Source https://celka.fr/ocw/plc-control/modbus/intro-modbus/intro/
Philippe Celka Copyright © 2025 CC Attribution-Non Commercial-Share Alike 4.0 International
0 - Robotique et physical AI
IA robotique - Architectures pour l'apprentissage profond
Le contrôle d'un robot pour une application donnée au moyen d'un modèle de réseaux de neurones nécessite de fournir une quantité importante de données d'apprentissage. Ces données doivent permettre de comprendre comment résoudre la tâche, par exemple pour une tâche de saisie et dépose d'un objet (Pick and Place) elles doivent donc comporter :
- Comment bouge le robot et chacun de ses moteurs
- Comment bouge la pince
- Où sont placés les objets au début "problème"
- Où sont placé les objets à la fin "solution"
L'approche la plus répandue pour générer ces données d'apprentissage est la démonstration : le robot est "téléguidé" par un opérateur. On enregistre la trajectoire des servomoteurs ainsi qu'une ou plusieurs vidéos filmant les objets et le robot.
Bancs matériel de Machine Learning
Open ARM et open arm mini
https://huggingface.co/spaces/lerobot/robot-folding
- Follower : Open ARM modified by LeRobot
- https://huggingface.co/datasets/lerobot/openarms-hardware-modifications
- Teleop : open-arms-mini
- https://github.com/pkooij/open-arms-mini
- 8× Feetech STS3215-C046 servo (7.4 V, 1:147)

Koch
Robotis OMX
https://ai.robotis.com/omx/introduction_omx.html
LeRobot SO-ARM10X
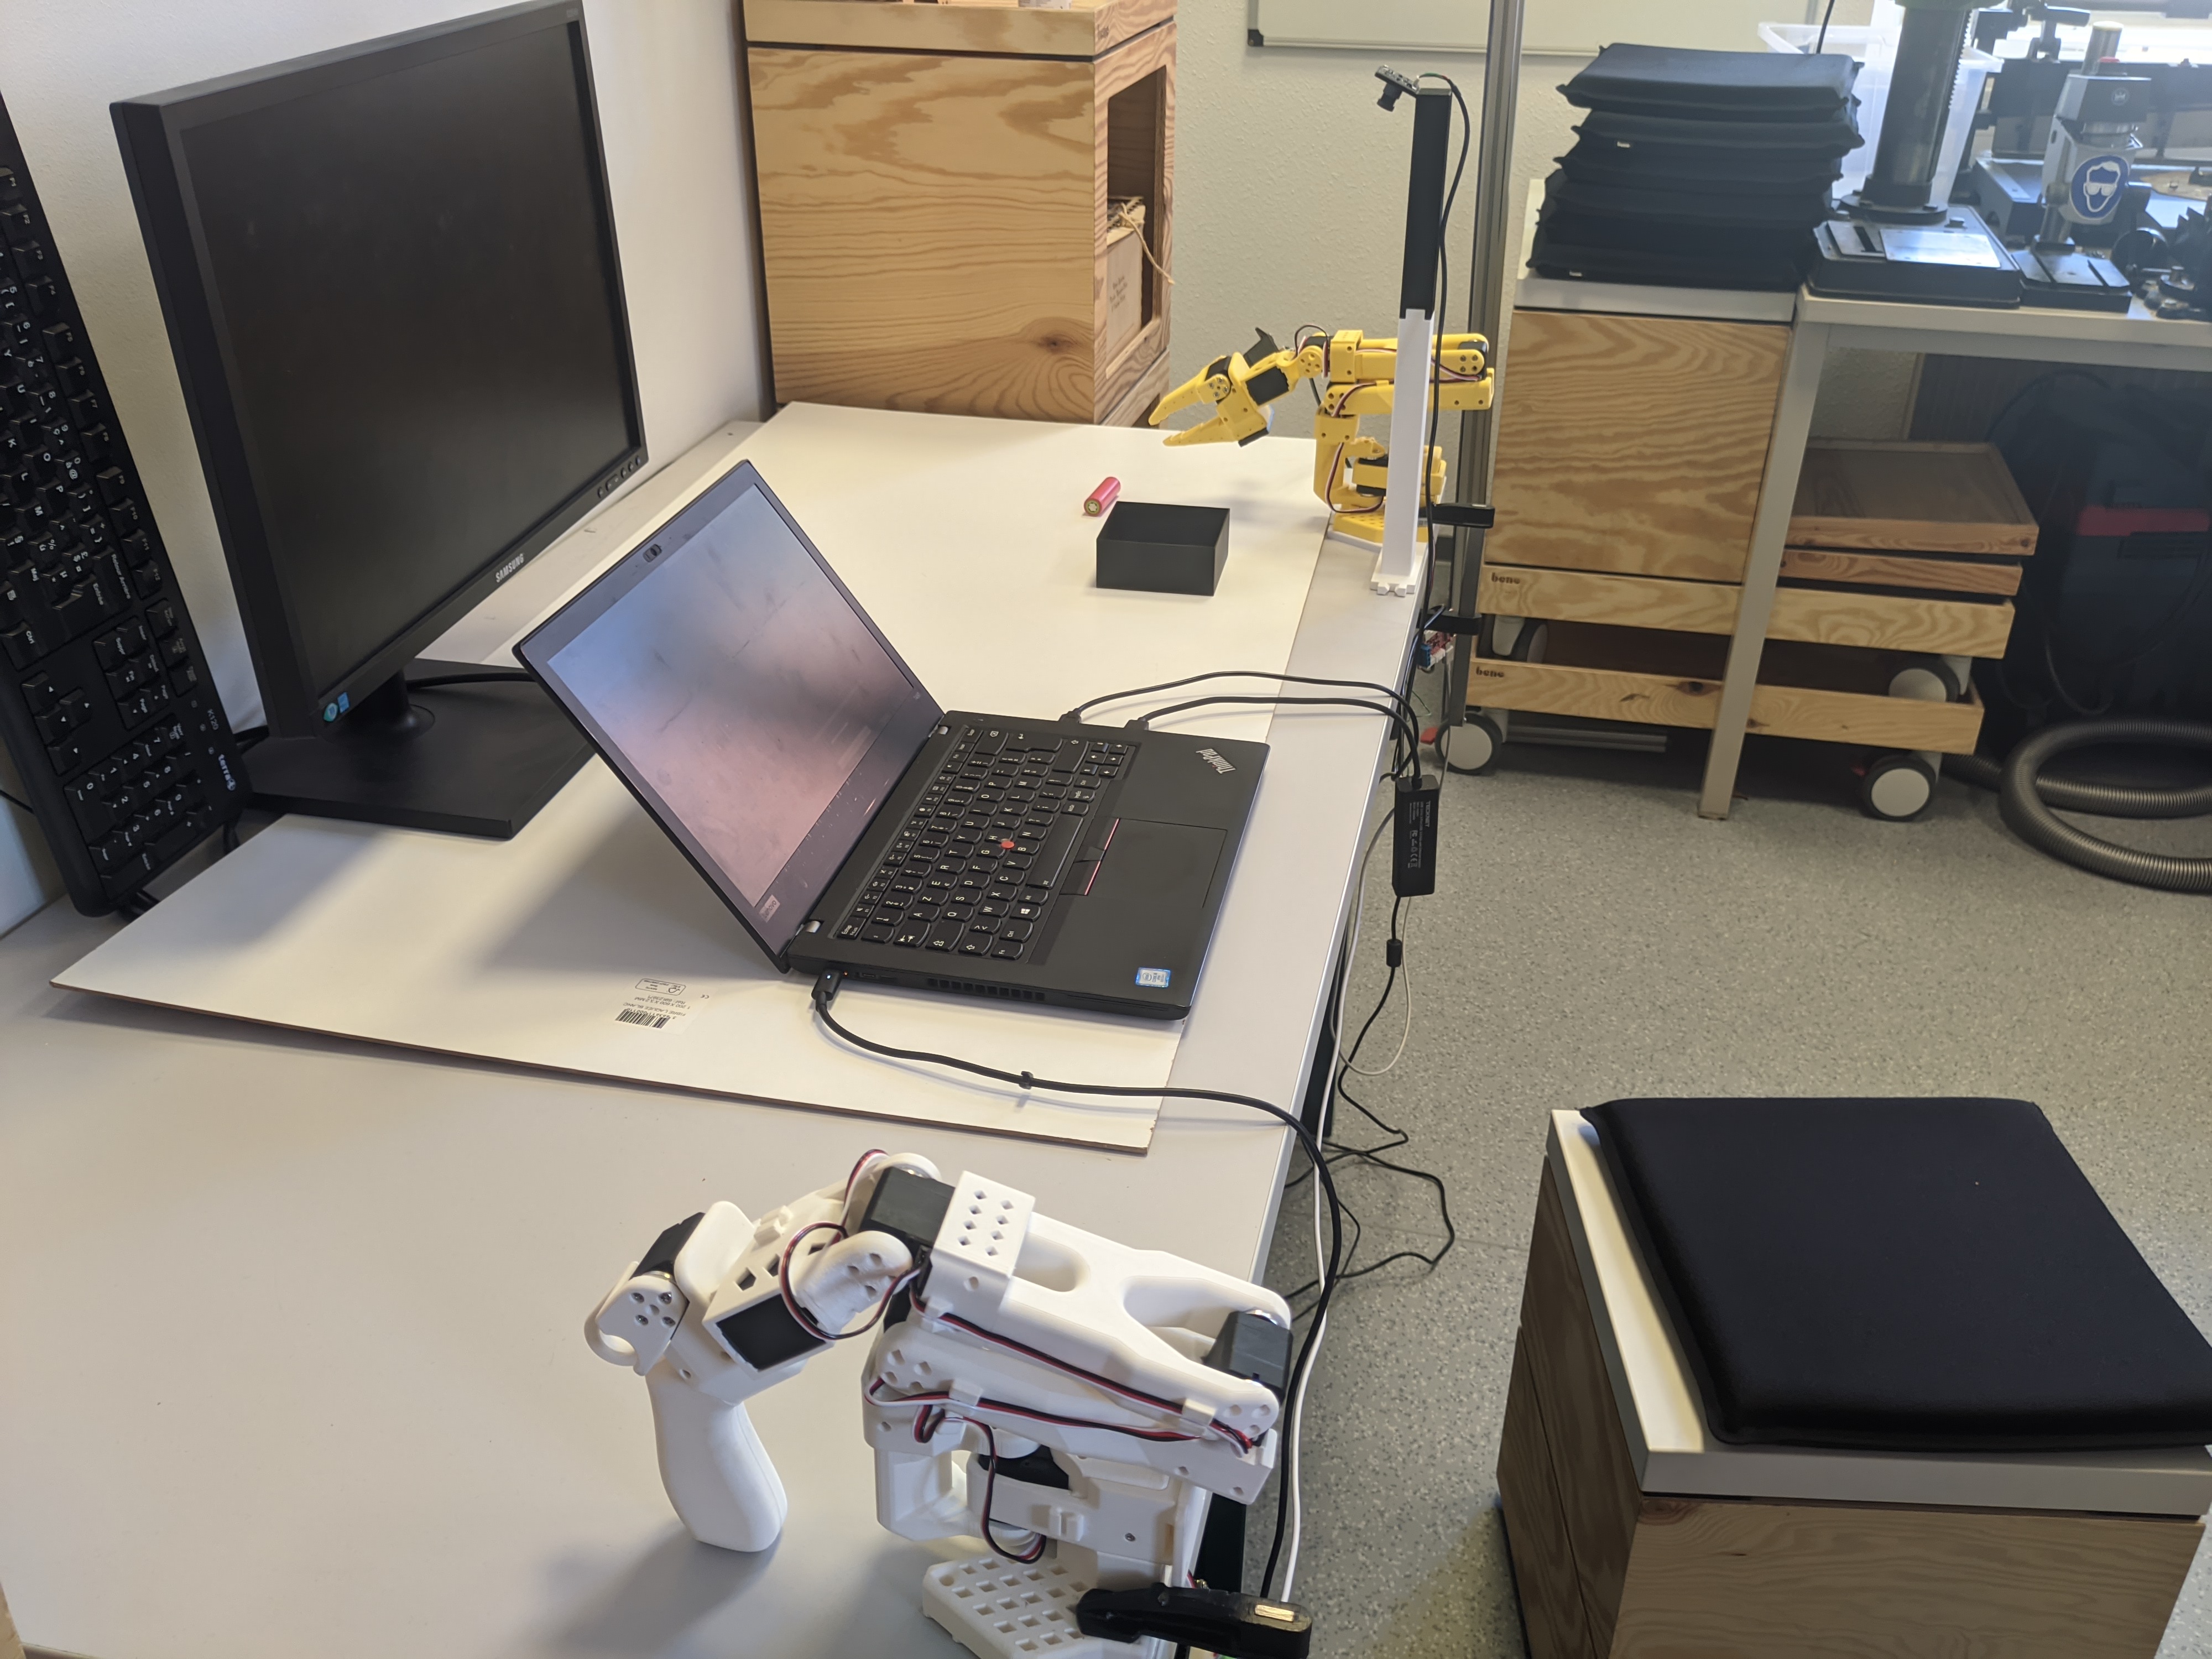
Aloha Solo
Base : $9,899.95
- WidowX Leader Arm ($4,949.95)
- ViperX Follower Arm ($7,149.95)
- 2x Intel RealSense D405 Cameras
- Portable Touchscreen Monitor
- Tripod, Cables, Accessories
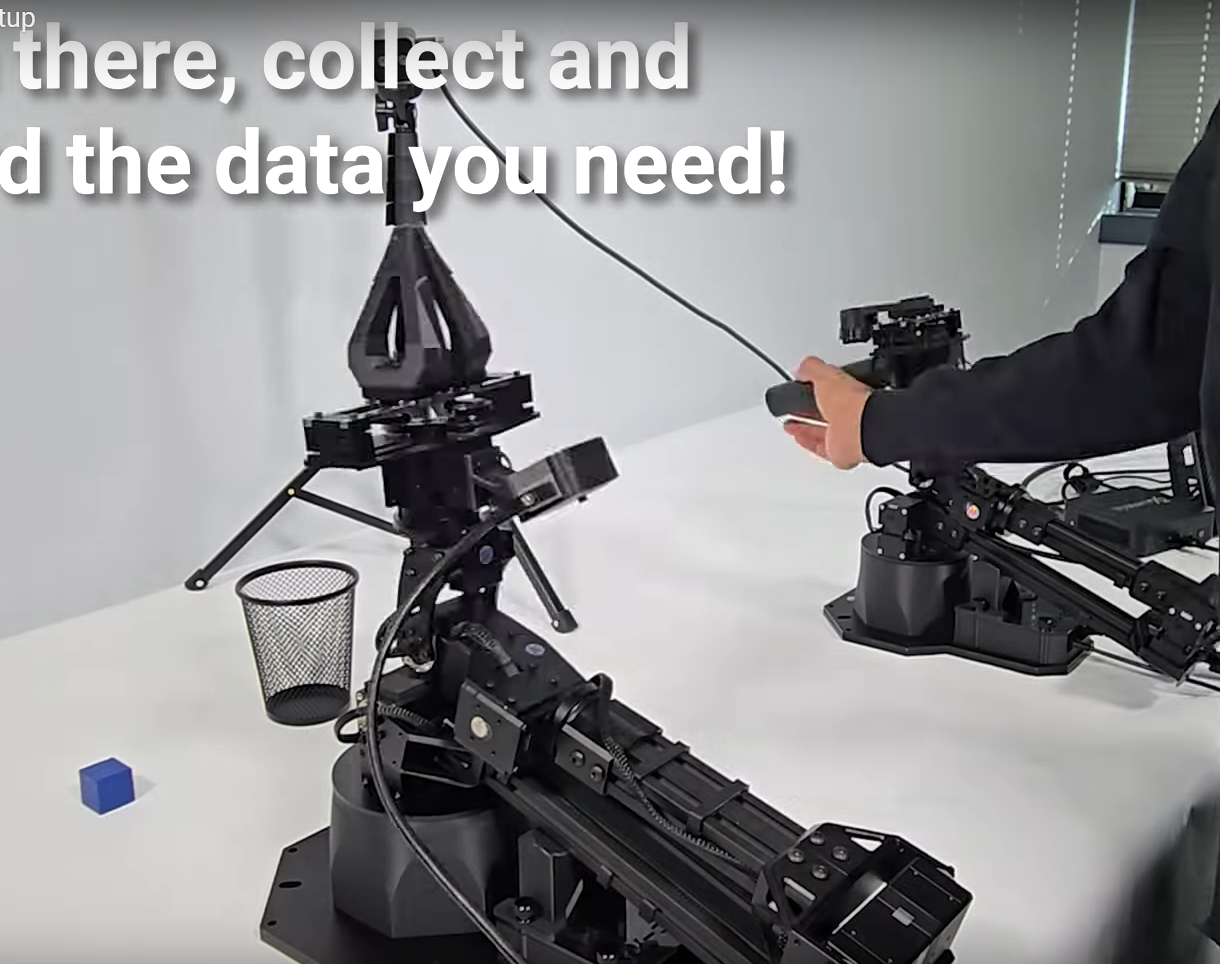
https://www.youtube.com/watch?v=hFqZJZ666Cw
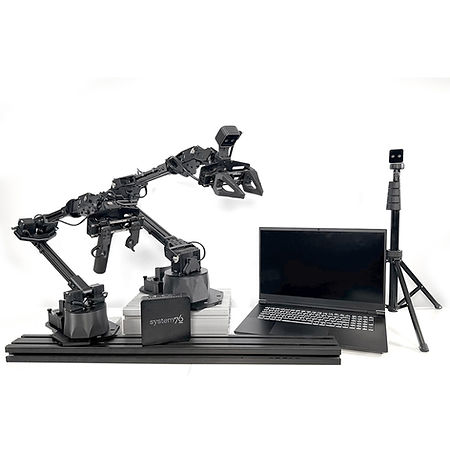
https://www.trossenrobotics.com/aloha-solo
Aloha Stationary
Without Laptop : $30,799.98
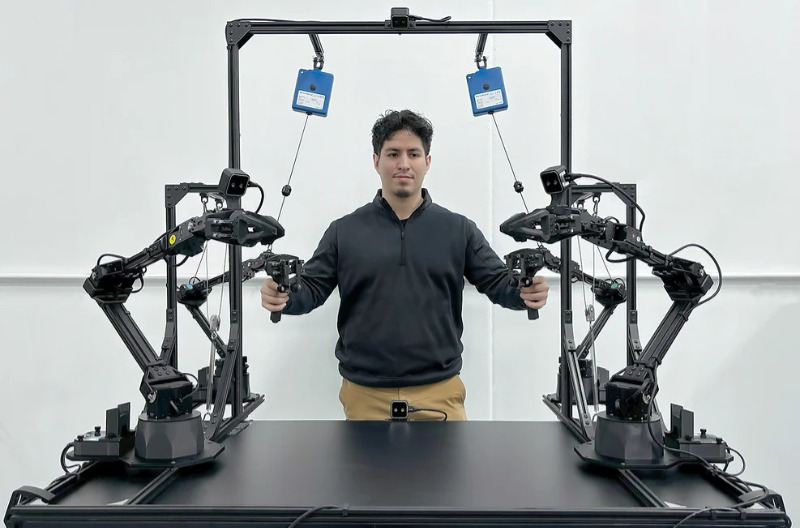
Environnement logiciel de collecte de données
Hugging Face LeRobot - Python
Visualisation des DataSet : https://huggingface.co/spaces/lerobot/visualize_dataset
On note qu'il y a beaucoup de tests avec le SO-ARM10X. Mais pas d'homogénéité dans la collecte de données : les caméras sont placées la plupart du temps devant le robot, parfois sur la pince, et quasiment jamais avec le setup recommandé.
Rechercher des DataSet qui ont servi à entrainer des modèles disponibles publiés :
- https://huggingface.co/models?pipeline_tag=robotics&sort=trending
- Dans le panneau de droite > Sélectionner le filtre Reinforcement Learning > Robotics
- Beaucoup de DataSets sont uploadés mais peu de modèles entrainés le sont
- Par exemple on recherche les travaux de Rémi Cadene
- Modèles : il y en a 4 https://huggingface.co/models?pipeline_tag=robotics&sort=trending&search=cadene
- DataSets : Il y en a beaucoup https://huggingface.co/datasets?task_categories=task_categories:robotics&sort=trending&search=cadene
- Les Modèles entrainés avec le SO-ARM10 concernent la manipulation de Lego, par exemple le plus récent :
- Modèle : https://huggingface.co/cadene/act_so100_5_lego_test_080000
- DataSet pour le training : https://huggingface.co/datasets/cadene/so100_5_lego_test
- DataSet pour l'évaluation du modèle : https://huggingface.co/datasets/cadene/eval_act_so100_5_lego_test_080000
Setup similaires à celui du SO-ARM10X simple :
- Robot Koch : /lerobot/koch_pick_place_1_lego
Télécharger un DataSet : https://github.com/huggingface/lerobot/blob/a1daeaf0c4ae345df9b2f5b862f091ce158e4446/examples/1_load_lerobot_dataset.py
Rejouer les épisodes d'un DataSet : https://github.com/huggingface/lerobot/blob/a1daeaf0c4ae345df9b2f5b862f091ce158e4446/examples/12_use_so101.md#replay-an-episode
Evaluer un modèle pré-entrainé : https://github.com/huggingface/lerobot/blob/a1daeaf0c4ae345df9b2f5b862f091ce158e4446/examples/2_evaluate_pretrained_policy.py
Trossen Robotics Interbotix - ROS, Python,
Banc de machine learning avec SO-ARM101
Assemblage et démarrage du SO-ARM101
Configurer les servomoteurs
La carte FE-URT-1 fournie par Feetech n'est pas détectée sous Ubuntu à cause d'un conflit avec un paquet de brail. On le désinstalle :
sudo apt-get autoremove brlttyhttps://askubuntu.com/questions/1321442/how-to-look-for-ch340-usb-drivers/1472246#1472246
https://github.com/huggingface/lerobot/blob/main/examples/10_use_so100.md#c-configure-the-motors
- Brancher la carte
- Trouver l'interface USB sur laquelle est branchée la carte
python lerobot/scripts/find_motors_bus_port.py
-
- Sous Linux, par ex.
/dev/ttyACM0ou/dev/ttyUSB0 - Sous Windows, par ex.
COM13ouCOM14
- Sous Linux, par ex.
- Sous Linux, Changer les droits sur les interfaces USB
sudo chmod 666 /dev/ttyACM0
sudo chmod 666 /dev/ttyACM1- Ouvrir Codium > File > Open Folder >
admin_ros/lerobot - Modifier le fichier de config
gedit ~/lerobot/lerobot/common/robot_devices/robots/configs.py
- Chercher la config du So100 en ligne 436
class So100RobotConfig(ManipulatorRobotConfig): - Remplacer
port="/dev/tty.usbmodem58760431091",pour leleader_arms(L446) et lefollower_arms(L463) par le port découvert - Brancher les servos un à un à la carte puis lancer le script d'initialisation, en incrémentant l'ID à chaque fois :
python lerobot/scripts/configure_motor.py \
--port /dev/tty.usbmodem58760432961 \
--brand feetech \
--model sts3215 \
--baudrate 1000000 \
--ID 1- Au fur et à mesure les brancher en série et/ou noter l'ID sur le moteur
- Les servos sont bougés à leur position centrale et l'offset mis à 0
Ne plus bouger les servos jusqu'à l'assemblage
Construction et assemblage mécanique
Une version 101 est sortie en 05/2025. Le Leader est plus simple à assembler, et plus besoin de démonter les servos pour enlever un engrenage et les rendre passifs. Il suffit d'acheter le kit de 6 servos avec 3 rapports de transmission différents :
- https://github.com/TheRobotStudio/SO-ARM100?tab=readme-ov-file#getting-your-own-so101
- https://www.alibaba.com/product-detail/6PCS-7-4V-STS3215-Servos-for_1601428584027.html?spm=a2747.product_manager.0.0.757c2c3clU7uH3
- Imprimer la mâchoire statique intégrant le support de caméra : https://github.com/TheRobotStudio/SO-ARM100/blob/main/Optional/Wrist_Cam_Mount_32x32_UVC_Module/README.md
- Suivre le guide d'assemblage pour le SO101 : https://huggingface.co/docs/lerobot/so101#step-by-step-assembly-instructions
- Pour le SO100 : https://huggingface.co/docs/lerobot/so100#step-by-step-assembly-instructions
Astuces pour l'assemblage
- Mettre une vis sur l'arbre moteur et l'axe passif (à l'opposée de l'arbre moteur) quand il y a la place d'en mettre une (vérifier qu'il y aura la place après assemblage des éléments autour du moteur)
- Ne plus bouger les servos après leur initialisation qui les met à l'angle 0. Dans l'idéal, assembler les éléments de manière à ce que le robot soit en configuration initiale avec tous les moteurs à 0
- En pratique, on monte le robot dans la configuration ci-dessous. C'est l'étape de calibration qui permettra de définir un offset pour que le zéro des moteurs corresponde au modèle cinématique du SO-ARM10X
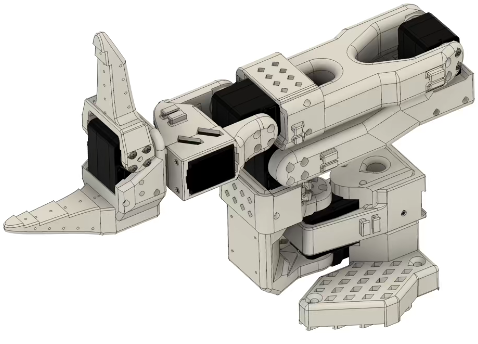
- Il est possible d'ajouter un offset dans la configuration des servomoteurs, par exemple via les scripts du projet LeRobot
- Attention si vous démarrez le robot sous ROS avant d'avoir lancer la calibration LeRobot qui fixe l'Offset dans les servomoteurs, vous risquez de casser le robot
Banc de Machine Learning LeRobot
Agencement des caméras et robots
Le nombre, le positionnement et la qualité des caméras sont importants pour la qualité du DataSet :
- Plusieurs setup sont proposés :
- Caméras d'environnement : https://github.com/TheRobotStudio/SO-ARM100?tab=readme-ov-file#2-overhead-camera-mount
- Caméras de poignet : https://github.com/TheRobotStudio/SO-ARM100?tab=readme-ov-file#5-wristmount-cameras
- Attention au champ de vision des caméras si vous prenez une de vos webcams
- Il risque de ne pas être assez "fish eye"
- Par exemple, la WebCam Logitech C270 (720p) a un champ trop étroit pour être intégrée au module Overhead
Au FabLab de IUT Haguenau
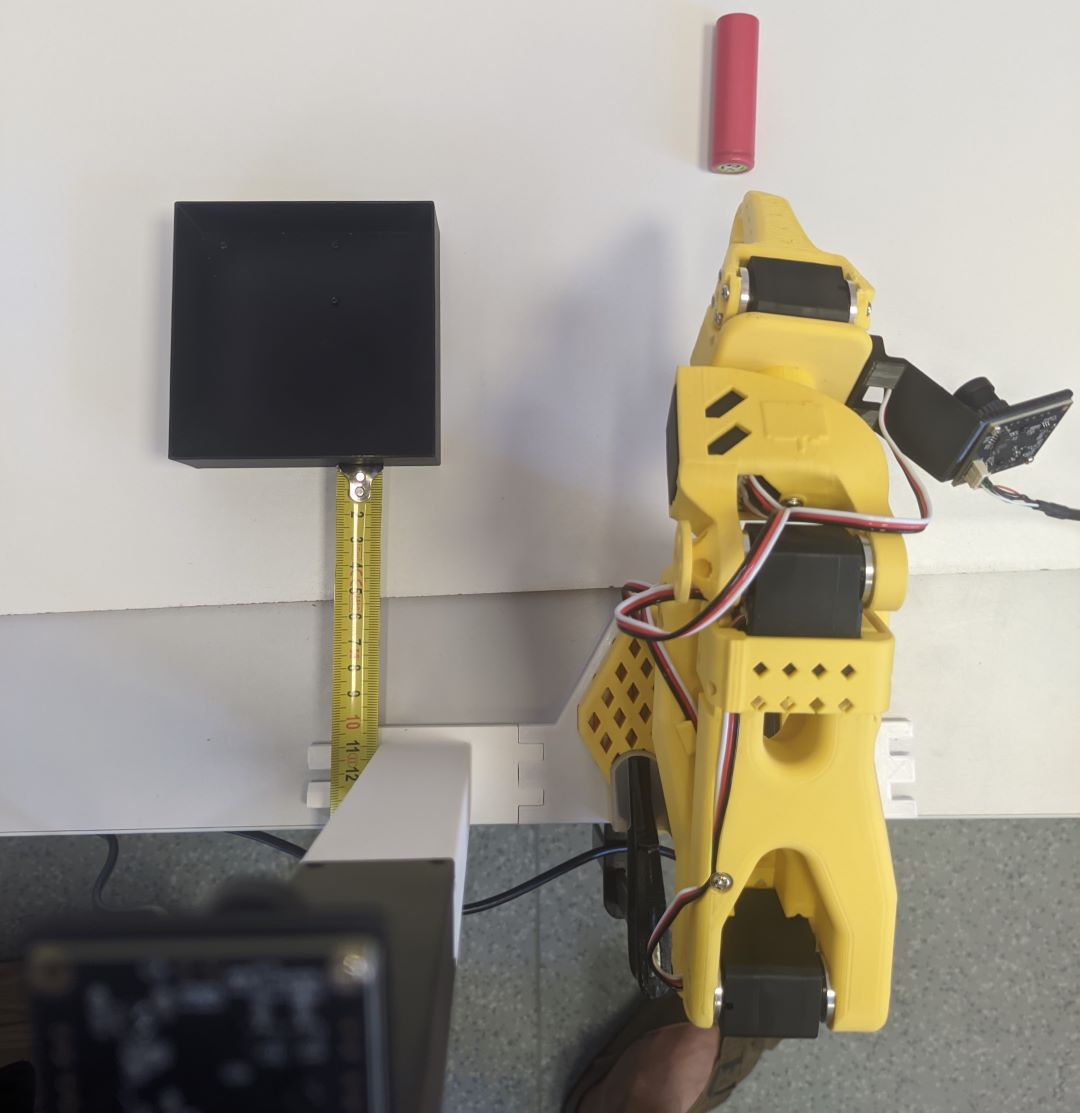
- On choisit de prendre deux caméras au format 32 x 32 , la version 1080p permet d'augmenter la qualité du DataSet
- Imprimer et assembler la mâchoire statique intégrant le support de caméra : https://github.com/TheRobotStudio/SO-ARM100/blob/main/Optional/Wrist_Cam_Mount_32x32_UVC_Module/README.md
- Imprimer et assembler le support de robot et de caméra Overhead : https://github.com/TheRobotStudio/SO-ARM100/blob/main/Optional/Overhead_Cam_Mount_32x32_UVC_Module/README.md
Calibration des caméras
https://huggingface.co/docs/lerobot/cameras
Assembler un PC d'IA en 2026
Usages :
- Serveur pour enseignement robotique et IA
- Pilotage de robots temps-réel avec ROS2
- Inférence de larges modèles d'IA, ex.
- Fine-tuning de modèles d'IA, ex. LeRobot
Configuration pour un total d'environ 1500€ :
- Carte graphique Nvidia RTX 5070 Ti 16GB (~900€)
- Processeur AMD AM5 Ryzen 7 7700 (~190€)
- Carte mère moyenne gamme (~150€) AMD AM5 PCIe 5.0 x16 b650/e https://pausehardware.com/comparatif-des-chipsets-amd-x870-x670-b650-ryzen/ https://www.cdiscount.com/mp-267-asu1705279946652.html https://www.pccomponentes.fr/carte-mere-gigabyte-b650e-eagle-amd-b650-socket-am5-ddr5-atx-wifi-6e-pcie-50-raid-rgb https://www.pccomponentes.fr/carte-mere-asus-tuf-gaming-b650e-plus-wifi-b650-am5-ddr5-atx-wifi-6e-pcie-50-raid
- 1 x PCIe 5.0 x16 @CPU
- 1 x PCIe 4.0 x16 (max. @x1) @PCH
- 3 x M2 (1 x PCIe 5.0 et 2 x PCIe 4.0)
- 1 x USB 20GBps
- 4 x ports SATA
- Wi-Fi 6E, Ethernet Realtek 2,5 Gbit
- 4 x DDR5
- 64GB DDR5 5600 MHz
- Alimentation 750-850W 80+ Gold
- Boîtier silencieux Antec P10C silent
5070 Ti
- Installer nvidia-driver >570 et linux-kernel >6.11
- Installer la version open du driver :
nvidia-driver-570-open
Donc par exemple :
export distro="ubuntu2404"
export arch="x86_64"
export version="570"
wget https://developer.download.nvidia.com/compute/cuda/repos/$distro/$arch/cuda-keyring_1.1-1_all.deb
sudo dpkg -i cuda-keyring_1.1-1_all.deb
sudo apt update
sudo apt install nvidia-driver-pinning-$version
sudo IGNORE_PREEMPT_RT_PRESENCE=1 apt install cuda-drivers nvidia-driver-$version-openBenchmark glmark2 en résolution 1920x1080 https://openbenchmarking.org/test/pts/glmark2
glmark2 -s 1920x1080
=======================================================
glmark2 2023.01
=======================================================
OpenGL Information
GL_VENDOR: NVIDIA Corporation
GL_RENDERER: NVIDIA GeForce RTX 5070 Ti/PCIe/SSE2
GL_VERSION: 4.6.0 NVIDIA 570.211.01
Surface Config: buf=32 r=8 g=8 b=8 a=8 depth=24 stencil=0 samples=0
Surface Size: 1920x1080 windowed
=======================================================
[build] use-vbo=false: FPS: 17118 FrameTime: 0.058 ms
[build] use-vbo=true: FPS: 29160 FrameTime: 0.034 ms
[texture] texture-filter=nearest: FPS: 24267 FrameTime: 0.041 ms
[texture] texture-filter=linear: FPS: 29185 FrameTime: 0.034 ms
[texture] texture-filter=mipmap: FPS: 29395 FrameTime: 0.034 ms
[shading] shading=gouraud: FPS: 28971 FrameTime: 0.035 ms
[shading] shading=blinn-phong-inf: FPS: 28964 FrameTime: 0.035 ms
[shading] shading=phong: FPS: 28750 FrameTime: 0.035 ms
[shading] shading=cel: FPS: 28703 FrameTime: 0.035 ms
[bump] bump-render=high-poly: FPS: 26538 FrameTime: 0.038 ms
[bump] bump-render=normals: FPS: 29854 FrameTime: 0.033 ms
[bump] bump-render=height: FPS: 29795 FrameTime: 0.034 ms
[effect2d] kernel=0,1,0;1,-4,1;0,1,0;: FPS: 25300 FrameTime: 0.040 ms
[effect2d] kernel=1,1,1,1,1;1,1,1,1,1;1,1,1,1,1;: FPS: 19425 FrameTime: 0.051 ms
[pulsar] light=false:quads=5:texture=false: FPS: 27432 FrameTime: 0.036 ms
[desktop] blur-radius=5:effect=blur:passes=1:separable=true:windows=4: FPS: 9557 FrameTime: 0.105 ms
[desktop] effect=shadow:windows=4: FPS: 17248 FrameTime: 0.058 ms
[buffer] columns=200:interleave=false:update-dispersion=0.9:update-fraction=0.5:update-method=map: FPS: 3425 FrameTime: 0.292 ms
[buffer] columns=200:interleave=false:update-dispersion=0.9:update-fraction=0.5:update-method=subdata: FPS: 3852 FrameTime: 0.260 ms
[buffer] columns=200:interleave=true:update-dispersion=0.9:update-fraction=0.5:update-method=map: FPS: 4847 FrameTime: 0.206 ms
[ideas] speed=duration: FPS: 24299 FrameTime: 0.041 ms
[jellyfish] <default>: FPS: 20993 FrameTime: 0.048 ms
[terrain] <default>: FPS: 2663 FrameTime: 0.376 ms
[shadow] <default>: FPS: 17595 FrameTime: 0.057 ms
[refract] <default>: FPS: 6201 FrameTime: 0.161 ms
[conditionals] fragment-steps=0:vertex-steps=0: FPS: 28276 FrameTime: 0.035 ms
[conditionals] fragment-steps=5:vertex-steps=0: FPS: 28159 FrameTime: 0.036 ms
[conditionals] fragment-steps=0:vertex-steps=5: FPS: 23158 FrameTime: 0.043 ms
[function] fragment-complexity=low:fragment-steps=5: FPS: 24062 FrameTime: 0.042 ms
[function] fragment-complexity=medium:fragment-steps=5: FPS: 27253 FrameTime: 0.037 ms
[loop] fragment-loop=false:fragment-steps=5:vertex-steps=5: FPS: 28133 FrameTime: 0.036 ms
[loop] fragment-steps=5:fragment-uniform=false:vertex-steps=5: FPS: 28144 FrameTime: 0.036 ms
[loop] fragment-steps=5:fragment-uniform=true:vertex-steps=5: FPS: 28068 FrameTime: 0.036 ms
=======================================================
glmark2 Score: 22083
=======================================================
Config laptop
- suspend-then-hibernate swap partition
Installation de machine avec RT Kernel et accélération graphique
Déploiement avec FAI-Project
https://fai-project.org/FAIme/
- Sélectionner Ubuntu
- Basculer en mode avancé en cliquant sur Toggle
- Si le mdp est laissé vide, ce sera le code du projet FAI
- Choisir un utilisateur, par ex.
etudiant - Attention si vous choisissez US, le clavier sera QWERTZ
Your job BYDEGIKS is currently being processed. https://fai-project.org/myimages/BYDEGIKS
Your web config:
type="install" partition="ONE" desktop="XORG" suite="ubuntu" keyboard="fr" addpkgs="software-properties-common terminator nano htop wget curl gpg apt-transport-https python3-rosdep2 ubuntu-realtime docker-ce docker-ce-cli containerd.io docker-buildx-plugin docker-compose-plugin" email="robotics@hentz.eu" rootpw='' username="etudiant" userpw='' gittype="" gituser="" repo="deb [trusted=yes] http://download.docker.com/linux/ubuntu noble stable" postinst="install_pc_aica.sh" rclocal="1" datapart="" cmdline="" options="STANDARD REBOOT RECOMMENDS"
curl "https://fai-project.org/cgi/faime.cgi?type=install;username=etudiant;partition=ONE;repo=http%3A%2F%2Fdownload.docker.com%2Flinux%2Fubuntu%20noble%20stable;keyboard=fr;suite=ubuntu;desktop=XORG;cl6=STANDARD;addpkgs=software-properties-common%20terminator%20nano%20htop%20wget%20curl%20gpg%20apt-transport-https%20python3-rosdep2%20ubuntu-realtime%20docker-ce%20docker-ce-cli%20containerd.io%20docker-buildx-plugin%20docker-compose-plugin;cl9=RECOMMENDS;email=robotics%40hentz.eu;postinst=install_pc_aica.sh;rclocal=1;cl8=REBOOT;sbm=2"
sudo apt install ubuntu-realtime
sudo nano /etc/default/grub
sudo update-grub
uname -v | cut -d" " -f1-4
sudo apt install cpufrequtils
sudo systemctl disable ondemand
sudo systemctl enable cpufrequtils
sudo sh -c 'echo "GOVERNOR=performance" > /etc/default/cpufrequtils'
sudo systemctl daemon-reload && sudo systemctl restart cpufrequtils
sudo systemctl status docker
cpufreq-info
wget <https://developer.download.nvidia.com/compute/cuda/repos/ubuntu2404/x86_64/cuda-keyring_1.1-1_all.deb>
sudo dpkg -i cuda-keyring_1.1-1_all.deb
sudo apt update
sudo apt install nvidia-driver-pinning-570
sudo IGNORE_PREEMPT_RT_PRESENCE=1 apt install cuda-drivers
sudo apt-get update && sudo apt-get install -y --no-install-recommends ca-certificates curl gnupg2
sudo apt-get remove docker docker-engine docker.io containerd runc
sudo install -m 0755 -d /etc/apt/keyrings
sudo curl -fsSL <https://download.docker.com/linux/ubuntu/gpg> -o /etc/apt/keyrings/docker.asc
sudo chmod a+r /etc/apt/keyrings/docker.asc
# Add the repository to Apt sources:
sudo tee /etc/apt/sources.list.d/docker.sources <<EOF
Types: deb
URIs: <https://download.docker.com/linux/ubuntu>
Suites: $(. /etc/os-release && echo "${UBUNTU_CODENAME:-$VERSION_CODENAME}")
Components: stable
Signed-By: /etc/apt/keyrings/docker.asc
EOF
sudo apt update
sudo apt install docker-ce docker-ce-cli containerd.io docker-buildx-plugin docker-compose-plugin
sudo docker run hello-world
sudo usermod -aG docker $USER
curl -fsSL <https://nvidia.github.io/libnvidia-container/gpgkey> | sudo gpg --dearmor -o /usr/share/keyrings/nvidia-container-toolkit-keyring.gpg && curl -s -L <https://nvidia.github.io/libnvidia-container/stable/deb/nvidia-container-toolkit.list> | sed 's#deb <https://#deb> [signed-by=/usr/share/keyrings/nvidia-container-toolkit-keyring.gpg] <https://#g>' | sudo tee /etc/apt/sources.list.d/nvidia-container-toolkit.list
sudo apt update
sudo apt install nvidia-container-toolkit
sudo nvidia-ctk runtime configure --runtime=docker
sudo reboot
sudo docker run --rm --runtime=nvidia --gpus all ubuntu nvidia-smi
git clone <https://github.com/gautz/unistra-aica-practical> aica
cd ~/aica/package-template
docker build -f aica-package.toml -t object-detection-utils .RT Kernel
RT Kernel ou Low Latency ?
Soit on build à la main (https://innovation.iha.unistra.fr/books/robotique-open-source/page/commander-un-robot-ur-avec-le-driver-ros2#bkmrk-installation-d%27ubunt ), soit on prend un Kernel qui est dispo dans les dépôts
sudo apt list *realtime* linux*rt
ubuntu-realtime
linux-realtime
linux-image-6.8.1-1015-realtime- On install
sudo apt install ubuntu-realtime - Permettre le choix du noyau au démarrage (grub)
sudo nano /etc/default/grub
GRUB_SAVEDEFAULT=true
GRUB_DEFAULT="saved" # Le dernier Kernel choisi devient le Kernel par défaut
#GRUB_DEFAULT="Advanced options for Ubuntu>Ubuntu, with Linux 6.8.1-1015-realtime"
#GRUB_TIMEOUT_STYLE=hidden
GRUB_TIMEOUT=3 # 3 secondes pour choisir le Kernel à démarrersudo update-grub
https://unix.stackexchange.com/questions/198003/set-the-default-kernel-in-grub
https://www.gnu.org/software/grub/manual/grub/html_node/Simple-configuration.html
Accélération GPU
Que ce soit pour LeRobot, pour AICA, ou en général pour utiliser des modèles d'IA, l'installation de Linux avec les bons drivers graphiques n'est pas toujours aisé.
On veut accéder dans Docker aux capacités Compute d'un GPU, essentiellement fournie par NVidia Cuda. On différentiera l'installation d'un serveur qui n'a pas besoin de l'accélération graphique liée à l'affichage, ni de capacités temps-réel, contrairement à un PC de commande de robot.
NVidia Driver et RT Kernel
https://interfacinglinux.com/2024/01/16/nvidia-cuda-on-debian-real-time-kernel/
https://gist.github.com/pantor/9786c41c03a97bca7a52aa0a72fa9387
Prérequis
- Les paquets Nvidia pour les Kernels installés ne sont pas nécessairement dispos, mais le patch est automatique
- Par contre le patch échoue si un RT Kernel est détecté
- Il faut forcer le patch à s'appliquer sur le RT Kernel
export IGNORE_PREEMPT_RT_PRESENCE=1- On peut l'ajouter au
~.bashrcpour ne pas oublier de le faire lors d'un upgrade de Kernel) - On installe les headers pour le Kernel en cours
sudo apt install linux-headers-$(uname -r)- S'il y a d'autres Kernel, installer les header
sudo apt install linux-headers-...
sudo apt install nvidia-driver installe la dernière version du driver dispo, mais cuda-drivers n'est pas forcément dispo pour cette version. Donc on va chercher la bonne version.
Pour supprimer tous les drivers nvidia précédemment installés. A utiliser avec précautions : sudo apt autoremove --purge *nvidia*
Installation du nvidia-driver et de cuda
- On installe le dépôt CUDA
-
wget https://developer.download.nvidia.com/compute/cuda/repos/$distro/x86_64/cuda-keyring_1.1-1_all.deb sudo dpkg -i cuda-keyring_1.1-1_all.deb sudo apt update - On regarde les version de
nvidia-driverqui peuvent être pin : sudo apt install nvidia-driver-pinning-*- On regarde les version des
cuda-driversqui peuvent être installées : sudo apt list cuda-drivers-*- On regarde quelle version de
nvidia-driverserait installé pour une version voulue de cuda : - Exemple :
sudo apt install cuda-13-1OUsudo apt install cuda-12-8 - On choisi de pin la version de
nvidia-driverqui a uncuda-driverset qui permet d'installer la bonne version de CUDA : - Exemple :
sudo apt install nvidia-driver-pinning-550installe CUDA 12.5 - Exemple :
sudo apt install nvidia-driver-pinning-560installe CUDA 12.6 - Exemple :
sudo apt install nvidia-driver-pinning-570installe CUDA 12.8 - Exemple :
sudo apt install nvidia-driver-pinning-580installe CUDA 13.0 - On install les drivers propriétaires (Calcul et Affichage GPU) :
sudo IGNORE_PREEMPT_RT_PRESENCE=1 apt install cuda-drivers(pour patcher même les RT Kernel)- Installer nvidia-container-toolkit pour Docker :
sudo apt install nvidia-container-toolkit
Optionnel
- Si on est sur un serveur, on peut aussi n'installer que les composants de Calcul GPU :
sudo apt -V install libnvidia-compute nvidia-dkms
- Si on est sur un PC, on peut aussi n'installer que les composants d'Affichage GPU :
sudo apt -V install libnvidia-gl nvidia-dkms
- Pour installer les composants Libres (Open Kernel Modules), voir :
https://docs.nvidia.com/datacenter/tesla/driver-installation-guide/ubuntu.html
- Installer le SDK CUDA
sudo apt install cuda-toolkit - puis les paquets GDS
sudo apt install nvidia-gds(qui contientnvidia-fskernel module) - pour
arm64-jetson:sudo apt install cuda-compat
https://docs.nvidia.com/cuda/cuda-installation-guide-linux/#network-repo-installation-for-ubuntu
Vérification de la compatibilité GPU - Application IA
Procédure :
- Lister les applications d'IA qu'on va vouloir faire tourner
- Regarder les prérequis de la version actuelle de l'application IA
- Regarder les prérequis de ses dépendances
- Par exemple YOLO requiert onnxruntime-gpu
- Regarder les prérequis en termes GPU (Compute Capability, etc.)
- Regarder les prérequis en termes d'environnement d'exécution
- Version d'Ubuntu et drivers dispos
- Version de CUDA, cuDNN, Pytorch
- Acheter le GPU nécessaire et installer la version d'Ubuntu nécessaire
- Si on est motivé et qu'on veut essayer avec notre GPU et notre version d'Ubuntu actuelle, regarder les prérequis des versions précédentes et voir s'il y en a une qui passe
On a une application d'IA donnée
Par exemple YOLO :
- utilise onnxruntime https://onnxruntime.ai/docs/execution-providers/CUDA-ExecutionProvider.html
- onnxruntime-gpu >=1.18.1 : CUDA 12.x ; cuDNN 9.x ; PyTorch >= 2.4.0
- onnxruntime-gpu < 1.18.0 : CUDA 12.x ; cuDNN 8.x ; PyTorch < 2.4.0
- onnxruntime-gpu 1.18-1.20 : CUDA 11.8 ; cuDNN 8.x ; PyTorch <= 2.3.1
- onnxruntime-gpu >= 1.16 supports CC 6.0 or above
- onnxruntime-gpu < 1.18 requiert CUDA 11.x
- L'environnement YOLO de AICA utilise onnxruntime-gpu=1.22.2
- onnxruntime-gpu >=1.24 requiert CC 6.0 pour CUDA 12 et CC 7.5 pour CUDA 13
Différentes versions de l'environnement d'exécution
- Grâce à la compatibilité des versions mineures de Nvidia CUDA, une application d'IA compilée avec CUDA 11.8 peut être exécutée avec n'importe laquelle des version CUDA 11.x . Idem pour CUDA 12.x .
- Par contre une application cuDNN 8.x n'est pas compatible avec cuDNN 9.x .
- PyTorch 2.3 et inférieur utilisent cuDNN 8.x
- PyTorch 2.4 et supérieur utilisent cuDNN 9.x
- Il faut donc choisir la version de Pytorch en fonction des versions de CUDA et cuDNN qui sont compatibles avec l'environnement d'exécution (carte graphique et driver)
https://docs.nvidia.com/deeplearning/cudnn/backend/latest/reference/support-matrix.html
cuDNN>=v9.12.0 supporte :
- CUDA 12.x (nvidia-driver>=525.60.13)
- CUDA 13.x (nvidia-driver>=580.65.06)
- CUDA CC>=7.5
cuDNN<=v9.11.1
- CUDA 12.x (nvidia-driver>=525.60.13)
- CUDA CC>=5.0-9.0 (10.0-12.0 avec CUDA>=12.8 et nvidia-driver>=570.26)
cuDNN<=v9.10.2 :
- CUDA 12.x (nvidia-driver>=525.60.13) (12.8-9 pour >=570.26 et CC 10-12)
- CUDA 11.x (nvidia-driver>=450.80.02)
- CUDA CC>=5.0-9.0 (10.0-12.0 avec CUDA>=12.8 et nvidia-driver>=570.26)
Compatibilité de version d'Ubuntu
Sur Ubuntu 24.04 :
- les
sudo apt list nvidia-driver*dispos sont 460-470,515-590 - les
sudo apt list cuda-drivers*dispos sont 550,555,560,565,570,575,580 - les
sudo apt list nvidia-driver-pinning*dispo sont 570,580,590 - les
sudo apt list cuda-toolkit*seuls CUDA 12.5-13.1 sont dispos
On a une carte graphique donnée :
- Vérification du Compute Capability (CC) https://developer.nvidia.com/cuda/gpus
- Si on est dans cette liste, donc CC >= 7.5 c'est TOP, on est compatible avec onnx et CUDA 13
- A partir de 6.0 on est compatible avec onnx et CUDA 12 (mais pas CUDA 13)
- On conseille de laisser tomber l'IA avec des CC de 5.0 ou inférieur
- Si on a 5.2 >= CC < 6.0 , on a une carte Legacy, voir ci-dessous, c'est compliqué
- On vérifie la version de CUDA Max supportée en fonction du CC : https://stackoverflow.com/questions/28932864/which-compute-capability-is-supported-by-which-cuda-versions
- On va donc pouvoir chercher une compatibilité d'exécution avec CUDA 12.x et CUDA 11.x , mais pas CUDA 13.x
Problèmes avec les GPU NVidia anciens : https://github.com/ultralytics/ultralytics/issues/5305
GPU NVidia anciens / Legacy
On lance Yolo et on a l'erreur suivante :
10:17:40.111 [yolo_executor] error: ONNX Runtime error during model query: Non-zero status code returned while running QuickGelu node. Name:'node_silu/QuickGeluFusion/' Status Message: CUDA error cudaErrorNoKernelImageForDevice:no kernel image is available for execution on the device
- onnxruntime-gpu 1.14 supports CC 3.7 or above
- onnxruntime-gpu 1.15 supports CC 5.2 or above
- onnxruntime-gpu >=1.16 supports CC 6.0 or above
- onnxruntime-gpu <1.18 requiert CUDA 11.x
- >1.24 requiert CC 6.0 pour CUDA 12 et CC 7.5 pour CUDA 13
- L'environnement YOLO de AICA utilise onnxruntime-gpu=1.22.2
- FP16 models ne tournent qu'à partir de CC 5.3
- C'est pour ça que l'erreur indique qu'il n'y a pas de kernel FP16 compilé pour notre GPU
- Problème : CUDA 11.x n'est pas dispo sur Ubuntu 24.04
- Mais peut être installé : https://askubuntu.com/questions/1536271/can-i-install-cuda-11-4-in-ubuntu-24-04-if-so-how
Solution (voir analyse ci-dessous) :
- Installer le driver 470
- Installer CUDA 11.8? en suivant https://askubuntu.com/questions/1536271/can-i-install-cuda-11-4-in-ubuntu-24-04-if-so-how
- Exporter le modèle onnx en kernel FP32
- Déployer le modèle YOLO dans un environnement Legacy avec onnxruntime-gpu 1.15
https://github.com/microsoft/onnxruntime/issues/17861#issuecomment-1758098712
On a une carte graphique donnée | par exemple Quadro M620 (GM107GLM) :
- Vérification du Compute Capability https://developer.nvidia.com/cuda/gpus/legacy | CC5.2
- On conseille de laisser tomber l'IA avec des Compute Capability de 5.0 ou inférieur |
- Si on a une Compute Capability entre 5.2 et 7.2 , on peut envisager des choses mais c'est compliqué
- On vérifie la version de CUDA Max supportée : https://stackoverflow.com/questions/28932864/which-compute-capability-is-supported-by-which-cuda-versions | pour CC5.2 : CUDA 12.x
- On va donc pouvoir chercher une compatibilité d'exécution avec CUDA 12.x et CUDA 11.x , mais pas CUDA 13.x
- Les
nvidia-driverdispos sont 460-470,515-590 (535 est testé/recommandé) - mais les
cuda-driversdispos sont 550,555,560,565,570,575,580 - et les
nvidia-driver-pinninget dispo de 570,580,590 - Exemple :
sudo apt install nvidia-driver-470mais CUDA 11.x pas dispo sur Ubuntu 24.04 - Exemple :
sudo apt install nvidia-driver-pinning-550installe CUDA 12.5 - Exemple :
sudo apt install nvidia-driver-pinning-560installe CUDA 12.6 - Exemple :
sudo apt install nvidia-driver-pinning-570installe CUDA 12.8 - Exemple :
sudo apt install nvidia-driver-pinning-580installe CUDA 13.0 - Avec CUDA 12.0-1 et le driver 535 on peut avoir v8.9.2<=cuDNN<=v9.11.1
- Avec CUDA 12.2 v8.9.7<=cuDNN<=v9.11.1
- Avec CUDA >=12.3 v9<=cuDNN<=v9.11.1
- Donc il faudrait CUDA 12.0-2
- mais
sudo apt list cuda-toolkit*seuls CUDA 12.5-13.1 sont dispos
Option 1 : Driver Version: 580 CUDA Version: 13.0
- On n'a pas cuDNN v8
- on a
cuda-drivers-580
Option 2 : Driver Version: 570 CUDA Version: 12.8
- on a
cuda-drivers-570
Option 3 : Driver Version: 535.288.01 CUDA Version: 12.2
- On a v8.9.7<=cuDNN<=v9.11.1
- Mais on n'a pas
cuda-drivers
Option 4 : Driver Version: 470 CUDA Version: 11.x
- Installer CUDA 11.8? en suivant https://askubuntu.com/questions/1536271/can-i-install-cuda-11-4-in-ubuntu-24-04-if-so-how
- On n'a pas
cuda-drivers-> Problème ?
https://pytorch.org/get-started/previous-versions/
- Avec pytorch 2.1.1 et 2.2.0 , c'est cuddn 8.9.2 qui est installé par défaut
- pytorch <2.2.0 n'est plus supporté dans pip
https://docs.nvidia.com/deeplearning/cudnn/archives/cudnn-892/support-matrix/index.html
cuDNN=v8.9.2 :
- CUDA 12.0-1 (nvidia-driver>=525.60.13)
- CUDA 11.x (nvidia-driver>=450.80.02)
- CUDA CC>=5.0 <=8.6 (8.9-9.0 avec CUDA>=11.8)
- Avec pytorch ... c'est cuddn 8.9.7 qui est installé par défaut
https://docs.nvidia.com/deeplearning/cudnn/archives/cudnn-897/support-matrix/index.html
cuDNN=v8.9.7 :
- CUDA 12.0-2 (nvidia-driver>=525.60.13)
- CUDA 11.x (nvidia-driver>=450.80.02)
- CUDA CC>=5.0 <=8.6 (8.9-9.0 avec CUDA>=11.8)
Voir aussi https://docs.nvidia.com/deeplearning/cudnn/onnxruntime-gpuarchives/index.html
Avec :
#syntax=ghcr.io/aica-technology/app-builder:v2
# launch with bash:
[core]
"image" = "v5.1.0"
[packages]
# add components
#"@aica/components/rl-policy-components" = "v3.0.0"
"@aica/components/advanced-perception" = "v1.0.0" # contains YoloExecutor
"@aica/components/core-vision" = "v1.1.2" # contains CameraStreamer
"@aica/foss/toolkits/cuda" = "v1.0.0-cuda24.12" # prerequisite for NVidia GPU acceleration
"@aica/foss/toolkits/ml" = "v1.0.0-gpu24.12" # prerequisite for ML model inference
# other extensions
"object-detection-utils" # self-built component to feed goal frame extracted from yolo to robot velocity controller
# add hardware collections
"@aica/collections/intel-realsense-collection" = "v2.0.1" # D4XX and L515 cameras models, stream RGBD
"@aica/collections/ur-collection" = "v4.3.0"On a :
ros2@iha-portrob-1:~/examples$ python3 -m torch.utils.collect_env
<frozen runpy>:128: RuntimeWarning: 'torch.utils.collect_env' found in sys.modules after import of package 'torch.utils', but prior to execution of 'torch.utils.collect_env'; this may result in unpredictable behaviour
Collecting environment information...
PyTorch version: 2.6.0+cu126
Is debug build: False
CUDA used to build PyTorch: 12.6
ROCM used to build PyTorch: N/A
OS: Ubuntu 24.04.2 LTS (x86_64)
GCC version: (Ubuntu 13.3.0-6ubuntu2~24.04) 13.3.0
Clang version: Could not collect
CMake version: version 3.28.3
Libc version: glibc-2.39
Python version: 3.12.3 (main, Feb 4 2025, 14:48:35) [GCC 13.3.0] (64-bit runtime)
Python platform: Linux-6.17.0-14-generic-x86_64-with-glibc2.39
Is CUDA available: True
CUDA runtime version: 12.6.85
CUDA_MODULE_LOADING set to: LAZY
GPU models and configuration: GPU 0: Quadro M620
Nvidia driver version: 570.211.01
cuDNN version: Probably one of the following:
/usr/lib/libcudnn.so.9.6.0
/usr/lib/libcudnn_adv.so.9.6.0
/usr/lib/libcudnn_cnn.so.9.6.0
/usr/lib/libcudnn_engines_precompiled.so.9.6.0
/usr/lib/libcudnn_engines_runtime_compiled.so.9.6.0
/usr/lib/libcudnn_graph.so.9.6.0
/usr/lib/libcudnn_heuristic.so.9.6.0
/usr/lib/libcudnn_ops.so.9.6.0
HIP runtime version: N/A
MIOpen runtime version: N/A
Is XNNPACK available: True
CPU:
Architecture: x86_64
CPU op-mode(s): 32-bit, 64-bit
Address sizes: 39 bits physical, 48 bits virtual
Byte Order: Little Endian
CPU(s): 4
On-line CPU(s) list: 0-3
Vendor ID: GenuineIntel
Model name: Intel(R) Core(TM) i5-7440HQ CPU @ 2.80GHz
CPU family: 6
Model: 158
Thread(s) per core: 1
Core(s) per socket: 4
Socket(s): 1
Stepping: 9
CPU(s) scaling MHz: 84%
CPU max MHz: 3800.0000
CPU min MHz: 800.0000
BogoMIPS: 5599.85
Flags: fpu vme de pse tsc msr pae mce cx8 apic sep mtrr pge mca cmov pat pse36 clflush dts acpi mmx fxsr sse sse2 ss ht tm pbe syscall nx pdpe1gb rdtscp lm constant_tsc art arch_perfmon pebs bts rep_good nopl xtopology nonstop_tsc cpuid aperfmperf pni pclmulqdq dtes64 monitor ds_cpl vmx smx est tm2 ssse3 sdbg fma cx16 xtpr pdcm pcid sse4_1 sse4_2 x2apic movbe popcnt tsc_deadline_timer aes xsave avx f16c rdrand lahf_lm abm 3dnowprefetch cpuid_fault epb pti ssbd ibrs ibpb stibp tpr_shadow flexpriority ept vpid ept_ad fsgsbase tsc_adjust bmi1 avx2 smep bmi2 erms invpcid mpx rdseed adx smap clflushopt intel_pt xsaveopt xsavec xgetbv1 xsaves dtherm ida arat pln pts hwp hwp_notify hwp_act_window hwp_epp vnmi md_clear flush_l1d arch_capabilities
Virtualization: VT-x
L1d cache: 128 KiB (4 instances)
L1i cache: 128 KiB (4 instances)
L2 cache: 1 MiB (4 instances)
L3 cache: 6 MiB (1 instance)
NUMA node(s): 1
NUMA node0 CPU(s): 0-3
Vulnerability Gather data sampling: Vulnerable
Vulnerability Ghostwrite: Not affected
Vulnerability Indirect target selection: Not affected
Vulnerability Itlb multihit: KVM: Mitigation: Split huge pages
Vulnerability L1tf: Mitigation; PTE Inversion; VMX conditional cache flushes, SMT disabled
Vulnerability Mds: Mitigation; Clear CPU buffers; SMT disabled
Vulnerability Meltdown: Mitigation; PTI
Vulnerability Mmio stale data: Mitigation; Clear CPU buffers; SMT disabled
Vulnerability Old microcode: Not affected
Vulnerability Reg file data sampling: Not affected
Vulnerability Retbleed: Mitigation; IBRS
Vulnerability Spec rstack overflow: Not affected
Vulnerability Spec store bypass: Mitigation; Speculative Store Bypass disabled via prctl
Vulnerability Spectre v1: Mitigation; usercopy/swapgs barriers and __user pointer sanitization
Vulnerability Spectre v2: Mitigation; IBRS; IBPB conditional; STIBP disabled; RSB filling; PBRSB-eIBRS Not affected; BHI Not affected
Vulnerability Srbds: Mitigation; Microcode
Vulnerability Tsa: Not affected
Vulnerability Tsx async abort: Mitigation; TSX disabled
Vulnerability Vmscape: Mitigation; IBPB before exit to userspace
Versions of relevant libraries:
[pip3] ament-flake8==0.17.2
[pip3] flake8==7.0.0
[pip3] flake8-builtins==2.1.0
[pip3] flake8-comprehensions==3.14.0
[pip3] flake8-docstrings==1.6.0
[pip3] flake8-import-order==0.18.2
[pip3] flake8-quotes==3.4.0
[pip3] numpy==1.26.4
[pip3] nvidia-cublas-cu12==12.6.4.1
[pip3] nvidia-cuda-cupti-cu12==12.6.80
[pip3] nvidia-cuda-nvrtc-cu12==12.6.77
[pip3] nvidia-cuda-runtime-cu12==12.6.77
[pip3] nvidia-cudnn-cu12==9.5.1.17
[pip3] nvidia-cufft-cu12==11.3.0.4
[pip3] nvidia-curand-cu12==10.3.7.77
[pip3] nvidia-cusolver-cu12==11.7.1.2
[pip3] nvidia-cusparse-cu12==12.5.4.2
[pip3] nvidia-cusparselt-cu12==0.6.3
[pip3] nvidia-nccl-cu12==2.21.5
[pip3] nvidia-nvjitlink-cu12==12.6.85
[pip3] nvidia-nvtx-cu12==12.6.77
[pip3] onnxruntime-gpu==1.22.2
[pip3] pytorch3d==0.7.8
[pip3] torch==2.6.0+cu126
[pip3] torchaudio==2.6.0+cu126
[pip3] torchvision==0.21.0+cu126
[pip3] triton==3.2.0
[conda] Could not collectAvec :
"@aica/foss/toolkits/cuda" = "v1.0.0-cuda24.12" # prerequisite for NVidia GPU acceleration
"@aica/foss/toolkits/ml" = "v1.0.0-gpu24.12" # prerequisite for ML model inferenceOn a :
ros2@iha-portrob-1:~/examples$ python3 -m torch.utils.collect_env
<frozen runpy>:128: RuntimeWarning: 'torch.utils.collect_env' found in sys.modules after import of package 'torch.utils', but prior to execution of 'torch.utils.collect_env'; this may result in unpredictable behaviour
Collecting environment information...
PyTorch version: 2.6.0+cu126
Is debug build: False
CUDA used to build PyTorch: 12.6
ROCM used to build PyTorch: N/A
OS: Ubuntu 24.04.2 LTS (x86_64)
GCC version: (Ubuntu 13.3.0-6ubuntu2~24.04) 13.3.0
Clang version: Could not collect
CMake version: version 3.28.3
Libc version: glibc-2.39
Python version: 3.12.3 (main, Feb 4 2025, 14:48:35) [GCC 13.3.0] (64-bit runtime)
Python platform: Linux-6.17.0-14-generic-x86_64-with-glibc2.39
Is CUDA available: True
CUDA runtime version: 12.6.85
CUDA_MODULE_LOADING set to: LAZY
GPU models and configuration: GPU 0: Quadro M620
Nvidia driver version: 570.211.01
cuDNN version: Probably one of the following:
/usr/lib/libcudnn.so.9.6.0
/usr/lib/libcudnn_adv.so.9.6.0
/usr/lib/libcudnn_cnn.so.9.6.0
/usr/lib/libcudnn_engines_precompiled.so.9.6.0
/usr/lib/libcudnn_engines_runtime_compiled.so.9.6.0
/usr/lib/libcudnn_graph.so.9.6.0
/usr/lib/libcudnn_heuristic.so.9.6.0
/usr/lib/libcudnn_ops.so.9.6.0
HIP runtime version: N/A
MIOpen runtime version: N/A
Is XNNPACK available: True
CPU:
Architecture: x86_64
CPU op-mode(s): 32-bit, 64-bit
Address sizes: 39 bits physical, 48 bits virtual
Byte Order: Little Endian
CPU(s): 4
On-line CPU(s) list: 0-3
Vendor ID: GenuineIntel
Model name: Intel(R) Core(TM) i5-7440HQ CPU @ 2.80GHz
CPU family: 6
Model: 158
Thread(s) per core: 1
Core(s) per socket: 4
Socket(s): 1
Stepping: 9
CPU(s) scaling MHz: 81%
CPU max MHz: 3800.0000
CPU min MHz: 800.0000
BogoMIPS: 5599.85
Flags: fpu vme de pse tsc msr pae mce cx8 apic sep mtrr pge mca cmov pat pse36 clflush dts acpi mmx fxsr sse sse2 ss ht tm pbe syscall nx pdpe1gb rdtscp lm constant_tsc art arch_perfmon pebs bts rep_good nopl xtopology nonstop_tsc cpuid aperfmperf pni pclmulqdq dtes64 monitor ds_cpl vmx smx est tm2 ssse3 sdbg fma cx16 xtpr pdcm pcid sse4_1 sse4_2 x2apic movbe popcnt tsc_deadline_timer aes xsave avx f16c rdrand lahf_lm abm 3dnowprefetch cpuid_fault epb pti ssbd ibrs ibpb stibp tpr_shadow flexpriority ept vpid ept_ad fsgsbase tsc_adjust bmi1 avx2 smep bmi2 erms invpcid mpx rdseed adx smap clflushopt intel_pt xsaveopt xsavec xgetbv1 xsaves dtherm ida arat pln pts hwp hwp_notify hwp_act_window hwp_epp vnmi md_clear flush_l1d arch_capabilities
Virtualization: VT-x
L1d cache: 128 KiB (4 instances)
L1i cache: 128 KiB (4 instances)
L2 cache: 1 MiB (4 instances)
L3 cache: 6 MiB (1 instance)
NUMA node(s): 1
NUMA node0 CPU(s): 0-3
Vulnerability Gather data sampling: Vulnerable
Vulnerability Ghostwrite: Not affected
Vulnerability Indirect target selection: Not affected
Vulnerability Itlb multihit: KVM: Mitigation: Split huge pages
Vulnerability L1tf: Mitigation; PTE Inversion; VMX conditional cache flushes, SMT disabled
Vulnerability Mds: Mitigation; Clear CPU buffers; SMT disabled
Vulnerability Meltdown: Mitigation; PTI
Vulnerability Mmio stale data: Mitigation; Clear CPU buffers; SMT disabled
Vulnerability Old microcode: Not affected
Vulnerability Reg file data sampling: Not affected
Vulnerability Retbleed: Mitigation; IBRS
Vulnerability Spec rstack overflow: Not affected
Vulnerability Spec store bypass: Mitigation; Speculative Store Bypass disabled via prctl
Vulnerability Spectre v1: Mitigation; usercopy/swapgs barriers and __user pointer sanitization
Vulnerability Spectre v2: Mitigation; IBRS; IBPB conditional; STIBP disabled; RSB filling; PBRSB-eIBRS Not affected; BHI Not affected
Vulnerability Srbds: Mitigation; Microcode
Vulnerability Tsa: Not affected
Vulnerability Tsx async abort: Mitigation; TSX disabled
Vulnerability Vmscape: Mitigation; IBPB before exit to userspace
Versions of relevant libraries:
[pip3] ament-flake8==0.17.2
[pip3] flake8==7.0.0
[pip3] flake8-builtins==2.1.0
[pip3] flake8-comprehensions==3.14.0
[pip3] flake8-docstrings==1.6.0
[pip3] flake8-import-order==0.18.2
[pip3] flake8-quotes==3.4.0
[pip3] numpy==1.26.4
[pip3] nvidia-cublas-cu12==12.6.4.1
[pip3] nvidia-cuda-cupti-cu12==12.6.80
[pip3] nvidia-cuda-nvrtc-cu12==12.6.77
[pip3] nvidia-cuda-runtime-cu12==12.6.77
[pip3] nvidia-cudnn-cu12==9.5.1.17
[pip3] nvidia-cufft-cu12==11.3.0.4
[pip3] nvidia-curand-cu12==10.3.7.77
[pip3] nvidia-cusolver-cu12==11.7.1.2
[pip3] nvidia-cusparse-cu12==12.5.4.2
[pip3] nvidia-cusparselt-cu12==0.6.3
[pip3] nvidia-nccl-cu12==2.21.5
[pip3] nvidia-nvjitlink-cu12==12.6.85
[pip3] nvidia-nvtx-cu12==12.6.77
[pip3] onnxruntime-gpu==1.22.2
[pip3] pytorch3d==0.7.8
[pip3] torch==2.6.0+cu126
[pip3] torchaudio==2.6.0+cu126
[pip3] torchvision==0.21.0+cu126
[pip3] triton==3.2.0
[conda] Could not collectSources
https://interfacinglinux.com/2024/01/16/nvidia-cuda-on-debian-real-time-kernel/
https://forum.zorin.com/t/nvidia-drivers-cannot-be-installed-because-of-real-time-kernel/46419/22
Machine Learning LeRobot avec SO-ARM101
Installation et prérequis
- Une carte graphique NVidia et une installation de Cuda ?
- Comparaison cartes graphiques (un peu dépassé car ne prend pas en compte les dernières génération type 5090) https://www.geeksforgeeks.org/machine-learning/choosing-the-right-gpu-for-your-machine-learning/
- Puissance de calcul dispo à l'Innov'Lab TPS https://www.innovlab-tps.net/calcul-et-stockage.html
- Pour l'entraînement des modèles : Serveur de calcul Apollo 6500 doté de 4 GPU HGX A100, 80Go
- Pour l'inférence des modèles : Terminaux de calcul dotés GPU Nvidia RTX 4090, 24Go
Prérequis pour l'exécution d'un modèle d'IA :
- Config minimum : L'exécution semble résulter en un mouvement saccadé du robot sur une Quadro P620 (2 GB GDDR5).
- Config recommandée : 4-8 GB GDDR, testé avec RTX 2080 Super de 2019 (8 GB GDDR6)
- Il faut au moins 16 GB de RAM (CPU) sinon elle sature pendant l'enregistrement du dataset d'évaluation.
Prérequis pour l'entraînement d'un modèle d'IA :
- L'entrainement avec 100 épisodes et 100 000 steps a mis 12H sur une RTX 2080 Super de 2019
- mais
batch_size=8alors qu'il faut un minimum de 16, et dans l'idéal 64. Cela résulte sans doute en des mouvements saccadés et une mauvaise généralisation du modèle (variation de la position de la pile). - Il n'aboutit pas au bout de plus de 24H sur une Quadro P620 (via WSL2 et Docker)
- mais
- Config minimum pour ACT :
batch_size=16- Tesla T4 (gratuit 5H / mois sur Google Colab) on a 15G de RAM qui permet donc un
batch_size=15 - https://github.com/huggingface/lerobot/issues/2213
- Tesla T4 (gratuit 5H / mois sur Google Colab) on a 15G de RAM qui permet donc un
- Config recommandée pour ACT :
batch_size=64- avec A100 (12€ les 100 compute units, 70 = ~5H sur Google Colab) on a 40G de RAM ou 80G de RAM (extra RAM)
- https://github.com/huggingface/lerobot/blob/main/docs/source/notebooks.mdx#training-act
- https://colab.research.google.com/github/antonilo/real_world_robot_learning_sp25/blob/main/_tutorials/lerobot_tutorial/lerobot_tutorial.ipynb#scrollTo=ff7eafe4
- avec un
batch_size=64la RAM consommée était d'environ 50G, l'entraînement a mis 7H environ pour environ 80 compute units, soit environ 10€ - https://huggingface.co/gautz/act_so101_pick_red_18650_drop_black_box_test2_100ep_64batch_60ksteps
- https://wandb.ai/hentz-robotics/lerobot/runs/niiti0v3?nw=nwusergautz
Installation sous Linux
- Installer Miniconda pour Linux : l'environnement de développement Python
wget https://repo.anaconda.com/miniconda/Miniconda3-latest-Linux-x86_64.sh
# Vérifier que la clé SHA256 de Miniconda3-latest-Linux-x86_64.sh ici : https://repo.anaconda.com/miniconda/ correspond à :
sha256sum ~/Miniconda3-latest-Linux-x86_64.sh
bash ~/Miniconda3-latest-Linux-x86_64.sh
source ~/.bashrc- Créer et activer l'environnement Conda
conda create -y -n lerobot python=3.10
conda activate lerobot
git clone https://github.com/huggingface/lerobot.git ~/lerobot
conda install ffmpeg=7.1.1 -c conda-forge
cd ~/lerobot && pip install -e ".[feetech]"- A chaque ouverture de Terminal l'environnement python conda est activé, voir au bas du
~/.bashrc - Pour éviter les conflits, on propose d'avoir un fichier
~/.bashrc_condapour conda et un~/.bashrc_rospour ros
Astuces pour activer/désactiver l'environnement conda sans passer par la modification du ~/.bashrc :
- Ne pas activer conda au démarrage :
conda config --set auto_activate_base false - Ne pas configurer le shell pour initialiser conda au démarrage :
conda init --reverse $SHELL
Installation Windows
- Le compte utilisateur doit avoir les droits pour créer des raccourcis (liens symboliques) dans les sous-dossiers de
C:\Users\$USER\lerobot\outputs\train\ - Ils seront utilisés lors de l'entraînement pour créer un lien entre le dossier
lastet le dossier du dernier Checkpoint par ex.100000- Le plus sûr est de travailler avec un compte administrateur
- Il faut peut-être aussi les droits dans le dossier
C:\Users\$USER\.cache\huggingface\lerobot\$HUGGINGFACE_USER
- Installer Miniconda pour Windows : l'environnement de développement Python
- Ouvrir
Anaconda PowerShell Prompt - Créer et activer l'environnement Conda
conda create -y -n lerobot python=3.10
conda activate lerobot
git clone https://github.com/huggingface/lerobot.git ~/lerobot- Installer Pytorch pour la version de Cuda installée sur votre système (testé avec une version Cuda 127 installée et la version cu128 de Pytorch) et autres dépendances nécessaires
cd ~/lerobot
# pip install av poetry-core
conda install ffmpeg=7.1.1 -c conda-forge
pip3 install --pre torch torchvision torchaudio --index-url https://download.pytorch.org/whl/cu128
pip install -e ".[feetech]"Débuguer l'installation si les scripts basculent sur le cpu
S'assurer que Pytorch a été installé, cela installe Cuda :
pip3 install --pre torch torchvision torchaudio --index-url https://download.pytorch.org/whl/cu128
Récupérer les infos système :
python lerobot/scripts/display_sys_info.pypython -m torch.utils.collect_envpython -c "import torch; print(torch.cuda.is_available())" && nvcc -V- cf. https://github.com/huggingface/lerobot/issues/928 > Here for additional information of my full installation.
Créer un compte HuggingFace et se login via un token
- Se créer un compte sur https://huggingface.co/settings/tokens
- Aller dans le menu > Access Tokens
- Récupérer un
TOKENavec des droits en écriture - Ouvrir un Anaconda PowerShell lerobot
(lerobot) PS C:\Users\gauthier.hentz\github\lerobot> - Login avec le Token
huggingface-cli.exe login --token TOKEN
Vous pouvez maintenant uploader et downloaded des DataSets et Modèles vers le Hub HuggingFace pour collaborer avec des experts du Machine Learning.
Google Colab
Pour avoir accès à un GPU avec suffisamment de mémoire (16G recommandé et 64G dans l'idéal) on peut utiliser Google Colab
- Avec Tesla T4 (gratuit 5H / mois) on a 15G de RAM qui permet donc un
batch_size=15 - Avec A100 (12€ les 70 crédits) on a 80G de RAM qui permet donc un
batch_size=64
- Ouvrir le Notebook : https://colab.research.google.com/github/huggingface/notebooks/blob/main/lerobot/training-act.ipynb#scrollTo=NQUk3Y0WwYZ4
- Voir aussi https://colab.research.google.com/github/antonilo/real_world_robot_learning_sp25/blob/main/_tutorials/lerobot_tutorial/lerobot_tutorial.ipynb#scrollTo=ff7eafe4
- Change runtime type
- Install conda
- Install LeRobot
- Login avec un jeton d'API Weights & Biases
- Login avec un jeton d'API Hugging Face Hub
- Modifier la commande d'entrainement et l'exécuter :
!cd lerobot && python src/lerobot/scripts/lerobot_train.py \
--dataset.repo_id=gautz/so101_pick_red_18650_drop_black_box_test2_100ep \
--policy.type=act \
--output_dir=outputs/train/act_so101_pick_red_18650_drop_black_box_test2_100ep_64batch \
--job_name=act_so101_pick_red_18650_drop_black_box_test2_100ep_64batch \
--policy.device=cuda \
--policy.push_to_hub=True \
--policy.repo_id=gautz/act_so101_pick_red_18650_drop_black_box_test2_100ep_64batch \
--batch_size=64 \
--wandb.enable=true- Surveiller l'éxecution depuis le runtime ou WanDB
- Ouvrir un Terminal et lancer la commande pour uploader le dernier Checkpoint du modèle :
huggingface-cli upload ${HF_USER}/act_so101_pick_red_18650_drop_black_box_test2_100ep_64batch \ /content/lerobot/outputs/train/act_so101_pick_red_18650_drop_black_box_test2_100ep_64batch/checkpoints/last/pretrained_modelAstuces et Erreurs :
- Si vous utilisez Colab avec un compte gratuit, il faut utiliser l'extension Colab Auto Reconnect pour ne pas être déconnecté au boût de 1H. Il est probable que le runtime soit déconnecté par manque de crédit gratuit avant d'arriver à un checkpoint. Faire des CheckPoint plus souvent, ou passer à un compte payant.
- Si vous utilisez un compte payant, vous ne serez pas déconnecté mais il faut surveiller pour déconnecter le Runtime à la fin de l'entraînement (ou d'un Checkpoint)
- https://github.com/huggingface/lerobot/issues/1532
18 cd /content/
20 cd lerobot/
24 python
25 from huggingface_hub import HfApi
26 hub_api = HfApi()
27 hub_api.create_tag("gautz/so101_pick_red_18650_drop_black_box_test2_100ep", tag="v2.1", repo_type="dataset"
30 cd src/
32 cd lerobot
34 python -m lerobot.datasets.v30.convert_dataset_v21_to_v30 --repo-id=gautz/so101_pick_red_18650_drop_black_box_test2_100epVoir le rapport : https://api.wandb.ai/links/hentz-robotics/wdsr4k2r
Utilisation de LeRobot avec le bash Linux
- Activer l'environnement conda lerobot
cd ~/lerobotconda activate lerobot
lerobot-find-port
A chaque connexion du robot : sudo chmod 666 /dev/ttyACM1
lerobot-find-cameras opencv
lerobot-calibrate --robot.type=so101_follower --robot.port=/dev/ttyACM0 --robot.id=follower_arm_fan1
lerobot-calibrate --teleop.type=so101_leader --teleop.port=/dev/ttyACM1 --teleop.id=leader_arm_fan1
lerobot-teleoperate --robot.type=so101_follower --robot.port=/dev/ttyACM0 --robot.id=follower_arm_fan1 --teleop.type=so101_leader --teleop.port=/dev/ttyACM1 --teleop.id=leader_arm_fan1
lerobot-dataset-viz --repo-id gautz/so101_pick_red_18650_drop_black_box_test2_100ep --episode-index 0
lerobot-record --robot.type=so101_follower --robot.port=/dev/ttyACM0 --robot.id=follower_arm_fan1 --robot.cameras="{ top: {type: opencv, index_or_path: 4, width: 800, height: 600, fps: 20},follower: {type: opencv, index_or_path: 2, width: 800, height: 600, fps: 20}}" --display_data=true --dataset.push_to_hub=False --dataset.repo_id=gautz/eval_act_so101_pick_red_18650_drop_black_box_test2_100ep_64batch_60ksteps --dataset.num_episodes=10 --dataset.single_task="Pick red 18650 battery place black box" --policy.path=gautz/act_so101_pick_red_18650_drop_black_box_test2_100ep_64batch_60ksteps
--resume=true
lerobot-train --dataset.repo_id=gautz/so101_pick_red_18650_drop_black_box_test2_100ep --policy.type=act --output_dir=outputs/train/act_so101_pick_red_18650_drop_black_box_test2_100ep_m620 --job_name=act_so101_pick_red_18650_drop_black_box_test2_100ep_m620 --policy.device=cuda --wandb.enable=false --policy.repo_id=gautz/act_so101_pick_red_18650_drop_black_box_test2_100ep_m620 --batch_size=2
nano lerobot/common/robot_devices/robots/configs.py
python lerobot/scripts/control_robot.py --robot.type=so101 --robot.cameras='{}' --control.type=teleoperate
lerobot-record --robot.type=so101_follower --robot.port=/dev/ttyACM0 --robot.id=follower_arm_fan1 --robot.cameras="{ top: {type: opencv, index_or_path: 0, width: 800, height: 600, fps: 20},follower: {type: opencv, index_or_path: 2, width: 800, height: 600, fps: 20}}" --dataset.push_to_hub=False --dataset.repo_id=gautz/eval_act_so101_pick_battery_place_ifixit_test1_50ep_rtx507016_chkpt100kter --dataset.num_episodes=10 --dataset.single_task="Eval Pick battery place ifixit" --policy.path=outputs/train/act_so101_pick_battery_place_ifixit_test1_50ep_rtx507016/checkpoints/100000/pretrained_model --display_data=false
Server inference
pip install 'lerobot[feetech,async]'
python -m lerobot.async_inference.robot_client --server_address=127.0.0.1:8080 --robot.type=so101_follower --robot.port=/dev/ttyACM0 --robot.id=follower_arm_fan1 --robot.cameras="{ top: {type: opencv, index_or_path: 0, width: 800, height: 600, fps: 20},follower: {type: opencv, index_or_path: 2, width: 800, height: 600, fps: 20}}" --task="Eval Pick battery place ifixit" --policy_type=act --pretrained_name_or_path=gautz/act_so101_pick_battery_place_ifixit_test1_50ep_rtx507016_chkpt100000 --policy_device=cuda --actions_per_chunk=50 --chunk_size_threshold=0.5 --aggregate_fn_name=weighted_average --debug_visualize_queue_size=True
Calibration robot et configuration caméras
python -m lerobot.calibrate --teleop.type=so101_leader --teleop.port=/dev/ttyACM0 --teleop.id=leader_arm_fan1
python -m lerobot.calibrate --robot.type=so101_follower --robot.port=/dev/ttyUSB0 --robot.id=follower_arm_fan1
Téléopération
python -m lerobot.teleoperate \
--robot.type=so101_follower \
--robot.port=/dev/ttyUSB0 \
--robot.id=follower_arm_fan1 \
--robot.cameras="{ top: {type: opencv, index_or_path: 2, width: 640, height: 480, fps: 30},follower: {type: opencv, index_or_path: 4, width: 640, height: 480, fps: 30}}" \
--teleop.type=so101_leader \
--teleop.port=/dev/ttyACM0 \
--teleop.id=leader_arm_fan1 \
--display_data=trueRejouer dataset en local :
python -m lerobot.replay \
--robot.type=so101_follower \
--robot.port=/dev/ttyUSB0 \
--robot.id=follower_arm_fan1 \
--dataset.repo_id=gautz/18650-test1-10ep \
--dataset.episode=0 # choose the episode you want to replayMachine Learning
Enregistrer dataset en local :
python -m lerobot.record \
--robot.type=so101_follower \
--robot.port=/dev/ttyUSB0 \
--robot.id=follower_arm_fan1 \
--robot.cameras="{ top: {type: opencv, index_or_path: 2, width: 640, height: 480, fps: 30},follower: {type: opencv, index_or_path: 4, width: 640, height: 480, fps: 30}}" \
--teleop.type=so101_leader \
--teleop.port=/dev/ttyACM0 \
--teleop.id=leader_arm_fan1 \
--display_data=true \
--dataset.repo_id=gautz/18650-test1-10ep \
--dataset.episode_time_s=10 \
--dataset.reset_time_s=10 \
--dataset.num_episodes=10 \
--dataset.single_task="Pick red 18650 battery place black box" \
--dataset.push_to_hub=FalseEntrainer en local avec le CPU
python lerobot/scripts/train.py \
--dataset.repo_id=gautz/18650-test1-10ep \
--policy.type=act \
--output_dir=outputs/train/act_so101_18650-test1-10ep \
--job_name=act_so101_18650-test1-10ep \
--policy.device=cpu # \
--wandb.enable=false # trueEntrainer en local avec le GPU NVidia
python lerobot/scripts/train.py \
--dataset.repo_id=gautz/18650-test1-10ep \
--policy.type=act \
--output_dir=outputs/train/act_so101_18650-test1-10ep \
--job_name=act_so101_18650-test1-10ep \
--policy.device=cuda \
--wandb.enable=falseEnregistrer un dataset d'évaluation d'un modèle à un checkpoint donné :
python -m lerobot.record \
--robot.type=so101_follower \
--robot.port=/dev/ttyUSB0 \
--robot.cameras="{ top: {type: opencv, index_or_path: 2, width: 800, height: 600, fps: 30},follower: {type: opencv, index_or_path: 4, width: 800, height: 600, fps: 30}}" \
--robot.id=follower_arm_fan1 \
--display_data=false \
--dataset.repo_id=gautz/eval_act_18650-test2-100ep \
--dataset.single_task="Pick red 18650 battery place black box" \
--policy.path=outputs/train/act_so101_18650-test2-100ep/checkpoints/last/pretrained_model \
--dataset.push_to_hub=FalseUtilisation de LeRobot avec Anaconda Powershell Prompt
Calibration des robots
python -m lerobot.setup_motors --robot.type=so101_follower --robot.port=COM13python -m lerobot.setup_motors --robot.type=so101_leader --robot.port=COM14
Machine Learning
Collecte de données :
Uploader les données vers le Hub HuggingFace :
https://huggingface.co/docs/lerobot/en/il_robots#dataset-upload
huggingface-cli.exe upload gautz/so101_pick_red_18650_drop_black_box_test2_100ep ..\.cache\huggingface\lerobot\gautz\18650-test2-100ep\ --repo-type dataset
Entrainer un modèle sur un Dataset (sur IHA-QLIOVR-1, compte admin) :
cd ..\gauthier.hentz\lerobot\
conda activate lerobot
cd .\lerobot\
conda create -y -n lerobot python=3.10
conda activate lerobot
conda install ffmpeg -c conda-forge
ffmpeg -encoders
conda install ffmpeg=7.1.1 -c conda-forge
pip install av poetry-core
pip3 install --pre torch torchvision torchaudio --index-url https://download.pytorch.org/whl/cu128
pip install -e .
python lerobot/scripts/train.py --dataset.repo_id=gautz/18650-test2-100ep --policy.type=act --output_dir=outputs/train/act_so101_18650-test2-100ep --job_name=act_so101_18650-test2-100ep --policy.device=cuda --wandb.enable=false
Enregistrer un dataset d'évaluation d'un modèle à un checkpoint donné :
python -m lerobot.record --robot.type=so101_follower --robot.port=/dev/ttyUSB0 --robot.cameras="{ top: {type: opencv, index_or_path: 2, width: 800, height: 600, fps: 30},follower: {type: opencv, index_or_path: 4, width: 800, height: 600, fps: 30}}" --robot.id=follower_arm_fan1 --display_data=false --dataset.repo_id=gautz/eval_act_18650-test2-100ep --dataset.single_task="Pick red 18650 battery place black box" --policy.path=outputs/train/act_so101_18650-test2-100ep/checkpoints/last/pretrained_model --dataset.push_to_hub=False
Uploader un modèle vers HuggingFace
https://github.com/huggingface/lerobot/?tab=readme-ov-file#add-a-pretrained-policy
- Rechercher le dossier du Checkpoint voulu, par ex.
C:\Users\User\github\lerobot\outputs\train\act_so101_18650-test2-100ep\checkpoints\100000 - Définir le User HuggingFace (qui doit être Login via un Token)
gautzet le Repoact_so101_pick_red_18650_drop_black_box_test2_100ep_100000, puis uploader le Checkpoint :huggingface-cli.exe upload gautz/act_so101_pick_red_18650_drop_black_box_test2_100ep_100000 .\outputs\train\act_so101_18650-test2-100ep\checkpoints\100000
Historique du Terminal complet
wget "https://repo.anaconda.com/miniconda/Miniconda3-latest-Windows-x86_64.exe" -outfile ".\Downloads\Miniconda3-latest-Windows-x86_64.exe"
cd .\github\lerobot\
conda create -y -n lerobot python=3.10
conda activate lerobot
conda install ffmpeg -c conda-forge
conda install ffmpeg=7.1.1 -c conda-forge
wsl --shutdown
pip install -e .
pip install -e ".[feetech]" # or "[dynamixel]" for example
python lerobot/find_port.py
python lerobot/find_cameras.py opencv
python -m lerobot.setup_motors --robot.type=so101_follower --robot.port=COM13`
python -m lerobot.record --robot.type=so101_follower --robot.port=COM13 --robot.cameras="{ top: {type: opencv, index_or_path: 2, width: 800, height: 600, fps: 30},follower: {type: opencv, index_or_path: 4, width: 800, height: 600, fps: 30}}" --robot.id=follower_arm_fan1 --display_data=false --dataset.repo_id=gautz/eval_act_18650-test2-100ep --dataset.single_task="Pick red 18650 battery place black box" --policy.path=outputs/train/act_so101_18650-test2-100ep/checkpoints/last/pretrained_model --dataset.push_to_hub=False
python -m lerobot.calibrate --teleop.type=so101_leader --teleop.port=COM14 --teleop.id=leader_arm_fan1`
python -m lerobot.calibrate --robot.type=so101_follower --robot.port=COM13 --robot.id=follower_arm_fan1
python -m lerobot.teleoperate --robot.type=so101_follower --robot.port=COM13 --robot.id=follower_arm_fan1 --robot.cameras="{ top: {type: opencv, index_or_path: 1, width: 640, height: 480, fps: 30},follower: {type: opencv, index_or_path: 2, width: 640, height: 480, fps: 30}}" --teleop.type=so101_leader --teleop.port=COM14 --teleop.id=leader_arm_fan1 --display_data=true
python lerobot/find_cameras.py opencv
python -m lerobot.teleoperate --robot.type=so101_follower --robot.port=COM13 --robot.id=follower_arm_fan1 --robot.cameras="{ top: {type: opencv, index_or_path: 1, width: 800, height: 600, fps: 30},follower: {type: opencv, index_or_path: 2, width: 800, height: 600, fps: 30}}" --teleop.type=so101_leader --teleop.port=COM14 --teleop.id=leader_arm_fan1 --display_data=true
pip install -e .
python lerobot/find_cameras.py opencv
python -m lerobot.teleoperate --robot.type=so101_follower --robot.port=COM13 --robot.id=follower_arm_fan1 --robot.cameras="{ top: {type: opencv, index_or_path: 1, width: 800, height: 600, fps: 30},follower: {type: opencv, index_or_path: 0, width: 800, height: 600, fps: 30}}" --teleop.type=so101_leader --teleop.port=COM14 --teleop.id=leader_arm_fan1 --display_data=true
python -m lerobot.record --robot.type=so101_follower --robot.port=COM13 --robot.cameras="{ top: {type: opencv, index_or_path: 1, width: 800, height: 600, fps: 30},follower: {type: opencv, index_or_path: 0, width: 800, height: 600, fps: 30}}" --robot.id=follower_arm_fan1 --display_data=false --dataset.repo_id=gautz/eval_act_18650-test2-100ep --dataset.single_task="Pick red 18650 battery place black box" --policy.path=outputs/train/act_so101_18650-test2-100ep/checkpoints/last/pretrained_model --dataset.push_to_hub=False
python lerobot/scripts/display_sys_info.py
python -m torch.utils.collect_env
python -c "import torch; print(torch.cuda.is_available())" && nvcc -V
python -c "import torch; print(torch.cuda.is_available())"
pip3 install --pre torch torchvision torchaudio --index-url https://download.pytorch.org/whl/cu128
python -m lerobot.record --robot.type=so101_follower --robot.port=COM13 --robot.cameras="{ top: {type: opencv, index_or_path: 1, width: 800, height: 600, fps: 30},follower: {type: opencv, index_or_path: 0, width: 800, height: 600, fps: 30}}" --robot.id=follower_arm_fan1 --display_data=false --dataset.repo_id=gautz/eval_act_18650-test2-100ep --dataset.single_task="Pick red 18650 battery place black box" --policy.path=outputs/train/act_so101_18650-test2-100ep/checkpoints/last/pretrained_model --dataset.push_to_hub=False --wandb.enable=false
python -m lerobot.record --robot.type=so101_follower --robot.port=COM13 --robot.cameras="{ top: {type: opencv, index_or_path: 1, width: 800, height: 600, fps: 30},follower: {type: opencv, index_or_path: 0, width: 800, height: 600, fps: 30}}" --robot.id=follower_arm_fan1 --display_data=false --dataset.repo_id=gautz/eval_act_18650-test2-100ep --dataset.single_task="Pick red 18650 battery place black box" --policy.path=outputs/train/act_so101_18650-test2-100ep/checkpoints/last/pretrained_model --dataset.push_to_hub=False --dataset.episode_time_s=10 --dataset.reset_time_s=10 --dataset.num_episodes=10
exit
cd .\github\lerobot\
conda activate lerobot
python -m lerobot.record --robot.type=so101_follower --robot.port=COM13 --robot.cameras="{ top: {type: opencv, index_or_path: 1, width: 800, height: 600, fps: 30},follower: {type: opencv, index_or_path: 0, width: 800, height: 600, fps: 30}}" --robot.id=follower_arm_fan1 --display_data=false --dataset.repo_id=gautz/eval_act_18650-test2-100ep --dataset.single_task="Pick red 18650 battery place black box" --policy.path=outputs/train/act_so101_18650-test2-100ep/checkpoints/last/pretrained_model --dataset.push_to_hub=False --dataset.episode_time_s=15 --dataset.reset_time_s=10 --dataset.num_episodes=10
python -m lerobot.teleoperate --robot.type=so101_follower --robot.port=COM13 --robot.id=follower_arm_fan1 --robot.cameras="{ top: {type: opencv, index_or_path: 1, width: 800, height: 600, fps: 30},follower: {type: opencv, index_or_path: 0, width: 800, height: 600, fps: 30}}" --teleop.type=so101_leader --teleop.port=COM14 --teleop.id=leader_arm_fan1 --display_data=true
exit
cd .\github\lerobot\
conda activate lerobot
python -m lerobot.teleoperate --robot.type=so101_follower --robot.port=COM13 --robot.id=follower_arm_fan1 --robot.cameras="{ top: {type: opencv, index_or_path: 1, width: 800, height: 600, fps: 30},follower: {type: opencv, index_or_path: 0, width: 800, height: 600, fps: 30}}" --teleop.type=so101_leader --teleop.port=COM14 --teleop.id=leader_arm_fan1 --display_data=true
python lerobot/find_port.py
python -m lerobot.teleoperate --robot.type=so101_follower --robot.port=COM15 --robot.id=follower_arm_fan1 --robot.cameras="{ top: {type: opencv, index_or_path: 1, width: 800, height: 600, fps: 30},follower: {type: opencv, index_or_path: 0, width: 800, height: 600, fps: 30}}" --teleop.type=so101_leader --teleop.port=COM14 --teleop.id=leader_arm_fan1 --display_data=true
python lerobot/find_cameras.py opencv
python -m lerobot.teleoperate --robot.type=so101_follower --robot.port=COM15 --robot.id=follower_arm_fan1 --robot.cameras="{ top: {type: opencv, index_or_path: 0, width: 800, height: 600, fps: 30},follower: {type: opencv, index_or_path: 2, width: 800, height: 600, fps: 30}}" --teleop.type=so101_leader --teleop.port=COM14 --teleop.id=leader_arm_fan1 --display_data=true
python -m lerobot.record --robot.type=so101_follower --robot.port=COM15 --robot.cameras="{ top: {type: opencv, index_or_path: 1, width: 800, height: 600, fps: 30},follower: {type: opencv, index_or_path: 0, width: 800, height: 600, fps: 30}}" --robot.id=follower_arm_fan1 --display_data=false --dataset.repo_id=gautz/eval_act_18650-test2-100ep --dataset.single_task="Pick red 18650 battery place black box" --policy.path=outputs/train/act_so101_18650-test2-100ep/checkpoints/last/pretrained_model --dataset.push_to_hub=False --dataset.episode_time_s=15 --dataset.reset_time_s=10 --dataset.num_episodes=10
python -m lerobot.record --robot.type=so101_follower --robot.port=COM15 --robot.cameras="{ top: {type: opencv, index_or_path: 0, width: 800, height: 600, fps: 30},follower: {type: opencv, index_or_path: 2, width: 800, height: 600, fps: 30}}" --robot.id=follower_arm_fan1 --display_data=false --dataset.repo_id=gautz/eval_act_18650-test2-100ep --dataset.single_task="Pick red 18650 battery place black box" --policy.path=outputs/train/act_so101_18650-test2-100ep/checkpoints/last/pretrained_model --dataset.push_to_hub=False --dataset.episode_time_s=15 --dataset.reset_time_s=10 --dataset.num_episodes=10
python -m lerobot.teleoperate --robot.type=so101_follower --robot.port=COM15 --robot.id=follower_arm_fan1 --robot.cameras="{ top: {type: opencv, index_or_path: 0, width: 800, height: 600, fps: 30},follower: {type: opencv, index_or_path: 2, width: 800, height: 600, fps: 30}}" --teleop.type=so101_leader --teleop.port=COM14 --teleop.id=leader_arm_fan1 --display_data=true
cd .\github\lerobot\
cd ..
cd .\.cache\
cd .\huggingface\ls
cd .\huggingface\lerobot\calibration\cd ..
cd .\huggingface\lerobot\
cd .\gautz\
cd ..
cd .\github\lerobot\
cd .\outputs\train\
cd .\act_so101_18650-test2-100ep\
cd .\checkpoints\Migration dataset v2.1 to v3
https://github.com/huggingface/lerobot/blob/main/docs/source/lerobot-dataset-v3.mdx#migrate-v21--v30
Sources
https://wiki.seeedstudio.com/lerobot_so100m/
https://huggingface.co/blog/sherryxychen/train-act-on-so-101
https://github.com/sherrychen1120/so101_bench
Démo AICA YOLO Portes Ouvertes 2026
Mise en place
Après avoir récupéré le robot UR5e et l'armoire à roulettes qui contient le PC AICA :
- Brancher l’alimentation du robot UR5e et du PC AICA
- La webcam et le dongle Wifi sont branchés en USB sur le PC
- On a une paire de ciseau ou autre
- Le câble Ethernet relie le PC AICA et le contrôleur de l’UR5e
- On démarre le PC et le robot.
- Adresse IP de l’UR5e : 192.168.0.10
Sur le teach panel du robot :
- Pour connaître l’adresse IP du robot : Cliquer sur les 3 petits points en haut à droite, puis À propos
- Cliquer en bas à gauche sur le bouton rouge
- Cliquer deux fois sur On pour allumer le robot puis quitter
- Basculer en haut à droite sur le mode Remote Control
- Le robot est prêt pour être commandé par AICA
- Pour la sécurité lors du pilotage par AICA : Une personne tient le teach panel et reste prêt à déclencher le bouton d’arrêt
Sur le PC AICA :
- Adresse IP de l’ordinateur : 192.168.0.1
- On se connecte à Ubuntu à l’aide du compte étudiant.
MDP :
Ensuite, on se connecte au Wifi Osiris (ouvert)
On ouvre le navigateur et on se connecte avec les identifiants Unistra ou Portes ouvertes :
Login : Conf-jpoiha
MDP : demander à M. Le Normand. - Ouvrir l’explorateur de fichiers et cliquer sur le raccourci « aica launcher »
Dans le dossier /home/etudiant/aica/aica-launcher.../ on lance l’exécutable AICA Launcher - Sélectionner la configuration GPU et Cliquer sur « launcher AICA Studio »
- On se retrouve sur la page d’identification de AICA Studio
- Cliquer sur Login, à droite de tp1@unistra.fr
- Le MDP du compte tp1@unistra.fr est dans le fichier /home/etudiant/aica/mdp.txt.
- Sélectionner le Programme yolo
- OU créer un nouveau programme en y copiant le code ci-dessous puis cliquer sur Generate Program
- Cliquer sur Start
- Accès à RViz depuis le menu launcher en haut à droite
- Dans RViz, une fois que le programme YOLO est Start,
- cliquer en bas à gauche sur Add, puis by topic, puis tout en bas sur yolo > annotated_image > image
- On visualise ainsi l’image annotée de YOLO
- Dans RViz afficher le collision box marker, cf. https://docs.aica.tech/core/examples/core-components/colliders#box-collider-example
Déroulement de la démo
- On prend une paire de ciseaux
- Quand ils sont au centre ou hors de l’image, le robot s’arrête
- Quand ils sont au Nord, Sud, Est, Ouest de l’image, l’UR5e se déplace dans les 4 directions du plan X,Y
Ce qu'on peut montrer en plus :
- Dans le bloc Bounding Box tracker adapter les gains de commande du robot pour qu’il aille plus ou moins vite
- Dans le bloc Yolo, on peut changer le type d'objet à suivre en remplaçant
scissorspar une des classes traitées par Yolo, par exemple unsandwich, unebottleou uneapplecf. https://gist.github.com/rcland12/dc48e1963268ff98c8b2c4543e7a9be8 - Contraindre le mouvement dans une Collision Box, cf. code ci-dessous
- Piloter le robot via un Point Attractor et contraindre son mouvement dans une Collision Box, cf. code ci-dessous
Ranger la démo
- Passer le teahc panel en mode manuel et remettre le robot dans sa position de repos
- Cliquer en bas à gauche sur le bouton vert puis stopper le contrôleur
- Cliquer en haut à droite sur les trois points puis arrêter le robot
- Quitter AICA Studio en cliquant en haut à droite sur Launcher > Force Stop
- Fermer la fenêtre
- Eteindre le PC
- Débrancher PC et UR5e
- voir la section mise-en-place à l'envers
Si le programme AICA ne veut plus se stopper :
- Cliquer en haut sur hardware puis revenir sur programme
- Si ça ne fonctionne toujours pas, relancer le launcher en cliquant en haut à droite sur le menu Launcher, Force Stop puis redémarrer AICA Studio.
Programme YOLO avec UR5e
vérifier l'adresse IP du robot
schema: 2-0-6
dependencies:
core: v5.1.0
on_start:
load:
- hardware: hardware
- component: camera_streamer
components:
yolo_executor:
component: advanced_perception::object_detection::YoloExecutor
display_name: YOLO Executor
events:
transitions:
on_load:
lifecycle:
component: yolo_executor
transition: configure
on_configure:
lifecycle:
component: yolo_executor
transition: activate
on_activate:
load:
component: bounding_box_tracker
parameters:
model_file:
value: /yolo-example-data/yolo12n.onnx
type: string
classes_file:
value: /yolo-example-data/coco.yaml
type: string
object_class:
value:
- scissors
type: string_array
conf_threshold:
value: 0.4
type: double
num_threads:
value: 2
type: int
inputs:
image: /camera_streamer/image
outputs:
detections: /yolo_executor/detections
camera_streamer:
component: core_vision_components::image_streaming::CameraStreamer
display_name: Camera Streamer
events:
transitions:
on_load:
lifecycle:
component: camera_streamer
transition: configure
on_configure:
lifecycle:
component: camera_streamer
transition: activate
on_activate:
load:
component: yolo_executor
parameters:
camera_frame:
value: tool0
type: string
outputs:
image: /camera_streamer/image
bounding_box_tracker:
component: object_detection_utils::BoundingBoxTracker
display_name: Bounding box tracker
events:
transitions:
on_load:
lifecycle:
component: bounding_box_tracker
transition: configure
on_configure:
lifecycle:
component: bounding_box_tracker
transition: activate
parameters:
rate:
value: 500
type: double
inputs:
detections: /yolo_executor/detections
outputs:
twist: /yolo_to_marker/twist
hardware:
hardware:
display_name: Hardware Interface
urdf: Universal Robots 5e
rate: 500
events:
transitions:
on_load:
load:
- controller: robot_state_broadcaster
hardware: hardware
- controller: joint_trajectory_controller
hardware: hardware
- controller: ur_dashboard_controller
hardware: hardware
- controller: ik_velocity_controller
hardware: hardware
parameters:
headless_mode: "true"
robot_ip: 192.168.0.10
script_filename: /ws/install/ur_client_library/share/ur_client_library/resources/external_control.urscript
controllers:
robot_state_broadcaster:
plugin: aica_core_controllers/RobotStateBroadcaster
events:
transitions:
on_load:
switch_controllers:
hardware: hardware
activate: robot_state_broadcaster
joint_trajectory_controller:
plugin: aica_core_controllers/trajectory/JointTrajectoryController
events:
predicates:
has_trajectory_succeeded:
call_service:
controller: ur_dashboard_controller
hardware: hardware
service: hand_back_control
transitions:
on_activate:
sequence:
start: sequence
ur_dashboard_controller:
plugin: aica_ur_controllers/URDashboardController
events:
predicates:
program_running:
switch_controllers:
hardware: hardware
activate: joint_trajectory_controller
hand_back_control_success:
application: stop
transitions:
on_load:
switch_controllers:
hardware: hardware
activate: ur_dashboard_controller
ik_velocity_controller:
plugin: aica_core_controllers/velocity/IKVelocityController
inputs:
command: /yolo_to_marker/twist
events:
transitions:
on_load:
switch_controllers:
hardware: hardware
activate: ik_velocity_controller
graph:
positions:
on_start:
x: -20
y: -360
stop:
x: -20
y: -260
components:
yolo_executor:
x: 740
y: -180
camera_streamer:
x: 200
y: -300
bounding_box_tracker:
x: 1400
y: 180
hardware:
hardware:
x: 1940
y: -360
edges:
yolo_to_marker_marker_pose_signal_point_attractor_attractor:
path:
- x: 1360
y: 520
- x: 1360
y: 680
yolo_executor_detections_yolo_to_marker_json_input:
path:
- x: 1160
y: 120
- x: 1160
y: 220
- x: 860
y: 220
- x: 860
y: 520
yolo_to_marker_twist_hardware_hardware_ik_velocity_controller_command:
path:
- x: 1820
y: 380
- x: 1820
y: 420
yolo_executor_detections_yolo_to_marker_detections:
path:
- x: 1200
y: 120
- x: 1200
y: 380
on_start_on_start_camera_streamer_camera_streamer:
path:
- x: 140
y: -300
- x: 140
y: -240
yolo_executor_on_activate_bounding_box_tracker_bounding_box_tracker:
path:
- x: 1300
y: 0
- x: 1300
y: 240
hardware_hardware_joint_trajectory_controller_has_trajectory_succeeded_hardware_hardware_ur_dashboard_controller_hand_back_control:
path:
- x: 1920
y: 400
- x: 1920
y: 900
hardware_hardware_ur_dashboard_controller_program_running_hardware_hardware_joint_trajectory_controller:
path:
- x: 1920
y: 820
- x: 1920
y: 240
hardware_hardware_ur_dashboard_controller_hand_back_control_success_on_stop_on_stop:
path:
- x: -40
y: 780
- x: -40
y: -200
camera_streamer_image_yolo_executor_image:
path:
- x: 640
y: -40
- x: 640
y: 120
yolo_executor_detections_bounding_box_tracker_detections:
path:
- x: 1220
y: 120
- x: 1220
y: 400
bounding_box_tracker_twist_hardware_hardware_ik_velocity_controller_command:
path:
- x: 1860
y: 400
- x: 1860
y: 1120
Programme UR5e avec YOLO et Bounding Box
- Dans RViz afficher le collision box marker, cf. https://docs.aica.tech/core/examples/core-components/colliders#box-collider-example
schema: 2-0-6
dependencies:
core: v4.0.0
frames:
start:
reference_frame: world
position:
x: 0.016268
y: 0.460877
z: 0.574409
orientation:
w: 0.000502
x: 0.999979
y: -0.005594
z: -0.003165
on_start:
load:
- component: frame_broadcaster
- hardware: hardware
sequence:
start: sequence
sequences:
sequence:
display_name: Sequence
steps:
- check:
condition:
controller: joint_trajectory_controller
hardware: hardware
predicate: has_trajectory_succeeded
wait_forever: true
- call_service:
controller: ur_dashboard_controller
hardware: hardware
service: zero_ftsensor
- check:
condition:
controller: ur_dashboard_controller
hardware: hardware
predicate: zero_ftsensor_success
wait_forever: true
- switch_controllers:
hardware: hardware
deactivate: joint_trajectory_controller
components:
frame_broadcaster:
component: aica_core_components::ros::StaticFrameBroadcaster
display_name: Frame Broadcaster
parameters:
frame:
value: camera_link
type: string
reference_frame:
value: ur_tool0
type: string
pose_values:
value:
- -0.02
- -0.11752
- 0.032
- 1
- 0
- 0
- 0
type: double_array
broadcast_periodically:
value: true
type: bool
yolo_executor:
component: advanced_perception::object_detection::YoloExecutor
display_name: YOLO Executor
events:
transitions:
on_load:
lifecycle:
component: yolo_executor
transition: configure
on_configure:
lifecycle:
component: yolo_executor
transition: activate
on_activate:
load:
component: bounding_box_tracker
parameters:
rate:
value: 30
type: double
model_file:
value: /data/models/yolo12n.onnx
type: string
classes_file:
value: /data/models/coco.yaml
type: string
object_class:
value:
- scissors
type: string_array
conf_threshold:
value: 0.4
type: double
inputs:
image: /camera_streamer/image
outputs:
detections: /yolo_executor/detections
bounding_box_tracker:
component: object_detection_utils::BoundingBoxTracker
display_name: Bounding box tracker
events:
transitions:
on_load:
lifecycle:
component: bounding_box_tracker
transition: configure
on_configure:
lifecycle:
component: bounding_box_tracker
transition: activate
parameters:
rate:
value: 100
type: double
gains:
value:
- 0.008
- 0.008
type: double_array
decay_rate:
value: 8
type: double
reference_frame:
value: world
type: string
inputs:
detections: /yolo_executor/detections
outputs:
twist: /bounding_box_tracker/twist
box_collider:
component: aica_core_components::utility::BoxCollider
display_name: Box Collider
events:
predicates:
is_out_of_bounds:
set:
parameter: gains
value:
- 0
- 0
type: double_array
component: bounding_box_tracker
is_in_bounds:
set:
parameter: gains
value:
- 0.008
- 0.008
type: double_array
component: bounding_box_tracker
transitions:
on_load:
lifecycle:
component: box_collider
transition: configure
on_configure:
lifecycle:
component: box_collider
transition: activate
parameters:
x_size:
value: 0.8
type: double
y_size:
value: 0.3
type: double
z_size:
value: 0.5
type: double
inputs:
target: /hardware/robot_state_broadcaster/cartesian_state
center: /frame_to_signal/pose
frame_to_signal:
component: aica_core_components::ros::TfToSignal
display_name: Frame to Signal
events:
transitions:
on_load:
lifecycle:
component: frame_to_signal
transition: configure
on_configure:
lifecycle:
component: frame_to_signal
transition: activate
on_activate:
load:
component: box_collider
parameters:
frame:
value: start
type: string
outputs:
pose: /frame_to_signal/pose
camera_streamer:
component: core_vision_components::image_streaming::CameraStreamer
display_name: Camera Streamer
events:
transitions:
on_load:
load:
- component: yolo_executor
- component: frame_to_signal
lifecycle:
component: camera_streamer
transition: configure
on_configure:
lifecycle:
component: camera_streamer
transition: activate
outputs:
image: /camera_streamer/image
hardware:
hardware:
display_name: Hardware Interface
urdf: Universal Robots 5e
rate: 500
events:
transitions:
on_load:
load:
- controller: robot_state_broadcaster
hardware: hardware
- controller: joint_trajectory_controller
hardware: hardware
- controller: ur_impedance_controller
hardware: hardware
- controller: ur_dashboard_controller
hardware: hardware
parameters:
robot_ip: 192.168.56.101
controllers:
ur_dashboard_controller:
plugin: aica_ur_controllers/URDashboardController
events:
transitions:
on_load:
switch_controllers:
hardware: hardware
activate: ur_dashboard_controller
joint_trajectory_controller:
plugin: aica_core_controllers/trajectory/JointTrajectoryController
events:
transitions:
on_load:
switch_controllers:
hardware: hardware
activate: joint_trajectory_controller
on_deactivate:
load:
component: camera_streamer
switch_controllers:
hardware: hardware
activate: ur_impedance_controller
on_activate:
call_service:
controller: joint_trajectory_controller
hardware: hardware
service: set_trajectory
payload: |-
frames:
- start
durations:
- 2.0
robot_state_broadcaster:
plugin: aica_core_controllers/RobotStateBroadcaster
outputs:
cartesian_state: /hardware/robot_state_broadcaster/cartesian_state
ft_sensor: /hardware/robot_state_broadcaster/ft_sensor
events:
transitions:
on_load:
switch_controllers:
hardware: hardware
activate: robot_state_broadcaster
ur_impedance_controller:
plugin: aica_ur_controllers/URImpedanceController
parameters:
selection_vector:
value:
- 1
- 1
- 1
- 0
- 0
- 1
type: int_array
force_limit:
value:
- 40
- 40
- 40
- 30
- 30
- 30
type: vector
stiffness:
value:
- 500
- 500
- 500
- 400
- 400
- 400
type: vector
damping:
value:
- 50
- 50
- 50
- 10
- 10
- 10
type: vector
inputs:
command: /bounding_box_tracker/twist
graph:
positions:
on_start:
x: -740
y: -360
stop:
x: -740
y: -260
components:
frame_broadcaster:
x: -420
y: -580
yolo_executor:
x: 760
y: 480
bounding_box_tracker:
x: 1300
y: 600
box_collider:
x: 840
y: 1020
frame_to_signal:
x: 280
y: 1140
camera_streamer:
x: 180
y: 520
hardware:
hardware:
x: 1880
y: -360
sequences:
sequence:
x: -420
y: -280
edges:
yolo_to_marker_marker_pose_signal_point_attractor_attractor:
path:
- x: 1360
y: 520
- x: 1360
y: 680
yolo_executor_detections_yolo_to_marker_json_input:
path:
- x: 1160
y: 120
- x: 1160
y: 220
- x: 860
y: 220
- x: 860
y: 520
yolo_to_marker_twist_hardware_hardware_ik_velocity_controller_command:
path:
- x: 1740
y: 680
- x: 1740
y: 920
yolo_to_marker_twist_hardware_hardware_velocity_impedance_controller_command:
path:
- x: 1740
y: 680
- x: 1740
y: 920
hardware_hardware_robot_state_broadcaster_ft_sensor_hardware_hardware_velocity_impedance_controller_ft_sensor:
path:
- x: 1840
y: 700
- x: 1840
y: 960
hardware_hardware_ur_dashboard_controller_zero_ftsensor_success_sequence_sequence_condition_input_2:
path:
- x: -60
y: 80
yolo_to_marker_on_activate_hardware_hardware_ur_impedance_controller:
path:
- x: 1840
y: 700
- x: 1840
y: 1060
yolo_to_marker_twist_hardware_hardware_ur_impedance_controller_command:
path:
- x: 1740
y: 780
- x: 1740
y: 1220
orbbec_camera_on_load_yolo_executor_yolo_executor:
path:
- x: 680
y: 620
- x: 680
y: 540
orbbec_camera_on_load_frame_to_signal_frame_to_signal:
path:
- x: 680
y: 620
- x: 680
y: 1020
- x: 240
y: 1020
- x: 240
y: 1200
orbbec_camera_color_image_yolo_executor_image:
path:
- x: 640
y: 700
- x: 640
y: 780
on_start_on_start_frame_broadcaster_frame_broadcaster:
path:
- x: -540
y: -300
- x: -540
y: -520
on_start_on_start_sequence_sequence:
path:
- x: -540
y: -300
- x: -540
y: -220
hardware_joint_trajectory_controller_has_trajectory_succeeded_condition_sequence_sequence_condition_input_0:
path:
- x: -380
y: 440
sequence_sequence_event_trigger_1_hardware_hardware_ur_dashboard_controller_zero_ftsensor:
path:
- x: -220
y: 140
hardware_ur_dashboard_controller_zero_ftsensor_success_condition_sequence_sequence_condition_input_2:
path:
- x: -60
y: 60
sequence_sequence_event_trigger_3_hardware_hardware_joint_trajectory_controller:
path:
- x: 100
y: 200
box_collider_is_out_of_bounds_bounding_box_tracker_bounding_box_tracker:
path:
- x: 1400
y: 1280
- x: 1400
y: 1000
- x: 1280
y: 1000
- x: 1280
y: 660
box_collider_is_in_bounds_bounding_box_tracker_bounding_box_tracker:
path:
- x: 1360
y: 1240
- x: 1360
y: 1040
- x: 1260
y: 1040
- x: 1260
y: 660
frame_to_signal_on_activate_box_collider_box_collider:
path:
- x: 800
y: 1320
- x: 800
y: 1080
camera_streamer_on_load_yolo_executor_yolo_executor:
path:
- x: 620
y: 700
- x: 620
y: 540
camera_streamer_on_load_frame_to_signal_frame_to_signal:
path:
- x: 620
y: 700
- x: 620
y: 1060
- x: 260
y: 1060
- x: 260
y: 1200
hardware_hardware_joint_trajectory_controller_on_deactivate_camera_streamer_camera_streamer:
path:
- x: 100
y: 360
- x: 100
y: 580
hardware_hardware_joint_trajectory_controller_on_deactivate_hardware_hardware_ur_impedance_controller:
path:
- x: 1820
y: 360
- x: 1820
y: 1040
hardware_hardware_joint_trajectory_controller_on_activate_hardware_hardware_joint_trajectory_controller_set_trajectory:
path:
- x: 1800
y: 320
- x: 1800
y: 520
yolo_executor_detections_bounding_box_tracker_detections:
path:
- x: 1240
y: 780
- x: 1240
y: 820
bounding_box_tracker_twist_hardware_hardware_ur_impedance_controller_command:
path:
- x: 1760
y: 820
- x: 1760
y: 1200
hardware_hardware_robot_state_broadcaster_cartesian_state_box_collider_target:
path:
- x: 740
y: 940
- x: 740
y: 1360Programme UR5e avec Point Attractor et Bounding Box
- Dans RViz afficher le collision box marker, cf. https://docs.aica.tech/core/examples/core-components/colliders#box-collider-example
schema: 2-0-6
dependencies:
core: v4.0.0
frames:
start:
reference_frame: world
position:
x: 0.016268
y: 0.460877
z: 0.574409
orientation:
w: 0.000502
x: 0.999979
y: -0.005594
z: -0.003165
on_start:
load:
- component: frame_broadcaster
- hardware: hardware
sequence:
start: sequence
sequences:
sequence:
display_name: Sequence
steps:
- check:
condition:
controller: joint_trajectory_controller
hardware: hardware
predicate: has_trajectory_succeeded
wait_forever: true
- call_service:
controller: ur_dashboard_controller
hardware: hardware
service: zero_ftsensor
- check:
condition:
controller: ur_dashboard_controller
hardware: hardware
predicate: zero_ftsensor_success
wait_forever: true
- switch_controllers:
hardware: hardware
deactivate: joint_trajectory_controller
components:
frame_broadcaster:
component: aica_core_components::ros::StaticFrameBroadcaster
display_name: Frame Broadcaster
parameters:
frame:
value: camera_link
type: string
reference_frame:
value: ur_tool0
type: string
pose_values:
value:
- -0.02
- -0.11752
- 0.032
- 1
- 0
- 0
- 0
type: double_array
broadcast_periodically:
value: true
type: bool
yolo_executor:
component: advanced_perception::object_detection::YoloExecutor
display_name: YOLO Executor
events:
transitions:
on_load:
lifecycle:
component: yolo_executor
transition: configure
on_configure:
lifecycle:
component: yolo_executor
transition: activate
on_activate:
load:
component: bounding_box_tracker
parameters:
rate:
value: 30
type: double
model_file:
value: /data/models/yolo12n.onnx
type: string
classes_file:
value: /data/models/coco.yaml
type: string
object_class:
value:
- scissors
type: string_array
conf_threshold:
value: 0.4
type: double
inputs:
image: /camera_streamer/image
outputs:
detections: /yolo_executor/detections
bounding_box_tracker:
component: object_detection_utils::BoundingBoxTracker
display_name: Bounding box tracker
events:
transitions:
on_load:
lifecycle:
component: bounding_box_tracker
transition: configure
on_configure:
lifecycle:
component: bounding_box_tracker
transition: activate
parameters:
rate:
value: 100
type: double
gains:
value:
- 0.008
- 0.008
type: double_array
decay_rate:
value: 8
type: double
reference_frame:
value: world
type: string
inputs:
detections: /yolo_executor/detections
outputs:
twist: /bounding_box_tracker/twist
box_collider:
component: aica_core_components::utility::BoxCollider
display_name: Box Collider
events:
predicates:
is_out_of_bounds:
set:
parameter: gains
value:
- 0
- 0
type: double_array
component: bounding_box_tracker
is_in_bounds:
set:
parameter: gains
value:
- 0.008
- 0.008
type: double_array
component: bounding_box_tracker
transitions:
on_load:
lifecycle:
component: box_collider
transition: configure
on_configure:
lifecycle:
component: box_collider
transition: activate
parameters:
x_size:
value: 0.8
type: double
y_size:
value: 0.3
type: double
z_size:
value: 0.5
type: double
inputs:
target: /hardware/robot_state_broadcaster/cartesian_state
center: /frame_to_signal/pose
frame_to_signal:
component: aica_core_components::ros::TfToSignal
display_name: Frame to Signal
events:
transitions:
on_load:
lifecycle:
component: frame_to_signal
transition: configure
on_configure:
lifecycle:
component: frame_to_signal
transition: activate
on_activate:
load:
component: box_collider
parameters:
frame:
value: start
type: string
outputs:
pose: /frame_to_signal/pose
camera_streamer:
component: core_vision_components::image_streaming::CameraStreamer
display_name: Camera Streamer
events:
transitions:
on_load:
load:
- component: yolo_executor
- component: frame_to_signal
lifecycle:
component: camera_streamer
transition: configure
on_configure:
lifecycle:
component: camera_streamer
transition: activate
outputs:
image: /camera_streamer/image
hardware:
hardware:
display_name: Hardware Interface
urdf: Universal Robots 5e
rate: 500
events:
transitions:
on_load:
load:
- controller: robot_state_broadcaster
hardware: hardware
- controller: joint_trajectory_controller
hardware: hardware
- controller: ur_impedance_controller
hardware: hardware
- controller: ur_dashboard_controller
hardware: hardware
parameters:
robot_ip: 192.168.56.101
controllers:
ur_dashboard_controller:
plugin: aica_ur_controllers/URDashboardController
events:
transitions:
on_load:
switch_controllers:
hardware: hardware
activate: ur_dashboard_controller
joint_trajectory_controller:
plugin: aica_core_controllers/trajectory/JointTrajectoryController
events:
transitions:
on_load:
switch_controllers:
hardware: hardware
activate: joint_trajectory_controller
on_deactivate:
load:
component: camera_streamer
switch_controllers:
hardware: hardware
activate: ur_impedance_controller
on_activate:
call_service:
controller: joint_trajectory_controller
hardware: hardware
service: set_trajectory
payload: |-
frames:
- start
durations:
- 2.0
robot_state_broadcaster:
plugin: aica_core_controllers/RobotStateBroadcaster
outputs:
cartesian_state: /hardware/robot_state_broadcaster/cartesian_state
ft_sensor: /hardware/robot_state_broadcaster/ft_sensor
events:
transitions:
on_load:
switch_controllers:
hardware: hardware
activate: robot_state_broadcaster
ur_impedance_controller:
plugin: aica_ur_controllers/URImpedanceController
parameters:
selection_vector:
value:
- 1
- 1
- 1
- 0
- 0
- 1
type: int_array
force_limit:
value:
- 40
- 40
- 40
- 30
- 30
- 30
type: vector
stiffness:
value:
- 500
- 500
- 500
- 400
- 400
- 400
type: vector
damping:
value:
- 50
- 50
- 50
- 10
- 10
- 10
type: vector
inputs:
command: /bounding_box_tracker/twist
graph:
positions:
on_start:
x: -740
y: -360
stop:
x: -740
y: -260
components:
frame_broadcaster:
x: -420
y: -580
yolo_executor:
x: 760
y: 480
bounding_box_tracker:
x: 1300
y: 600
box_collider:
x: 840
y: 1020
frame_to_signal:
x: 280
y: 1140
camera_streamer:
x: 180
y: 520
hardware:
hardware:
x: 1880
y: -360
sequences:
sequence:
x: -420
y: -280
edges:
yolo_to_marker_marker_pose_signal_point_attractor_attractor:
path:
- x: 1360
y: 520
- x: 1360
y: 680
yolo_executor_detections_yolo_to_marker_json_input:
path:
- x: 1160
y: 120
- x: 1160
y: 220
- x: 860
y: 220
- x: 860
y: 520
yolo_to_marker_twist_hardware_hardware_ik_velocity_controller_command:
path:
- x: 1740
y: 680
- x: 1740
y: 920
yolo_to_marker_twist_hardware_hardware_velocity_impedance_controller_command:
path:
- x: 1740
y: 680
- x: 1740
y: 920
hardware_hardware_robot_state_broadcaster_ft_sensor_hardware_hardware_velocity_impedance_controller_ft_sensor:
path:
- x: 1840
y: 700
- x: 1840
y: 960
hardware_hardware_ur_dashboard_controller_zero_ftsensor_success_sequence_sequence_condition_input_2:
path:
- x: -60
y: 80
yolo_to_marker_on_activate_hardware_hardware_ur_impedance_controller:
path:
- x: 1840
y: 700
- x: 1840
y: 1060
yolo_to_marker_twist_hardware_hardware_ur_impedance_controller_command:
path:
- x: 1740
y: 780
- x: 1740
y: 1220
orbbec_camera_on_load_yolo_executor_yolo_executor:
path:
- x: 680
y: 620
- x: 680
y: 540
orbbec_camera_on_load_frame_to_signal_frame_to_signal:
path:
- x: 680
y: 620
- x: 680
y: 1020
- x: 240
y: 1020
- x: 240
y: 1200
orbbec_camera_color_image_yolo_executor_image:
path:
- x: 640
y: 700
- x: 640
y: 780
on_start_on_start_frame_broadcaster_frame_broadcaster:
path:
- x: -540
y: -300
- x: -540
y: -520
on_start_on_start_sequence_sequence:
path:
- x: -540
y: -300
- x: -540
y: -220
hardware_joint_trajectory_controller_has_trajectory_succeeded_condition_sequence_sequence_condition_input_0:
path:
- x: -380
y: 440
sequence_sequence_event_trigger_1_hardware_hardware_ur_dashboard_controller_zero_ftsensor:
path:
- x: -220
y: 140
hardware_ur_dashboard_controller_zero_ftsensor_success_condition_sequence_sequence_condition_input_2:
path:
- x: -60
y: 60
sequence_sequence_event_trigger_3_hardware_hardware_joint_trajectory_controller:
path:
- x: 100
y: 200
box_collider_is_out_of_bounds_bounding_box_tracker_bounding_box_tracker:
path:
- x: 1400
y: 1280
- x: 1400
y: 1000
- x: 1280
y: 1000
- x: 1280
y: 660
box_collider_is_in_bounds_bounding_box_tracker_bounding_box_tracker:
path:
- x: 1360
y: 1240
- x: 1360
y: 1040
- x: 1260
y: 1040
- x: 1260
y: 660
frame_to_signal_on_activate_box_collider_box_collider:
path:
- x: 800
y: 1320
- x: 800
y: 1080
camera_streamer_on_load_yolo_executor_yolo_executor:
path:
- x: 620
y: 700
- x: 620
y: 540
camera_streamer_on_load_frame_to_signal_frame_to_signal:
path:
- x: 620
y: 700
- x: 620
y: 1060
- x: 260
y: 1060
- x: 260
y: 1200
hardware_hardware_joint_trajectory_controller_on_deactivate_camera_streamer_camera_streamer:
path:
- x: 100
y: 360
- x: 100
y: 580
hardware_hardware_joint_trajectory_controller_on_deactivate_hardware_hardware_ur_impedance_controller:
path:
- x: 1820
y: 360
- x: 1820
y: 1040
hardware_hardware_joint_trajectory_controller_on_activate_hardware_hardware_joint_trajectory_controller_set_trajectory:
path:
- x: 1800
y: 320
- x: 1800
y: 520
yolo_executor_detections_bounding_box_tracker_detections:
path:
- x: 1240
y: 780
- x: 1240
y: 820
bounding_box_tracker_twist_hardware_hardware_ur_impedance_controller_command:
path:
- x: 1760
y: 820
- x: 1760
y: 1200
hardware_hardware_robot_state_broadcaster_cartesian_state_box_collider_target:
path:
- x: 740
y: 940
- x: 740
y: 1360Machine Learning LeRobot avec SO-ARM101 - Legacy
Essai de déploiement sur Windows via WSL2, Docker, et Dev Container
Pour l'instant pas de test satisfaisant pour l'exécution d'un modèle sur le vrai robot. Passer au WSL2 les ports USB où sont connectés les robots et caméras fait crasher le conteneur. Probablement que la communication série n'est pas supporté.
- Cloner https://github.com/huggingface/lerobot dans un conteneur WSL2, par exemple Ubuntu
- Depuis le conteneur Ubuntu, ouvrir un Terminal, se placer dans le répertoire cloné
cd ~/lerobot_devcontainer, et lancer Visual Studio Code en tapantcode . - Ajouter un répertoire
~/lerobot_devcontainer/.devcontaineret un fichier dedans~/lerobot_devcontainer/.devcontainer/devcontainer.jsoncontenant :
{ "build": { // Path is relative to the devcontainer.json file. "dockerfile": "../docker/lerobot-gpu-dev/Dockerfile" }} - Lancer la commande VSCode : Reopen in container
Tentatives pour faire passer le port série à WSL2 :
wsl --shutdown
winget install --interactive --exact dorssel.usbipd-win
usbipd list
wmic diskdrive list brief
wsl --mount \\.\PHYSICALDRIVE1
wsl.exe --version
wsl --mount \\.\PHYSICALDRIVE1 --bare
wsl --mount \\.\PHYSICALDRIVE1 --partition 2 --type ext4
wsl --shutdown
ipconfig
net localgroup docker-users "gauthier.hentz" /ADD
wsl --set-default ubuntu
wsl --shutdown
usbipd list
usbipd bind --busid 1-1
usbipd list
usbipd attach --wsl --busid 1-1
usbipd attach --wsl --busid 2-1
Visualiser et rejouer des DataSets (avant hardware refactor)
- Visualiser un DataSet
python lerobot/scripts/visualize_dataset.py --repo-id lerobot/pusht --root ./my_local_data_dir --local-files-only 1 --episode-index 0
python lerobot/scripts/visualize_dataset_html.py \
--repo-id cadene/act_so100_5_lego_test_080000 \
--local-files-only 1- Rejouer un DataSet (ou une évaluation de modèle) sur le robot
python lerobot/scripts/control_robot.py \
--robot.type=so101 \
--control.type=replay \
--control.fps=30 \
--control.repo_id=cadene/act_so100_5_lego_test_080000 \
--control.episode=0- Rejouer la Policy
cadene/act_so100_5_lego_test_080000du modèle ACT pour le SO-ARM101- En sauvegardant l'évaluation dans
outputs/eval/act_so100_5_lego_test_080000_haguenau
- En sauvegardant l'évaluation dans
python lerobot/scripts/control_robot.py \
--robot.type=so101 \
--control.type=record \
--control.fps=30 \
--control.single_task="Grasp a lego block and put it in the bin." \
--control.repo_id=outputs/eval/act_so100_5_lego_test_080000_haguenau \
--control.tags='["tutorial"]' \
--control.warmup_time_s=5 \
--control.episode_time_s=30 \
--control.reset_time_s=30 \
--control.num_episodes=10 \
--control.push_to_hub=false \
--control.policy.path=cadene/act_so100_5_lego_test_080000