
Découverte d'Ubuntu Linux et son Terminal Bash
Navigating the Ubuntu GUI
In this exercise, we will familiarize ourselves with the graphical user interface (GUI) of the Ubuntu operating system.
Task 1: Familiarize Yourself with the Ubuntu Desktop
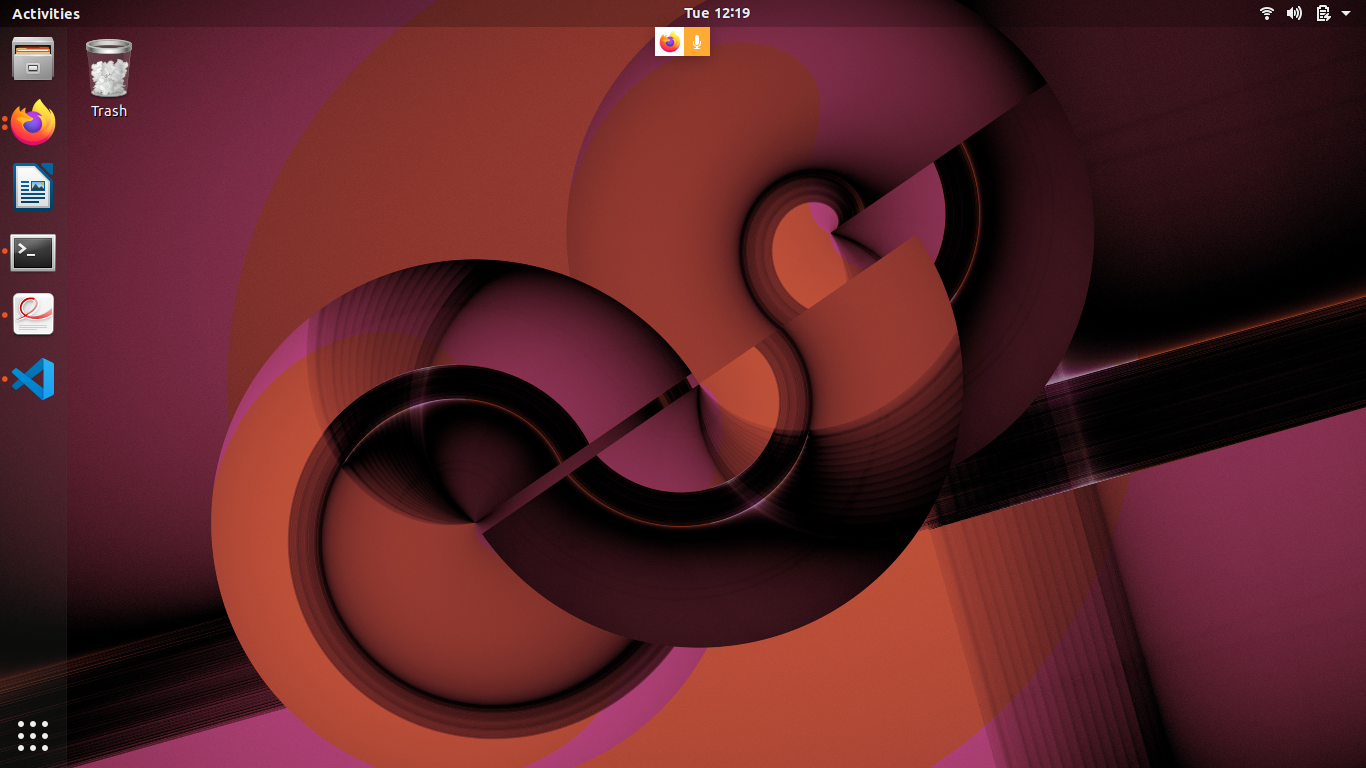
At the log-in screen, click in the password input box, enter rosindustrial for the password, and hit enter. The screen should look like the image below when you log in:
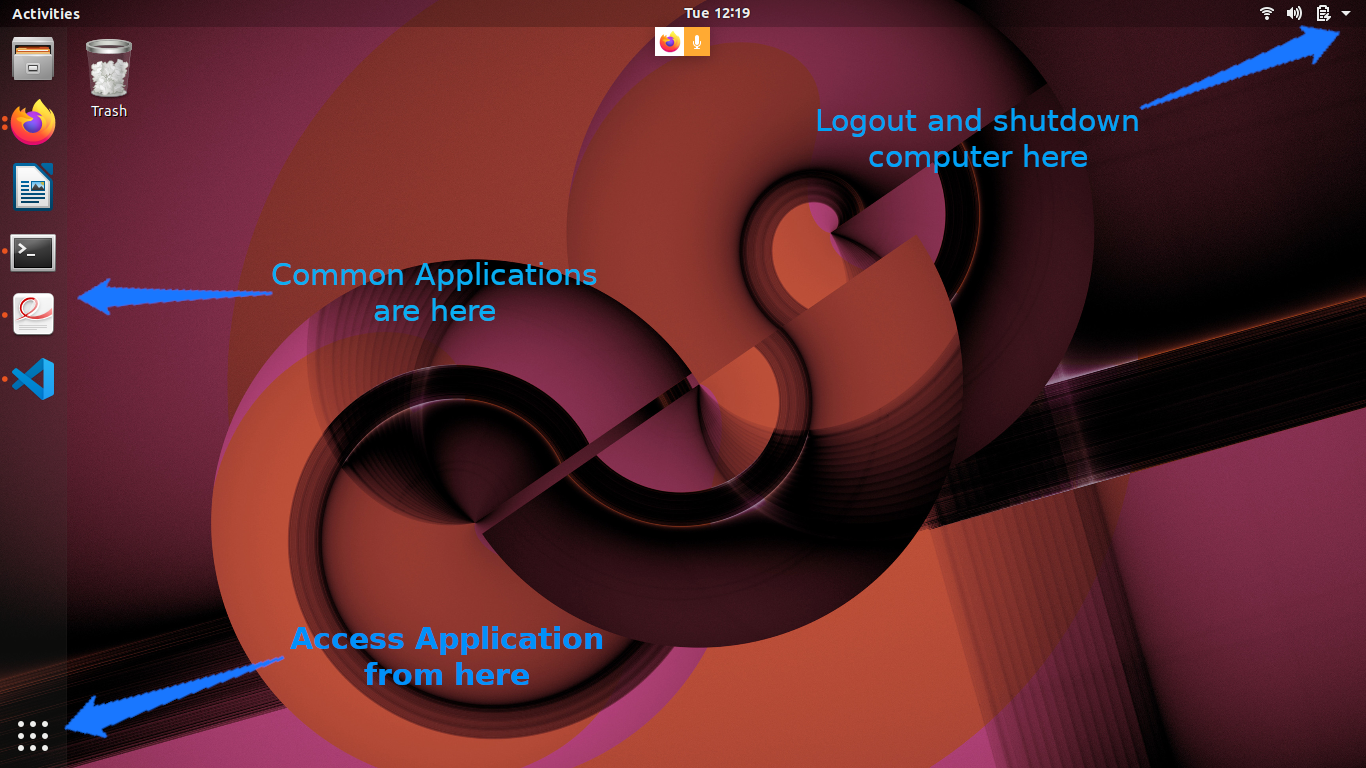
There are several things you will notice on the desktop:
-
The gear icon on the top right of the screen brings up a menu which allows the user to log out, shut down the computer, access system settings, etc…
-
The bar on the left side shows running and “favorite” applications, connected thumb drives, etc.
-
The top icon is used to access all applications and files. We will look at this in more detail later.
-
The next icons are either applications which are currently running or have been “pinned” (again, more on pinning later)
-
Any removable drives, like thumb drives, are found after the application icons.
-
If the launcher bar gets “too full”, clicking and dragging up/down allows you to see the applications that are hidden.
-
To reorganize the icons on the launcher, click and hold the icon until it “pops out”, then move it to the desired location.
Task 2: Open and Inspect an Application
Click on the filing-cabinet icon in the launcher. A window should show up, and your desktop should look like something below:
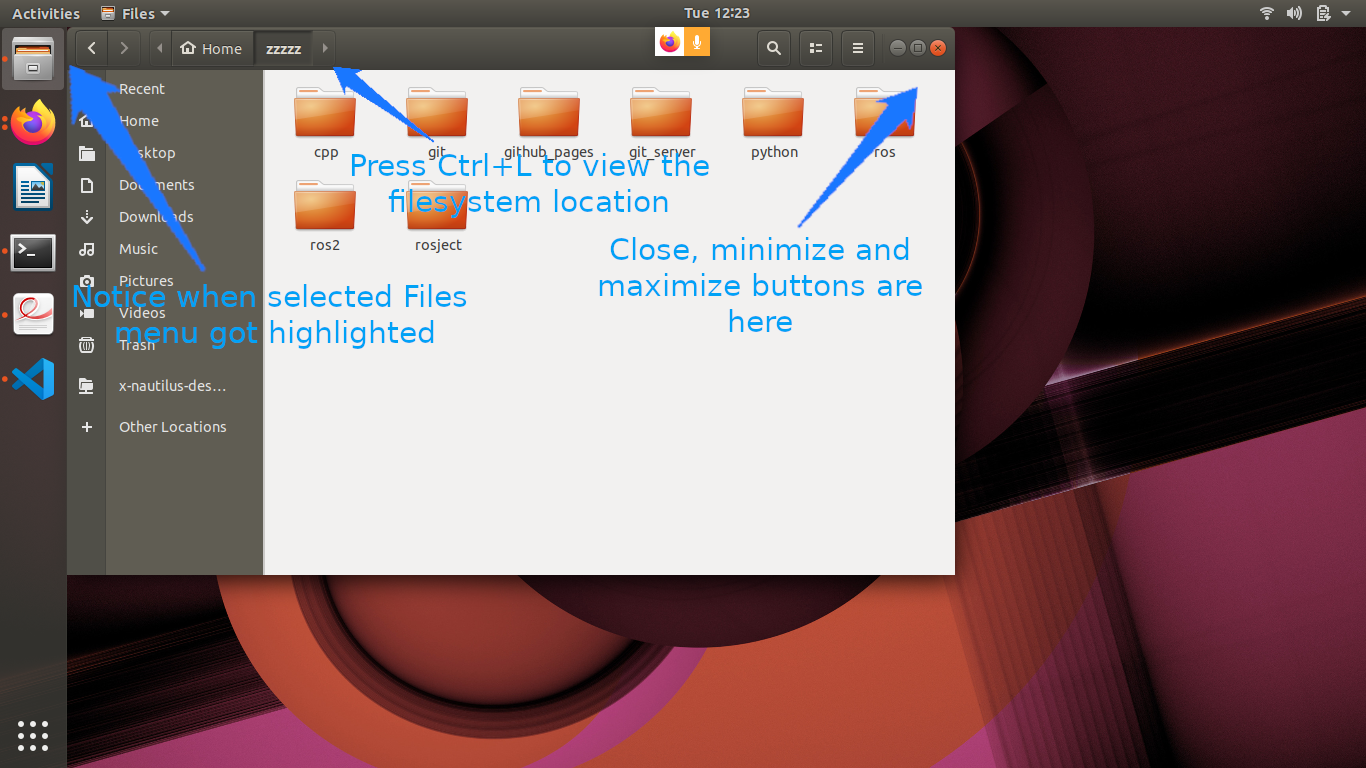
Things to notice:
-
The close, minimize, and maximize buttons typically found on the right-hand side of the window title bar are found on the left-hand side.
-
The menu for windows are found on the menu bar at the top of the screen, much in the same way Macs do. The menus, however, only show up when you hover the mouse over the menu bar.
-
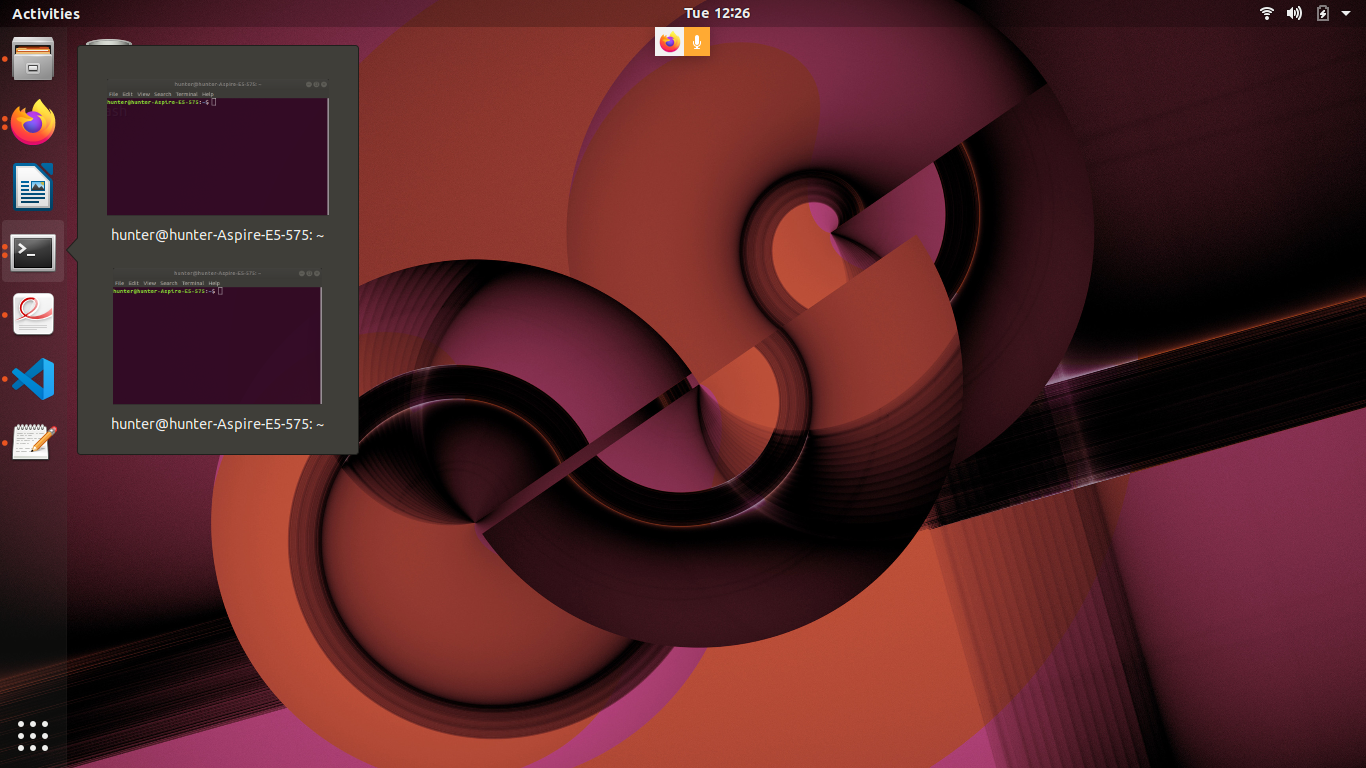
Notice that there are menu highlights of the folder icon. The dots on the left show how many windows of this application are open. Clicking on these icons when the applications are open does one of two things:
-
If there is only one window open, this window gets focus.
-
If more than one are open, clicking a second time causes all of the windows to show up in the foreground, so that you can choose which window to go to (see below):
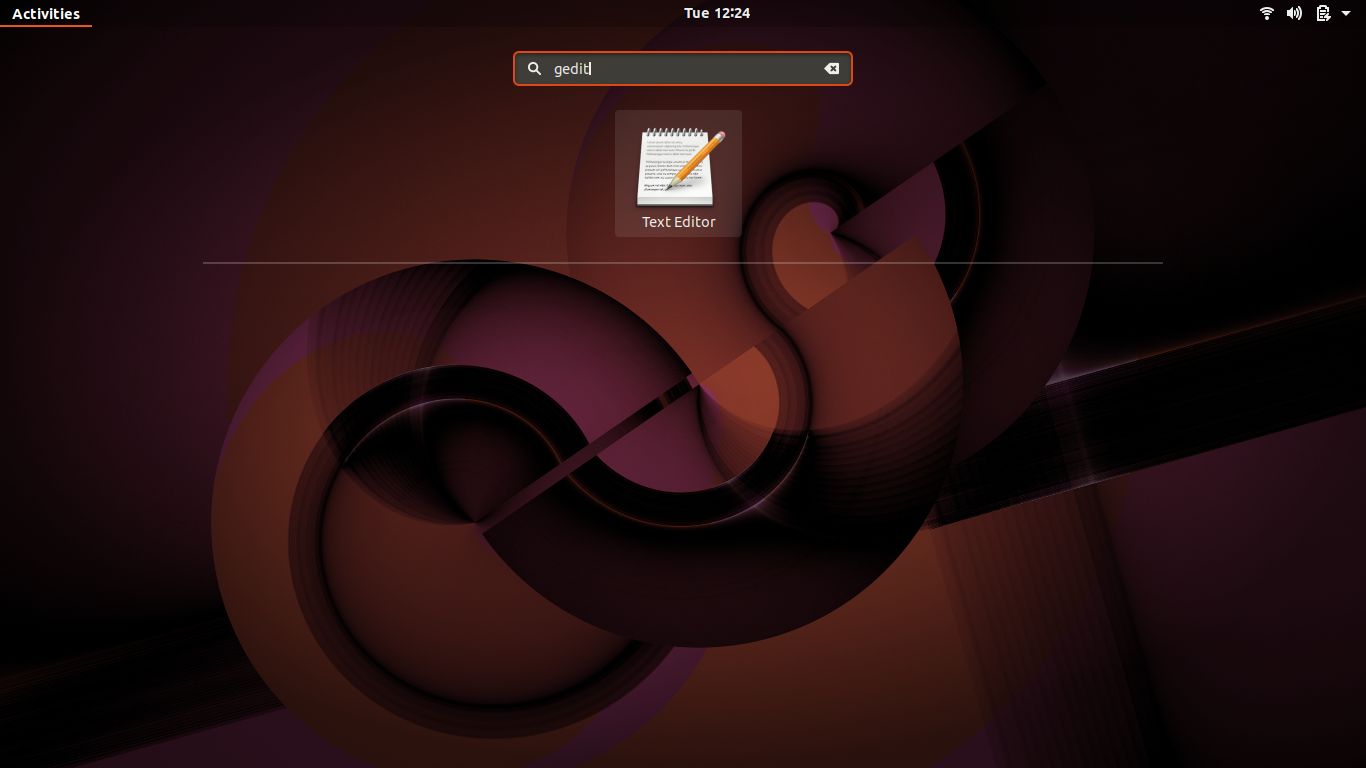
Task 3: Start an Application & Pin it to the Launcher Bar
Click on the launcher button (top left) and type gedit in the search box. The “Text Editor” application (this is actually gedit) should show up (see below):
Click on the application. The text editor window should show up on the screen, and the text editor icon should show up on the launcher bar on the left-hand side (see below):

-
Right-click on the text editor launch icon, and select “Lock to Launcher”.
-
Close the gedit window. The launcher icon should remain after the window closes.
-
Click on the gedit launcher icon. You should see a new gedit window appear.
Le Terminal Linux
In this exercise, we will familiarize ourselves with the Linux terminal.
Starting the Terminal
-
Pour ouvrir le Terminal, recherchez le programme "terminator" ou cliquez sur l'icône:

-
Create a second terminal window, either by:
-
Right-clicking on the terminal and selecting the “Open Terminal” or
-
Selecting “Open Terminal” from the “File” menu
-
-
Create a second terminal within the same window by pressing “Ctrl+Shift+T” while the terminal window is selected.
-
Close the 2nd terminal tab, either by:
-
clicking the small ‘x’ in the terminal tab (not the main terminal window)
-
typing
exitand hitting enter.
-
-
The window will have a single line, which looks like this:
ros-industrial@ros-i-humble-vm:~$ -
This is called the prompt, where you enter commands. The prompt, by default, provides three pieces of information:
-
ros-industrial is the login name of the user you are running as.
-
ros-i-humble-vm is the host name of the computer.
-
~ is the directory in which the terminal is currently in. (More on this later).
-
-
Close the terminal window by typing
exitor clicking on the red ‘x’ in the window’s titlebar.

Navigating Directories and Listing Files
Prepare your environment
-
Open your home folder in the file browser.
-
Double-click on the
ex0.3folder we created in the previous step.-
We’ll use this to illustrate various file operations in the terminal.
-
-
Right click in the main file-browser window and select “Open in Terminal” to create a terminal window at that location.
-
In the terminal window, type the following command to create some sample files that we can study later:
-
cp -a ~/industrial_training/exercises/0.3/. .
-
ls Command
-
Enter
lsinto the terminal.-
You should see
test.txt, andnewlisted. (If you don’t see ‘new’, go back and complete the previous exercise). -
Directories, like
new, are colored in blue. -
The file
sample_jobis in green; this indicates it has its “execute” bit set, which means it can be executed as a command.
-
-
Type
ls *.txt. Only the filetest.txtwill be displayed. -
Enter
ls -linto the terminal.-
Adding the
-loption shows one entry per line, with additional information about each entry in the directory. -
The first 10 characters indicate the file type and permissions
-
The first character is
dif the entry is a directory. -
The next 9 characters are the permissions bits for the file
-
The third and fourth fields are the owning user and group, respectively.
-
The second-to-last field is the time the file was last modified.
-
If the file is a symbolic link, the link’s target file is listed after the link’s file name.
-
-
Enter
ls -ain the terminal.-
You will now see one additional file, which is hidden.
-
-
Enter
ls -a -l(orls -al) in the command.-
You’ll now see that the file
hidden_link.txtpoints to.hidden_text_file.txt.
-
pwd and cd Commands
-
Enter
pwdinto the terminal.-
This will show you the full path of the directory you are working in.
-
-
Enter
cd newinto the terminal.-
The prompt should change to
ros-industrial@ros-i-humble-vm:~/ex0.3/new$. -
Typing
pwdwill show you now in the directory/home/ros-industrial/ex0.3/new.
-
-
Enter
cd ..into the terminal. * In the previous exercise, we noted that..is the parent folder. * The prompt should therefore indicate that the current working directory is/home/ros-industrial/ex0.3. -
Enter
cd /bin, followed byls.-
This folder contains a list of the most basic Linux commands.
Note thatpwdandlsare both in this folder.
-
-
Enter
cd ~/ex0.3to return to our working directory.-
Linux uses the
~character as a shorthand representation for your home directory. -
It’s a convenient way to reference files and paths in command-line commands.
-
You’ll be typing it a lot in this class… remember it!
-
If you want a full list of options available for any of the commands given in this section, type man <command> (where <command> is the command you want information on) in the command line. This will provide you with built-in documentation for the command. Use the arrow and page up/down keys to scroll, and q to exit.
Altering Files
mv Command
-
Type
mv test.txt test2.txt, followed byls.-
You will notice that the file has been renamed to
test2.txt.
This step shows howmvcan rename files.
-
-
Type
mv test2.txt new, thenls.-
The file will no longer be present in the folder.
-
-
Type
cd new, thenls.-
You will see
test2.txtin the folder.
These steps show howmvcan move files.
-
-
Type
mv test2.txt ../test.txt, thenls.-
test2.txtwill no longer be there.
-
-
Type
cd .., thenls.-
You will notice that
test.txtis present again.
This shows howmvcan move and rename files in one step.
-
cp Command
-
Type
cp test.txt new/test2.txt, thenls new.-
You will see
test2.txtis now in thenewfolder.
-
-
Type
cp test.txt "test copy.txt", thenls -l.-
You will see that
test.txthas been copied totest copy.txt.
Note that the quotation marks are necessary when spaces or other special characters are included in the file name.
-
rm Command
-
Type
rm "test copy.txt", thenls -l.-
You will notice that
test copy.txtis no longer there.
-
mkdir Command
-
Type
mkdir new2, thenls.-
You will see there is a new folder
new2.
-
touch Command
-
Type
touch ~/Templates/"Untitled Document".-
This will create a new Document named “Untitled Document”
-
You can use the -i flag with cp, mv, and rm commands to prompt you when a file will be overwritten or removed.
Editing Text (and Other GUI Commands)
-
Type
gedit test.txt.-
You will notice that a new text editor window will open, and
test.txtwill be loaded. -
The terminal will not come back with a prompt until the window is closed.
-
-
There are two ways around this limitation. Try both…
-
Starting the program and immediately returning a prompt:
-
Type
gedit test.txt &.-
The
&character tells the terminal to run this command in “the background”, meaning the prompt will return immediately.
-
-
Close the window, then type
ls.-
In addition to showing the files, the terminal will notify you that
gedithas finished.
-
-
-
Moving an already running program into the background:
-
Type
gedit test.txt.-
The window should open, and the terminal should not have a prompt waiting.
-
-
In the terminal window, press Ctrl+Z.
-
The terminal will indicate that
gedithas stopped, and a prompt will appear.
-
-
Try to use the
geditwindow.-
Because it is paused, the window will not run.
-
-
Type
bgin the terminal.-
The
geditwindow can now run.
-
-
Close the
geditwindow, and typelsin the terminal window.-
As before, the terminal window will indicate that
geditis finished.
-
-
Running Commands as Root
-
In a terminal, type
ls -a /root.-
The terminal will indicate that you cannot read the folder
/root. -
Many times you will need to run a command that cannot be done as an ordinary user, and must be done as the “super user”
-
-
To run the previous command as root, add
sudoto the beginning of the command.-
In this instance, type
sudo ls -a /rootinstead. -
The terminal will request your password (in this case,
rosindustrial) in order to proceed. -
Once you enter the password, you should see the contents of the
/rootdirectory.
-
Warning: sudo is a powerful tool which doesn’t provide any sanity checks on what you ask it to do, so be VERY careful in using it
https://industrial-training-master.readthedocs.io/en/humble/_source/prerequisites/Navigating-the-Ubuntu-GUI.html
No Comments